Page 2 of 2 FirstFirst 12
Results 16 to 26 of 26

Thread: Roast My Workbench Design

  1. #16
    Nice bench design.

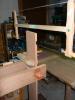
    I like the ratchet mechanism on your leg vise. I've built a few of those, been using one I made out of aluminum for the last year.

    I have the lever mechanism on the same side as you, and I would HIGHLY recommend you change it to the other side. You constantly have to move a step or two when you want to use the vise, and, while this doesn't sound like a lot, it is very inconvenient and drives me nuts.

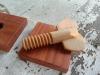
    Regarding the tenon/shoulder design, I wouldn't worry about it personally. That joint is very strong, easily tightened up if it loosens a bit, and it has held up very well on several large trestle tables and other furniture I've built. If you NEED to add a shoulder to the top I have done that once or twice by modifying the the wedge and design a little and having the wedge driven into a hidden pocket on the stretcher.
    Making furniture teaches us new ways to remove splinters.

  2. #17
    I have one question about the ratchet on the Parallel Guide. Why bother? BenchCrafted's crisscross has been perfected, it is an easier install and works a treat, better than any parallel guide with or without a ratchet mechanism.

    Forgive an OF's ramblings but there is a point that I will get to. Back in the Dark Ages I flew two different aircraft that were designed and built by two of the legends of aviation. One was Bill Lear, when Lear needed to find a solution to a problem he would find the simplest possible. As an example he developed the "jet pump" for moving fuel. That simplicity made the LearJet a joy to fly, it worked with you and felt as if it was a part of you. It was my favorite aircraft to fly. The other was Ed Swearingen, unlike Lear he would find the most complex way to build something. The SA227 was a pilot's nightmare with nicknames like the "Texas Death Tube, San Antonio Sewer Pipe, Necroliner and so on. The Merlin/Metro was always working against you and was miserable to fly.

    There is a reason for the above, if possible follow KISS. There is a reason thing evolved the way they have.

    ken

  3. #18
    Join Date
    Dec 2010
    Location
    South Coastal Massachusetts
    Posts
    6,824
    I don't think clamping should be the primary concern of bench design. Proper height, stability and flexibility are more important.

    So long as the top is sturdy, boring the occasional hole to accept holdfasts will accomplish most tasks.

    *The more things I make, the less I tend to clamp them down, particularly when planing.*

    It is VERY rare that I hold a thinner piece of stock upright in my tail vise. This position duplicates the function of the (more versatile) leg vise.

    The movable tail vise on my bench is frequently jammed due to Seasonal movement. I did not build the bench and would not include the feature, as it offers little utility and is difficult to make. Your all wooden design would be more sensitive to changes in humidity.

    An alternative exists - which would be simpler to mount.

    https://store.woodandshop.com/produc...ian-workbench/

  4. #19
    Quote Originally Posted by Jim Matthews View Post
    I don't think clamping should be the primary concern of bench design. Proper height, stability and flexibility are more important.

    So long as the top is sturdy, boring the occasional hole to accept holdfasts will accomplish most tasks.

    *The more things I make, the less I tend to clamp them down, particularly when planing.*

    It is VERY rare that I hold a thinner piece of stock upright in my tail vise. This position duplicates the function of the (more versatile) leg vise.

    The movable tail vise on my bench is frequently jammed due to Seasonal movement. I did not build the bench and would not include the feature, as it offers little utility and is difficult to make. Your all wooden design would be more sensitive to changes in humidity.

    An alternative exists - which would be simpler to mount.

    https://store.woodandshop.com/produc...ian-workbench/
    Jim,

    I'm with you on the tail/wagon vise and work holding in general. I often think I should have a standard reply on tail vise posts, do a search on Jim's work holding posts. For me an even better option than Will's vise for the few times I need one is just, I forget what Veritas calls 'em but I think", their Wonder Dog. That said, I have Will's wagon vise on a shelf waiting for the next bench build just to give it a go so I maybe I will know what I'm talking about.

    BTW, that procedure worked out with BC's crisscross. I believed I'd never find anything better than a wood screw and a parallel guide until I built a bench with the crisscross.

    ken

  5. #20
    Join Date
    Apr 2018
    Location
    N. Texas
    Posts
    70
    Ken, I seriously considered the Crisscross 14 but even with the smaller size I couldn't find a way to get it between the screw and the through tenon that I was happy with. Either I would have to raise the screw or put the stretchers just a couple inches off the ground. In the end I decided to go with the ratchet design, which has the advantage of greater clamping pressure and variable toe-in for tapered workpieces. Worst case, if I decide I hate it I can retrofit it with Jim Ritter's chain guide.

  6. #21
    I didn't read all the responses, so apologies if these are already addressed.

    FWIW, I have a very similar bench. My learning:

    1) Angled legs can interfere with the tail vise's ability to hold things vertically, say when working on the end of a tenon. Consider making those legs vertical or moving them farther from the plane of the tail vise opening.

    2) Dog holes over the leg or over a stretcher are a pain; they limit the use of hold fasts and fill with shavings too frequently.

    3) I often wish my tail vise was flush with the left side of the bench so that I might be able to use it to saw parts. Even though I am right handed; i would appreciate this option.

    4) I wish the handle of my leg vise were higher. I used to think I wanted the screw lower to allow bigger jaw capacity. I have never needed that (at least never on a part that couldn't navigate around the screw). Rather, having the screw as high as possible improves the holding power of the vise near the top of the jaws and also makes the handle more ergonomic to use (i.e. less stooping). These things are important during repeated use. You might think that a manual parallel guide requires stooping anyway, but in practice, you won't have to move the parallel guide that often. Your parts tend to be similar thickness on a given project. And each setting will work over a surprisingly wide range of thicknesses anyway.

    Angle legs are sexy, and my 60" bench is remarkably stable because of them. But unless you are doing a lot of heavy thicknessing sessions, the stability may not be worth the mild inconveniences. YMMV

  7. #22
    Join Date
    Jun 2005
    Location
    Shorewood, WI
    Posts
    897
    Quote Originally Posted by William Fretwell View Post
    Testing the pull out force to destruction is pointless as in the real world resisting wracking is the goal, the force applied to the shoulders at rest must be greater than the wracking force when in use.
    I don't think we disagree. The role of the shoulders is to convert wracking force into pull out force. My point is just that a through dovetailed tenon is not substandard. The component of the force provided by the dovetail tenon is sufficient to hold shoulders in contact.

    Part of that may be that a shallow wedge can exert a phenomenal amount of force along the leg without damage, so that even the small perpendicular component of that is plenty to hold the shoulders tight. It may be a smaller fraction than with a differently oriented wedge, but overall it's a large force. If you leave the shoulders loose and apply a substantial wracking force, then tap in the wedge, you can see the shoulders move into contact and the joint becomes square and solid. (Square because I'm talking about square joints here.)

  8. #23
    Join Date
    May 2013
    Location
    Liberty, SC
    Posts
    613
    Just keep us updated on how things go. New ideas most always take a thrashing at first.
    It's your idea, and I wish you the best with it.
    Nothing against the notes from some very knowledgeable people here. The next thing you know we all may have one similar to it
    Like Jim Kirk said to Scotty; young minds, fresh ideas.
    Best wishes,
    Joe
    You never get the answer if you don't ask the question.

    Joe

  9. #24
    Quote Originally Posted by Joshua Lucas View Post
    Ken, I seriously considered the Crisscross 14 but even with the smaller size I couldn't find a way to get it between the screw and the through tenon that I was happy with. Either I would have to raise the screw or put the stretchers just a couple inches off the ground. In the end I decided to go with the ratchet design, which has the advantage of greater clamping pressure and variable toe-in for tapered workpieces. Worst case, if I decide I hate it I can retrofit it with Jim Ritter's chain guide.
    Joshua,

    If you use the BC Classic screw you only need ~16" between the top of the bottom stretcher and the bottom of the slab. I've been a fan of Lake Erie wood screws but the BC Classic and crisscross is a perfect combination with much better holding power than any wood screw/parallel guide I've used. I doubt I will ever build another bench with a wood screw or parallel guide.

    As always it is your bench, have fun building it and putting it to use. I hope it turns out to be a Lear instead of a Merlin.

    ken

  10. #25
    Same here with respect to the overhang. Not sure if this is your first bench, but say for example with chisel work, you want an absolutely solid bench to pound into. I have a very solid traditional bench but I can tell the difference with the piece placed directly over a supporting leg versus placing the piece just on the bench surface but not exactly over a leg. This is only a slight difference, but I would imagine any overhang like that would not be efficient for chisel work.

    Totally agree with other posts, go with what has been proven before by hand tool workers before electricity was even discovered. It's like trying to improve on the design of a violin.

    On the design side, the bench looks like a Telsa truck, Vulcan-like. Personally I prefer to add some curves, spice it up, give the legs more form.

    But in the end, it's your bench, enjoy it.

  11. #26
    Join Date
    Apr 2017
    Location
    Michigan
    Posts
    2,769
    Quote Originally Posted by
    [ATTACH=CONFIG
    422668[/ATTACH]


    Hi Joshua
    A couple thoughts on the stretchers;

    This view shows that the short stretcher will interfere with the long stretcher, or be glued in with a short tenon. But with angled legs it is the short stretcher that sees the greatest stress.

    KD design compromises strength vs 100% glued joints. And moving this bench with a hand truck will be easy, much easier than say a piano. And those are moved all the time.

    Sweeping under your bench will be inconvenient.

    If you raise the long stretchers a few inches they will clear the short ones and your broom.

    Bench.jpg

    My stretchers are 3" x 5" and tucked right up to and slightly recessed into the 3" top. Absolutely rock solid.

Posting Permissions

  • You may not post new threads
  • You may not post replies
  • You may not post attachments
  • You may not edit your posts
  •