Hello,
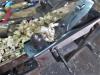
I'm a beginner woodworker and I've started a personal project to building a live edge coffee table. As a trial run and to learn technique, I got a rough sawn Ash slab, approx 3" x 24" x 60".
I want to use hand tools for the slab preparation. I got a few vintage no. 4 and no. 5 hand planes for this project.
I converted a no. 4 plane into a scrub plane and started to clean up the slab.
As you can see in the picture, there is a large knot in the middle of the slab. As I try to clean it up I get deep tears.
My questions are:
Which plane is better for scrubbing, the no. 4 or no. 5?
How to avoid tearing or minimize it?
Thank you,
Rafael

 Reply With Quote