This is on its way. Look closely. (Im like a kid on Christmas Eve.)
884A7054-18F4-47DF-BB01-F63A50FC2041.jpg
3743A878-C938-481E-BA3C-23BFAC903A99.jpg


 [OP]
Member
[OP]
Member
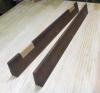
This is on its way. Look closely. (Im like a kid on Christmas Eve.)
884A7054-18F4-47DF-BB01-F63A50FC2041.jpg
3743A878-C938-481E-BA3C-23BFAC903A99.jpg
Member
Ok, Curtis, you got me....Is there a panther saw hidden under the red paint and rust?
[OP]
Member
Panther saw? No. But close. Better! At least by my tastes.
 Friend of the Creek
Id guess a Disston 112 panel saw.
[OP]
Member
Ding ding ding! Nice job Phil. That’s my deduction as well. It was not identified in the listing. Once again, thanks to Disstonianinstitute.com for the assist. I can just make out “Disston & Sons Philada” on the medallion. The handle is shaped like a No. 12, but with a skewback blade. That it’s a panel saw makes it a walk off grand slam at the College World Series for me. The condition of the saw appears to be fantastic restorable shape.
Of course, I could be wrong. Either way, I figured it would be fun to post a little unpacking party, so to speak, here at my favorite Website, as well as document rehab efforts. So, wish me luck, and stay tuned!
Member
Looks like a nice find. Let us know how the restoration goes. What is the length of that saw? It looks long for a panel saw but the handle is correct for that type.
[OP]
Member
The saw came in the mail today in a lot of three saws. I was thrilled to be able to confirm that it is indeed a Disston No. 112 panel saw. (Someone pinch me.) It has a 22 inch blade and 10 PPI. The latter is no doubt why it’s a survivor in the shape it’s in. It was made between 1901-1917.
E3A38575-BA2F-4D5C-82D5-959E796397DD.jpg
The seller did an outstanding job packing
9AB91755-A989-4D30-85C5-E762ED81D8FF.jpg
22 Inch blade
DE617047-A719-4085-96BB-EC70936423A7.jpg
“PHILADA”
D2B9E644-B02E-4073-8E7A-13E091C61D36.jpg
Unfortunately, the etch is nearly gone, but I can just make out “112.” I won’t be able to capture in a photo though.
Ideally, I’d joint to the gullet and re-tooth to something more desirable, but that’s a little beyond my abilities and means. I’ll be restoring as time and materials allows and will post my progress here. The blade will require hammer truing and re-tensioning as it has a couple curving bends and a gradual bow. Not anything I’ve not dealt successfully with before. Should be be a fun project.
Friend of the Creek
Congrats Curtis! If you find the time to take a few pictures, I would enjoy seeing the process you use for hammer truing and re-tensioning. Enjoy the restoration.
[OP]
Member
Will do. I use Bob Smalser’s step by step hammer truing process he posted somewhere (maybe here).Originally Posted by Phil Mueller

[edit] Found the link... https://sawmillcreek.org/showthread....Handsaw-Blades [/edit]
0080E7EE-E0AE-4AD7-9C2E-DF6C51CDDC32.jpeg
Snippet from Disston Catalog 100 R-9
Last edited by Kurtis Johnson; 11-16-2019 at 12:49 AM. Reason: Found link I referred to
[OP]
Member
Okay, the work begins...
5F48A374-C3D3-405B-BCE5-A7F1D1181CD9.jpg
When possible, I like to use a putty knife on the thin slots of the saw nuts so as not to damage the soft brass. I keep thinking I’ll get around to dressing a large screwdriver for the job someday, but the putty knife works so well on non frozen nuts.
830B86D3-8518-48FE-8355-2F7865CEC19C.jpg
Tapa tapa tapa
35F96264-1F39-4CA0-8EF8-88B21E4B86A1.jpg
I like to keep the nuts labeled for positive relocation
C441BFA7-CE5C-4535-80BB-A262616170E8.jpg
“2.” My two No. 12’s have a number stamped under the handle too. Can’t recall at the moment what number.
C113A5C8-3570-4D5C-A998-DB5307BB8719.jpg
The obligatory utility blade scraping
I have to break for a refrigerator delivery. I’ll be sanding and reconditioning the blade this afternoon.
Last edited by Kurtis Johnson; 11-16-2019 at 1:34 PM.
[OP]
Member
Continuing work on the blade. The following Process I owe to Mark Harrell of Bad Axe.
149E7A1D-1BCC-4853-99F4-0757A391A58C.jpg
4370B4CB-02A2-4561-B195-A014F87D05C3.jpg
Wizards Metal Renew, a Scotchbrite pad, a Sandflex block, an ultra fine sanding block, hours of elbow grease...
462A151E-8C8F-4A4C-A86F-2171FDFA5399.jpg
B5A3215C-11EE-4796-BFA3-12E6287F61CB.jpg
Wizards Power Seal
4A89BB2C-5491-442E-9970-3FC3F9DAC15D.jpg
I’m calling the surface refurb of this blade done.
I’ll be hammer straightening and tensioning it in the near future. But first, stripping the tote...
Last edited by Kurtis Johnson; 11-17-2019 at 1:42 AM.
[OP]
Member
Now the tote...
BB3D8E0F-BC8F-4989-A9E5-050BAF7DC8A5.jpg
Citristrip worked great on this one. Here is the second coat. It didnt need two... I removed the first after three minutes to check how it was behaving. It sat for a walk around the neighborhood with my wife and son before I removed it. I used dental instruments to easily scrape out the carvings. I also used the wash to neutralize the Citristrip. Dont recall the name of it.
D3960413-0B35-4B3E-ACD1-85DDB38D748D.jpg
Look what was under that red sprayed paint! Condition of this tote is way above average. No structural issues. A small chip at the bottom of the top horn, other that that, a small number of tiny dents and scratches overall. The carvings are super crisp.
690E98AD-5478-47D3-8712-6B848512EA50.jpg
A5E2B78A-9F77-4C5B-99EE-598919F682CD.jpg
Here is after a generous coating Feed-N-Wax and a polish. Ill probably give it four coats of shellac in the near future.
Last edited by Kurtis Johnson; 11-17-2019 at 2:21 AM.
Friend of the Creek
That cleaned up real well. Im with you regarding the scotchbrite pads and light abrasive and plenty of elbow grease. Makes me cringe when heavy abrasives are used on the plate...but thats just me. Havent tried the Wizards...may have to get some. Im sure it smells better than WD-40. Tote turned out really nice. I like the feen-n-wax as well. Not sure it even needs shellac.
Look forward to the rest of the restoration.
 Contributor
Feed-N-Wax is my favorite wood treatment. Often it is used on handles on the lathe with no other coating.Here is after a generous coating Feed-N-Wax and a polish.
jtk
"A pessimist sees the difficulty in every opportunity; an optimist sees the opportunity in every difficulty."
- Sir Winston Churchill (1874-1965)
 Contributor
Nice find!!! and good start on restore..WIZARD bottle good product but always razor blade first.....Good job!!!
Jerry
 Posting Permissions

 Reply With Quote