Page 1 of 2 12 LastLast
Results 1 to 15 of 19

Thread: Chairs finished - finally

  1. #1
    Join Date
    May 2015
    Location
    Ingleside, IL
    Posts
    1,417

    Chairs finished - finally

    Finally got the seats back from the upholstery guy, put them on, and I'm finally finished with the chairs. It'll be a while before I tackle chairs again. At least a couple of months - gotta use what I learned before I forget it!
    chairs.jpg chair.jpg back.jpg

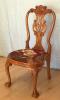
    The inspiration came from this Macintosh chair, and without any plans I tried to stay within these standards.
    Mc.jpg standards.jpg

    I wasn't real fond of the flat top rail, hence the dog ears on the tops of the back legs. And in retrospect I would shorten the angle of the back - they are a bit tippy. Something I might need to address. We'll see. And I thought the curved side stretchers would soften up the otherwise pretty hard lines of the chair. Didn't care for the curve on the back side.
    sides.jpg

    I had 2 major problems during the build. (other than having never built any chairs!) The first was that I made an error cutting the tenons on the side stretchers - they were slightly off angle because of the dumb ass way I cut them, so I had to glue pads on all of them and recut them.
    tenon repair.jpg

    The other was preparing the flat landing area on the back legs for the bottom stretchers. I planed them to a pattern which allowed very slight errors to creep in, changing the angle slightly and making fitup a nightmare. Every shoulder needed to be fit to the leg. But at least I got a nice LN shoulder plane out of the deal. Next time I'll line them all up, clamped together and plane the flat landing area on all of them at once. At least I think that'll work better.
    joint prep.jpg

    All in all a fun build, and a real learning experience. And for my first chairs, I'm pretty pleased.
    Stand for something, or you'll fall for anything.

  2. #2
    Join Date
    Jan 2004
    Location
    Lewiston, Idaho
    Posts
    28,530
    Well done Bill!
    Ken

    So much to learn, so little time.....

  3. #3
    Join Date
    Mar 2006
    Location
    Austin Texas
    Posts
    1,957
    Thanks for sharing Bill. I don't know why, but I have always thought that "chairs" are near to the top of the heap when it comes to woodworking. I have not taken the step yet and you are helping me move that way. I don't want to jump into swoopy Windsor types, just comfortable, useful, well made (not falling apart any time soon) chair type chairs. I like what you came up with. Question: How expensive was the upholstery work? I have a table to do after finishing up my current project, and I believe that I will tackle some chairs for the table after the table.
    David

  4. #4
    Join Date
    May 2015
    Location
    Ingleside, IL
    Posts
    1,417
    Hey David. There's a guy near me who does nice work. He charged me 60 bucks a chair, which included all materials. Fabric is a commercial product.
    Stand for something, or you'll fall for anything.

  5. #5
    Join Date
    Mar 2006
    Location
    Austin Texas
    Posts
    1,957
    Thanks Bill. I had an idea that upholsery could be very expensive. Hopefully I can find a deal more like yours.
    David

  6. #6
    Join Date
    Dec 2010
    Location
    WNY
    Posts
    9,702
    Nice work Bill. I agree that the seat back angle looks a little too laid back, and that probably makes them feel a bit unstable if you lean back. I haven't built many chairs, but when I have I've always made a prototype, or three, to work out the geometry and to make sure it sits as good as it looks. Another thing that helps me is to first make full size drawings. With them you can really see how the joinery goes together and check the actual parts against the drawing as you build.

    John

  7. #7
    BOLD! That "tippiness" could be adjusted by user with a bolster pillow fitted with Velcro. Children might enjoy being
    photographed in that early TV seat and stretcher frame.

  8. #8
    Join Date
    Dec 2004
    Location
    Cincinnati, OH
    Posts
    924
    Nice job. You might reduce the 'tippiness' by shortening the front legs a tad. Of course, it would change the seat angle but might still be within the comfort range. You could just remove the buttons from the front legs to get a notion of the effect.

    I am in the midst of building chairs and have been for quite some time. The first prototype looks more like a throne than a kitchen chair. The 2nd just needs a back splat design that I just cannot commit to. These decisions are the reason it takes me so long to complete designs. Well, that and good golf and/or fishing weather.
    Rustic? Well, no. That was not my intention!

  9. #9
    Join Date
    May 2015
    Location
    Ingleside, IL
    Posts
    1,417
    Hey David - yes, cutting something off the front legs was my thought as well. Or I could screw a 10 lb chunk of lead to the front stretcher.

    For some reason I can never convince myself to make prototypes - always seems like a waste of time and wood. I understand the logic behind it, and agree that it is probably a good idea for some things, like these chairs. Definitely these chairs. But it was fun building without any plans - I kinda knew what I wanted but as the pieces got made I changed a lot of it. For instance, the pieces I cut for the front bottom stretchers got put in the cut off bin at the last minute, for no better reason that I can articulate other than Just Cuz.
    Stand for something, or you'll fall for anything.

  10. #10
    Join Date
    Apr 2017
    Location
    Clarks Summit PA
    Posts
    1,744
    Good work Bill! I have yet to take on chairs and I admire your enthusiasm. I want to build a nice size dining room table, but know that I would want to build the chairs also. You have motivated me!

  11. #11
    Join Date
    May 2008
    Location
    MA
    Posts
    2,257
    Quote Originally Posted by Bill Carey View Post
    For some reason I can never convince myself to make prototypes - always seems like a waste of time and wood. I understand the logic behind it, and agree that it is probably a good idea for some things, like these chairs. Definitely these chairs. But it was fun building without any plans - I kinda knew what I wanted but as the pieces got made I changed a lot of it. For instance, the pieces I cut for the front bottom stretchers got put in the cut off bin at the last minute, for no better reason that I can articulate other than Just Cuz.
    I tend to not like planning or working off plans. A sketch....

    And did a set of 6 chairs a while back. I like everything about them ... but... they are just slightly off in a couple dimensions so not quite as comfortable as I would have liked (they are 'ok', but I was wanting them to feel perfect/cozy when sitting in them, although for the size of my kids bodies they seem to fit better). My rear legs could have splayed out a bit farther to the back (not tippy but not as stable as could be). And the cushions, once made, shifted the seating dimensions a bit.

    As such I have considered making some new ones, and tweaking the design slightly to fix it. I may some day, maybe. But it kinda made me think that instead of one prototype to get all this worked out, I kinda built 6 prototypes....

    Your chairs look great! I think chairs are one of these things that by the time you build 4 or 5 different designs (of course in batches of 6 or 8), you will be pretty good at it and have it down.

  12. #12
    Join Date
    May 2015
    Location
    Ingleside, IL
    Posts
    1,417
    Thanks for the comments gents. As far as dimensions and angles that chair standards drawing was referenced often during the build. That and a white board was all I needed. And I'm going to cut a 1/2" off the front legs to try to reduce the tippiness - which isn't helped by all the wood incorporated in the back of the chairs. Would have been better if I had extended the bottom curve of the back legs out more. Oh well. As you say Carl, for 4 prototypes I'm ok with how they turned out. And the Boss loves them so all good.

    One of the advantages we hobbyists have over the pros is that we can start with just a blue sky session and a pile of wood and go in whatever direction we want. We aren't feeding the family but just our souls with what we do - not to say pros don't also have that feeling, but we certainly don't work under the pressure they do. I started a couple of plant stands with no more idea than I want the tops to kinda float, with maybe a small oriental feel. One walnut and one red oak. Just finished cleaning up the boards so don't really know what they will look like yet. Only have a general idea of the height and size of the top based on where they will go and the size plants we'll put on them. And then a farm table and simple chairs for my grand daughter.

    For me, it's just a fun way to work.
    Stand for something, or you'll fall for anything.

  13. #13
    Join Date
    May 2015
    Location
    Ingleside, IL
    Posts
    1,417
    Finally got around to cutting 1/2" off the front legs and that has made a dramatic difference in how tippy the chairs are. When I made them, I had the 5/8" difference between the height of the front legs and the back legs, giving the seat about 5 or 6 degrees of fall toward the back. Per the chair standards I found. But having cut the 1/2" off, I find the chairs to be more comfortable than they were before. I guess a nearly level seat is more to my liking than the standard 5 to 10 degree slope toward the back. But having used these chairs for a while now, I really like them, and am well pleased with them - prototypes or not.
    Stand for something, or you'll fall for anything.

  14. #14
    very interesting. Is it because a higher back creates more of a tendency to tip back? Chair geometry fascinates (reads 'eludes') me.

  15. #15
    Quote Originally Posted by Prashun Patel View Post
    very interesting. Is it because a higher back creates more of a tendency to tip back? Chair geometry fascinates (reads 'eludes') me.
    Prashun,

    In my view these chairs were tippy because of the relationship of the back two legs and the seat back. I was taught that if you took a plumb bob from the top of the chair back and hung it down to the floor, ideally the back legs should be no more than 1" forward or 2" back of the line. In this case, the back legs were too far forward of this imaginary line which is an invitation to tip city. The tall back of the chairs added to this dilemma a little bit by increasing the length of this "lever" but the main issue is where the load from the seated person is occurring.

    Look around at chairs in your environment and they will invariably all follow this rule, and so does the reference drawing. I should add that in the case of a chair with a very tall back, the plumb line can and should be taken from 33" above the floor because this is the point on the back where the load is happening for the average person.

    BTW, not criticizing the OP's work, in fact I think he made a great effort. It's just that we're talking about chair design issues, and I thought it might help to share what I have learned. I think cutting the front legs was about the only solution because doing so partially counteracted the existing tip angle, and in the end these are going to be fine chairs indeed.

Posting Permissions

  • You may not post new threads
  • You may not post replies
  • You may not post attachments
  • You may not edit your posts
  •