Page 1 of 2 12 LastLast
Results 1 to 15 of 18

Thread: Tune up a Boggs spokeshave?

  1. #1
    Join Date
    Sep 2019
    Location
    Lafayette, CA
    Posts
    843

    Tune up a Boggs spokeshave?

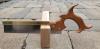
    I've always been a straight, square, and flat kind of woodworker, but recently I've acquired a Boggs spokeshave (with curved bottom) from Lie-Nielsen in hopes of producing silky smooth eased and curved edges. Out of the box the shave seems to do this quite beautifully, even in my hands.

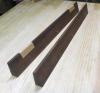
    Now, I want to see if I can use it to smooth a couple of concave radii I've cut on my other new curve-producing gem: my very first band saw!!! The band saw makes it stunningly easy to cut the 8-1/4" radius on the bottom of the short (10" long) rails for the side of a cherry cabinet my wife wants. (Makes me wonder why I waited almost 20 years to get a band saw! I'm kind of over the moon.)

    But back to the spokeshave: The rails are 7/8" thick and I want to shave the entire thickness of the "Face edge" before I turn to the corner edges. It doesn't seem to be maintaining a smooth shaving through the entire concave curve (about 10" long and 8-1/4" radius as I've said). All I have so far is a chattery hit-or-miss that produced a few tantalizingly smooth sections, maybe 1/2 inch to 1 inch along the length. I'm looking to the community for tips on how to tune the spokeshave so I can "swipe off" a full-length, fine shaving throughout the curve. Any ideas?
    Last edited by Bob Jones 5443; 10-23-2019 at 3:08 AM.

  2. #2
    Join Date
    Jan 2007
    Location
    Michiana
    Posts
    3,071
    I'm a little farther down the same learning curve. I got a bandsaw this summer and also have some Boggs shaves. I think what you're seeing is the shave hitting the high points first. While the sole is admittedly short, the shave really just a small plane. The high spots have to go first. Make sure you're razor sharp. Set the shave for a light cut and don't try to rush things. Make sure you're working "downhill" or with the grain direction. That means starting from each end and working to the middle. Take your time. You'll get there.
    Sharp solves all manner of problems.

  3. #3
    Join Date
    Mar 2015
    Location
    SE Michigan
    Posts
    3,225
    Bob, here’s a post/thread from 2012 you might find helpful
    https://sawmillcreek.org/showthread....eshave-chatter

    If you do a search, there may be more. Bottom line, if a quality spokeshave like the Boggs, sharpened well and set for a thin cut is chattering, it is most likely technique. I found curved spokeshaves to have the steepest learning curve. I’ve shaved down many a piece of scrap stock and like Rob, starting to get there.

  4. #4
    Bob,

    If the cutter is sharp (always the starting point) the likely culprit is grain direction, end grain, and direction of push/pull. In a concave curve the relationship of grain to surface is constantly changing requiring changing the push/pull of the shave and even in some cases changing the shave from a bevel down shave (your LN) to a bevel up shave when working mostly end grain. Light cuts, short strokes, and paying attention to shave's relation to grain should cure your problems.

    BTW, I use shaves mostly for chair making and find a bevel up is my most used shave, of course others MMV.

    ken

  5. #5
    Join Date
    Mar 2006
    Location
    Austin Texas
    Posts
    1,957
    As already said above, I believe that changing grain direction is the issue. The Boggs is set up for very light cuts and does not answer well to attempts at deeper cuts. I find that skewing the spokeshave as I encounter problems helps also. Try skew cuts from different angles and reverse the direction of the shave.
    David

  6. #6
    Join Date
    Sep 2019
    Location
    Lafayette, CA
    Posts
    843
    Bevel up: mind blown. I’ll try it in the morning. This will also give me more clearance for the shaving, right?

  7. #7
    Join Date
    Sep 2019
    Location
    Lafayette, CA
    Posts
    843
    Sound advice. Since posting I tried slowing down a bit, and the curve now has a much higher quality surface. Thanks for the tip — universally good counsel for working with hand tools.

  8. #8
    Quote Originally Posted by Bob Jones 5443 View Post
    Bevel up: mind blown. I’ll try it in the morning. This will also give me more clearance for the shaving, right?
    Bob,

    Bevel up is a type of shave. Some shaves are designed to be used bevel down like your LN shave others like most wood stock shaves are used bevel up. Check out Dave's Shaves http://www.ncworkshops.com/products.html

  9. #9
    Join Date
    Sep 2019
    Location
    Lafayette, CA
    Posts
    843
    Oops. Thanks, Ken.

  10. #10
    Join Date
    Aug 2007
    Location
    Dickinson, Texas
    Posts
    7,655
    Blog Entries
    1
    It helps to practice a lot. Always test a piece of wood scrap to see how it will work before working on the real piece.

  11. #11
    Join Date
    Apr 2019
    Location
    Madison, Wisconsin
    Posts
    283
    Quote Originally Posted by ken hatch View Post
    Bob,

    If the cutter is sharp (always the starting point) the likely culprit is grain direction, end grain, and direction of push/pull. In a concave curve the relationship of grain to surface is constantly changing requiring changing the push/pull of the shave and even in some cases changing the shave from a bevel down shave (your LN) to a bevel up shave when working mostly end grain. Light cuts, short strokes, and paying attention to shave's relation to grain should cure your problems.
    ken
    To this, I’d add that I find it helpful to really get my hands in there: I tend to almost have my knuckles touching both sides of the work, grasping the body of the shave with my thumb and first finger of each hand and the handles with my ring and pinky fingers. Especially in tricky grain situations or odd curves, it makes it easier for me to feel what’s happening at the cutter’s edge and adjust what I’m doing as necessary.

  12. #12
    Skewing a shave, each way, on alternate cuts , is a good technique if bumps develop.

    David charlesworth

  13. #13
    Join Date
    Sep 2007
    Location
    Longview WA
    Posts
    27,432
    Blog Entries
    1
    Another thing to try with the skewing is a slicing motion. With the blade skewed move it left to right while making the cut. Try it skewed at different angles and slicing in different directions.

    jtk
    "A pessimist sees the difficulty in every opportunity; an optimist sees the opportunity in every difficulty."
    - Sir Winston Churchill (1874-1965)

  14. #14
    Join Date
    Sep 2019
    Location
    Lafayette, CA
    Posts
    843
    Thanks, David and Jim. I have three more arcs to smooth: one more smaller radius and two nice long 26” radii. I’ll try the skew. I should be able to skew a bit more on those longer ones. At the moment I am evacuated with the California fires, but I hope to return to the work later this week. (Don’t worry — I brought the wood and my precious planes with me.)

  15. #15
    Join Date
    Sep 2007
    Location
    Longview WA
    Posts
    27,432
    Blog Entries
    1
    Having once lived in that general area of California it is heartbreaking for us to watch the news about the disaster our old stomping ground is going through.

    jtk
    "A pessimist sees the difficulty in every opportunity; an optimist sees the opportunity in every difficulty."
    - Sir Winston Churchill (1874-1965)

Posting Permissions

  • You may not post new threads
  • You may not post replies
  • You may not post attachments
  • You may not edit your posts
  •