Results 1 to 15 of 18

Thread: Attaching legs to a walnut nesting piece.

Hybrid View

Previous Post Previous Post   Next Post Next Post
  1. #1

    Attaching legs to a walnut nesting piece.

    Hello, everyone. My name is Steve and I am a 1st-time poster and relative newcomer to furniture repair. I have had some furniture refinishing experience. I hope this is the appropriate forum to discuss this kind of problem.

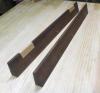
    Issue: one part of a walnut nesting set that needs its legs reattached. I have provided pictures to help, as I don't know the relevant terminology. The top of the piece is heavy for its size, 12-15 lbs, owing mainly to its marble inset. Obviously, the re-attached legs have to support that weight, and I am struggling to figure out how to attach the legs accordingly.

    These original legs--all four are detached now--are 1" x 1" at the top. The area on the underside of the top of the piece, where the top of the legs meet the top of the piece is, 1 1/4" x 1 1/4".
    Initially, I thought about threaded inserts for the legs, but there is no room to twist a leg onto the insert because the leg presses up tightly to the rest of the piece. The only other thing I could think of was to glue the touching surfaces and drive nails into the wood from the outside, then use a nail punch to drive the head of the nail below the exterior surface--to then later fill the holes with wood putty. I have no idea how feasible that plan is, however, or whether it is substantial enough to support the weight of the piece.

    Again, I am a newcomer, and would appreciate any contributions.
    Attached Images Attached Images
    Last edited by Steve Wynne; 10-15-2019 at 4:14 PM.

  2. #2
    Join Date
    Aug 2018
    Location
    Michigan, USA
    Posts
    548
    Steve,

    It's hard to tell from the photos, but my guess is that the legs were originally attached to the aprons (the pieces still attached to the underside of the table top) with a glued mortise and tenon joint - the mortises being openings cut into the sides of the leg and the tenons being a sort of "tongue" that extends from the ends of the aprons, fitting into the mortise. Alternatively, the joint might have consisted of dowels that fit into the leg and apron.

    Either way, this will be impossible to reproduce without removing the aprons from the top. You could insert dowels (or a "loose" tenon) between the leg and one of the aprons, but you won't get the leg attached to both aprons, which sacrifices some strength. A corner bracket like this:

    https://www.amazon.com/Surface-Mount...21180487&psc=1

    might do the job for you.

  3. #3
    Gary, Thanks. Unfortunately, every corner brace bracket I could find on the Internet were too big; additionally, all corners of my piece is missing a place to secure the bracket in the middle, so that the bracket, even one small enough, won't work in this instance. I've added a couple of more pictures of the leg positioned at the top of the base to give a better view of the dimensions of the problem. As I mentioned earlier, the top of the leg is 1" square and the area to which the leg is attached is 1 1/4" square.corner1.jpgcorner2.jpgcorner3.jpgcorner4.jpg

  4. #4
    I hope others can see the images I attached to my last posting. The forum will not allow me to view them.

  5. #5
    Join Date
    Mar 2003
    Location
    SE PA - Central Bucks County
    Posts
    65,896
    Quote Originally Posted by Steve Wynne View Post
    I hope others can see the images I attached to my last posting. The forum will not allow me to view them.
    You can see photos if you become a Contributor. Click on the "Donate" link up above...the minimum contribution is only $6 for a year and it also opens up private messaging and several forum areas including the classifieds.

    Jim
    Forum Moderator
    ------

    I also think that there originally was M&T involved in the apron to leg joinery given there are no wood or metal brackets. While I understand that you have limited space that's hidden behind the aprons, you should still be able to at least make an angled, close fitting bracket (wood is fine) that will help you reinforce things as you reassemble the leg to the aprons. There are a variety of ways to get it back together, but were it me, I might actually try pocket screws from the back of the apron into the leg initially with structural epoxy like T-88 and then glue in a corner bracket behind the aprons that's fitted to both them and the little corner of the leg that protrudes inward to reinforce things. I might even put another screw in through that bracket to the corner of the leg (carefully pre-drilling) to draw it together. If so, that screw should be in a different plane than the hidden pocket screws.

  6. #6
    Thank you, Jim. Sounds daunting. I'll have to look up a few things, given your posting. Hopefully, Google Images will help.

  7. #7
    Join Date
    Mar 2015
    Location
    SE Michigan
    Posts
    3,225
    Hello Steve, and welcome!
    Ideally, I would remove the apron pieces, repair those where needed, create mortises in both the apron ends and legs and reassemble the apron/legs with a loose tenon joint. Then reattach to the top. The question I have is how are the aprons attached to the top? Are they just glued to the top...are there screws somewhere holding the top to the aprons?

    If they are just glued, you may have success with heat...a heat gun or even hair dryer.

    Otherwise, the suggestions to make a corner block out of wood and screw it to both aprons and a center screw into the leg, may be the best solution. You may even want to add a dowel connection between the leg and top.

    It looks like a fun project and I hope it comes out well for you.

    For some education on restoration methods, I’m a fan of Thomas Johnson restoration videos on youtube. He goes through a wide variety of repair methods that may be of interest to you.

  8. #8
    Phil, thanks. I'll check out the aprons and definitely check out the videos on Youtube.

  9. #9
    Join Date
    Aug 2018
    Location
    Michigan, USA
    Posts
    548
    Steve,

    Good suggestions from both Jim and Phil.

    One other question - when the legs were removed, were the joints with the legs sawed through? If so, you'll probably want to add a thin spacer at the end of each apron, to make up for what the saw removed and keep the positioning of the legs right.

  10. #10
    Thanks, Phil. I'm going to immerse myself in videos and books. What you guys have described so clearly and simply is well beyond my experience.

  11. #11
    Join Date
    Mar 2015
    Location
    SE Michigan
    Posts
    3,225
    Steve, if you post where you live, perhaps a SMC member who lives near you could give you a hand.

  12. #12
    Phil, I live in Sequim, Washington.
    Per your suggestion about the aprons, assuming I could remove the aprons intact, could I then use a threaded insert and hanger bolt for each leg; there would be nothing preventing me from screwing the legs into the insert--or so I think. I could then re-attach the aprons. Of course, I don't know how removable the aprons are; there are no visible screws holding them on.
    Anyway, I thought I'd get some reactions to the apron removal--threaded insert/hanger bolt idea.

Posting Permissions

  • You may not post new threads
  • You may not post replies
  • You may not post attachments
  • You may not edit your posts
  •