Results 1 to 13 of 13

Thread: When the job is done

  1. #1
    Join Date
    Jun 2010
    Location
    twomiles from the "peak of Ohio
    Posts
    12,166

    When the job is done

    And time to put away the toys. In the case of my Stanley #45....it means a tear down....so,
    Stanley 45, tear down.JPG
    Spread all the parts out, clean them up. Including the #12 cutter.
    I get the plane's box down off the shelf..
    Stanley 45, inside the case.JPG
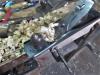
    And, this is what I find inside. Then start packing things up....
    Stanley 45, filling up.JPG
    Things like the long rods, fence, and sliding stock...screwdrivers get moved as need be. #12 cutter goes into the holder, there is a gap for it to fill..

    Then the main stock is fitted in...
    Stanley 45, all fits.JPG
    Type 20, from Roxton Pond, QUE, CAN. SW era. Well...
    Stanley 45, closed case.JPG
    Close the lid, and put it back up on the shelf, until the next time I need the plane...

  2. #2
    Join Date
    Jul 2014
    Location
    Edmond, Oklahoma
    Posts
    1,750
    Steven,

    Nice job, your 45 looks in great shape, and you obviously take good care of it.

    I have gotten so I try to wipe down my saws and planes and treat them with anti rust oil before putting them away each time I use them. I try to leave a light sheen of oil on all of the steel parts.

    In the case of the planes, I take the plane mostly apart, but do not take the frog out of the bed. However, I do take the iron and chip breaker apart and then clean the iron, chip breaker, and lever cap. Next I clean each part of the plane body and the entire plane, but I do not take the frog out of the plane body. Using a toothpick or broom straw, I then clean out any planning chips out from between the frog and sides of the plane, then brush it down with a hair brush. Finally I wipe everything down with a paper towel dampened with rust preventing oil and leave a light sheen on all of the plane part, put it back together and put it away.

    I have only been doing this for maybe 2 or 3 years.

    At any rate, I had not thought about taking a combination plane almost completely apart, and storing it that way.

    Good post.

    Thanks and regards,

    Stew
    Last edited by Stew Denton; 10-03-2019 at 8:12 PM.

  3. #3
    Join Date
    Sep 2007
    Location
    Longview WA
    Posts
    27,430
    Blog Entries
    1
    At any rate, I had not thought about taking a combination plane almost completely apart, and storing it that way.
    If you are storing a combination plane in its original box or one of the same size it is almost impossible to stow it without disassembling.

    Mine tend to rest on a shelf crammed together:

    Plane Wall.jpg

    They are on the left about mid height. One of my bucket list items is to rework my tools storage. It sometimes looks like maybe some of the tools should be sold in order to make it easier.

    The box below them actually came to me with two #45s inside. Also a full set of blades including all of the "Special Cutters" for the #45.

    jtk
    Last edited by Jim Koepke; 10-04-2019 at 3:16 PM. Reason: The box below…
    "A pessimist sees the difficulty in every opportunity; an optimist sees the opportunity in every difficulty."
    - Sir Winston Churchill (1874-1965)

  4. #4
    Join Date
    Jul 2014
    Location
    Edmond, Oklahoma
    Posts
    1,750
    Jim,

    In my case it is even worse. My 45 is old enough, around 1914 I believe, that the fence is not the micro-adjustable type, so for me, I bought one of the adjustable fenses to add to the box. That made the crowded original boxes go from bad to worse. I will probably build a box a little like one that Steven built to fix the problem.

    Regards,

    Stew
    Last edited by Stew Denton; 10-04-2019 at 11:58 PM.

  5. #5
    Join Date
    Jun 2010
    Location
    twomiles from the "peak of Ohio
    Posts
    12,166
    Box is a reproduction of the OEM box..
    two boxes.jpglabels.jpg
    Including all the inside details. USPS had used the OEM box as a football, I think...busted the lid up badly...
    rusty plane.jpg
    This is how it looked when I brought the plane home....was a gift from a friend, stipulation being that I would restore this mess back to like new condition....

    Came close?

  6. #6
    Join Date
    Jul 2014
    Location
    Edmond, Oklahoma
    Posts
    1,750
    Steven,

    From the photos you have made at the top of this post it looks like you got it pretty close to like new condition, or at least as close as could be reasonably expected.

    The question I had though, was that I remember you making the replacement box with finger joints. It looks like you restored the original box and are now using it for housing the 45, so you got the stain and finish to look a lot like the original. How did you get the decal, because it looks great?

    Looks good and I like the box you use now, whether it is the restored original or the replacement you built.

    My 45 is in the original box, but it is one of the hard cardboard boxes, and it was coming apart at the seams so I covered it with masking tape and then yellow duck tape. That said, the box is pretty crowded to get everything in it. Thus the reason i have thought that I would eventually like to make a box like you made with the finger joints, because that is what a number of the different 45s came in, depending on the vintage.

    Thus any information you have on where to get replacement decals for the box would be much appreciated.

    Thanks and regards,

    Stew
    Last edited by Stew Denton; 10-05-2019 at 12:50 PM.

  7. #7
    Join Date
    Jun 2010
    Location
    twomiles from the "peak of Ohio
    Posts
    12,166
    Labels came off the web,,,downloaded, and printed out....took a few tries to get things close.. I am still using the replacement box. The OEM box is retired, except to hold all my dremel stuff..

  8. #8
    Join Date
    Sep 2007
    Location
    Longview WA
    Posts
    27,430
    Blog Entries
    1
    Quote Originally Posted by Stew Denton View Post
    Jim,

    In my case it is even worse. My 45 is old enough, around 1914 I believe, that the fence is not the micro-adjustable type, so for me, I bought one of the adjustable fenses to add to the box. That made the crowded original boxes go from bad to worse. I will probably build a box a little like one that Steven built to fix the problem.

    Regards,

    Stew
    Stew, Here is an old thread on a use for the old fence:

    https://sawmillcreek.org/showthread.php?196104

    jtk
    "A pessimist sees the difficulty in every opportunity; an optimist sees the opportunity in every difficulty."
    - Sir Winston Churchill (1874-1965)

  9. #9
    Join Date
    Jul 2014
    Location
    Edmond, Oklahoma
    Posts
    1,750
    Jim,

    I read the thread when you originally first posted it, but didn't really follow it. This time I did, I think that because of having the extra fence I was motivated on how to use it. I see that the original post is now been brought back to the front page.

    If I end up doing that, I will probably not use the rosewood fence, rather I will take it off and use some maple I have or something similar. I don't really want to cut into the rosewood.

    It is a good way to take advantage of the extra fence by putting it to good use.

    Thanks for the idea and link.

    Stew

  10. #10
    Join Date
    Sep 2007
    Location
    Longview WA
    Posts
    27,430
    Blog Entries
    1
    Quote Originally Posted by Stew Denton View Post
    Jim,

    I read the thread when you originally first posted it, but didn't really follow it. This time I did, I think that because of having the extra fence I was motivated on how to use it. I see that the original post is now been brought back to the front page.

    If I end up doing that, I will probably not use the rosewood fence, rather I will take it off and use some maple I have or something similar. I don't really want to cut into the rosewood.

    It is a good way to take advantage of the extra fence by putting it to good use.

    Thanks for the idea and link.

    Stew
    It got brought back by my answering a question that slipped past me the last time someone posted to the thread.

    In one of my pictures it shows my altered fence. It is actualy a piece of pine that was used.

    jtk
    "A pessimist sees the difficulty in every opportunity; an optimist sees the opportunity in every difficulty."
    - Sir Winston Churchill (1874-1965)

  11. #11
    Join Date
    Apr 2007
    Location
    Columbus, Ohio, USA
    Posts
    3,441
    I was impressed with the plane, and Steve handles it well. I was equally impressed with the box; he put in time to put that as close to the original as possible as well.

  12. #12
    Join Date
    Jun 2010
    Location
    twomiles from the "peak of Ohio
    Posts
    12,166
    Times like this, I use to sort, clean, sharpen, and put away the tools covering the bench's top....re-arrange a few drawers to hold a few more tools (never have enough, right?)
    DVD cabinet, start up.JPG
    bench is almost ready for the next project to start...

  13. #13
    Join Date
    Feb 2011
    Location
    Carlsbad, CA
    Posts
    2,230
    Blog Entries
    2
    I'm with you Steve, putting away the tools, cleaning up the benchtop, maybe even a quick pass or 2 with a scraper to smooth the work surface/remove glue spills etc. and suddenly my mind is clear and the world is full of possibilities!

Posting Permissions

  • You may not post new threads
  • You may not post replies
  • You may not post attachments
  • You may not edit your posts
  •