Thanks for the follow along, Pete. It appears you’re building a two-piece rod, correct? Curious about one thing...how do you go about straightening?
Looks like a fabulous trout club.


 Friend of the Creek
Thanks for the follow along, Pete. It appears you’re building a two-piece rod, correct? Curious about one thing...how do you go about straightening?
Looks like a fabulous trout club.
Contributor
Really enjoying this thread. I have always wanted to build a bamboo rod (as well as a bent, laminated net). Thanks for sharing.
I had the same question about straightening after gluing the blank, and a couple more.
In the Lie Nielsen catalog, I saw a 60 1/2 block plane that had an option for a rod maker's groove. Have no idea how that is used. Wondering if you used one with a groove, or just a plain vanilla block plane?
Lastly, do you think there is any chance that someone with passable woodworking skills could build a decent bamboo rod without attending a class.
 [OP]
Contributor
[OP]
Contributor
Phil,
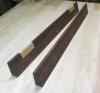
I am building a 7' two piece rod. When you make them yourself, the sky is the limit, two piece, 3 piece even 4 pieces.
Straightening is a hard job. All ours were relatively straight and required only minor tweaks. In reality, no rod is ever perfectly straight. Further, the level of straightness we attain is perfect as it relates to the function of the rod. Straightening is done mostly for cosmetic reasons. By straight, we are talking variations of .010" or less. They are really pretty straight out of the gate.
All of ours had some minor tweaks required in the tip section. To fix an offending section, you heat it with an alcohol lamp and flex in the opposite direction. Through trial and error, you can get them pretty straight.
Originally Posted by Phil Mueller

[OP]
Contributor
Todd,
The form that you place the cane in is hardened steel. As you can imagine, to get to the final exact dimension, the plane blade is rubbing on steel. By placing a groove in the center of the plane, that area is about .005" shallow, so you can have full cut without the blade digging into the steel. I think it's mostly hype, as the Master we practiced under had never heard of such a modification and doesn't know anyone who uses that sort of plane. He has lectured world wide and gets around pretty far and wide. In practice, I found that even with the final rubbing I only had to sharpen the blade once for each section. I found that a high angle blade of 38 degrees coupled with a standard angle plane of 20 degrees was the hot ticket. Gives you an effective planing angle of 60 degrees. Bamboo is not that hard, but because of the changing grain direction at the node, the high angle is very useful to prevent tear out.
As to experience, I think it you can sharpen a block plane blade and have attention to detail, you can definitely build a rod. The process is exacting, but not difficult. He goes over every single thing you need to know, even how to tune and sharpen a block plane. I excused myself to fish during that part! To put it in context, only one other guy had ever handled a block plane but me, two guys had no Wood Working experience, and all came home with a completed blank.
Posts to this thread will be spaced further apart as I have time to work on the rod as sadly class is now over and I'm home. Remaining tasks include:
Gluing the Grip to the Blank
Glueing the reel seat to the Blank
Wrapping the guides on the Blank
Varnishing the Rod
Jeff Wagner takes about a week to build a rod from splitting cane to completion, so likely two weeks for a beginner. I've built rods before (graphite), so I don't have issues with wrapping guides. As I do those steps, I will document them here. If you would like to take his class, look for him online. He does it once a year and it just ended, so he will do it again next year. Each class has 4 students and runs from Saturday night to Thursday Afternoon. Tell him I sent you if you decide to give it a go.
Thanks for looking.
 Contributor
Pete, thanks for posting. Flyfishing and woodworking seem to go together, and a bamboo rod is definitely the neander fly rodGood on you for going full monty!
Best,
Chris
"You can observe a lot just by watching."
--Yogi Berra
Member
Your photos and narration are very helpful. Thanks for taking the time while keeping so busy with the task at hand.
 Posting Permissions

 Reply With Quote