Page 1 of 2 12 LastLast
Results 1 to 15 of 19

Thread: Patent date?

  1. #1
    Join Date
    Jun 2010
    Location
    twomiles from the "peak of Ohio
    Posts
    12,169

    Cool Patent date?

    In a weird spot?

    Project for today; take a drill bit..
    drill bit.JPG
    and a handle..that fit..
    screwdriver, assembled.JPG
    Grind and file a new tip on the drill bit..
    screwdriver, new tip.JPG
    Until it match the slots..
    screwdriver, ready to use.JPG
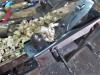
    On this rip saw's bolts. Seemed to work, too..
    screwdriver, nuts removed.JPG
    Only to find a patent date on each nut,
    screwdriver, patent dates.JPG
    Can only see it, once you flip the nut over to the non-showing side

    PAT DEC 31 1881

    Plan is to remove the handle, clean the plate and sharpen it up, maybe refinish the intact handle a bit. Not sure who made this saw...haven't found any etch...yet

    Stay tuned. Saw is a 5-1/2 rip....

  2. #2
    Join Date
    Jul 2015
    Location
    Broadview Heights, OH
    Posts
    714
    That's actually the Washbourne patent from Dec 31, 1867

    http://www.datamp.org/patents/search...&id=7540&set=2

  3. #3
    Join Date
    Jun 2010
    Location
    twomiles from the "peak of Ohio
    Posts
    12,169
    To build the screwdriver needed.....I bought a drill bit
    drill bit.JPG
    Then find a handle to hold the bit...
    screwdriver, assembled.JPG
    Take these, and a big cup of water down to the shop's grinder...and also dig out a file
    screwdriver, new tip.JPG
    File to square the notch. Had to thin the flat part until it just fits into the slots.
    Handle was part of a yard sale find last year. Paid less than $5 for the drill bit. didn't take all that long to grind the bit to fit.
    May dig around and find a punch to drive the bolts out?
    paid a dollar for the saw, itself. handle has NO cracks. May need to refinish it, though.

    Stay tuned
    Last edited by steven c newman; 05-21-2019 at 9:55 AM.

  4. #4
    Join Date
    Feb 2014
    Location
    Lincoln, NE
    Posts
    168
    Quote Originally Posted by Pete Taran View Post
    That's actually the Washbourne patent from Dec 31, 1867

    http://www.datamp.org/patents/search...&id=7540&set=2
    Cool! Those are a first for me.

  5. #5
    Join Date
    Jun 2010
    Location
    twomiles from the "peak of Ohio
    Posts
    12,169
    Have found a couple "drive pin" punches about the right size. Intend to gently tap the bolts back through the handle. May add a socket under the handle, just big enough for the head of the bolt to drop into...and stop the wood from trying to go along...

    Once the plate is free of the handle, I can start to clean both up. Need to keep the bolts in the order they go in the handle, with the nut that came with them....maybe a tray with some tape to hold them still.

    Wondering what to finish that handle with...shellac? Brasso to shine the brass up. Will also sharpen them teeth a bit....looks to be about a 5-1/2....

    Stay tuned...

  6. #6
    Join Date
    Jun 2010
    Location
    twomiles from the "peak of Ohio
    Posts
    12,169
    Well, found the wrong sized pins...
    Rip saw rehab, wrong pins.JPG
    Dig around a bit longer...
    Rip saw rehab, right size pin.JPG
    Found it! There is an empty dog hole under the handle, to catch the bolt. Needed that pin to line up the holes again....once things were cleaned up, and sharpened..
    Rip saw rehab, stamped.JPG
    haven't found an etch, but..there is a "6" stamped down by the teeth...and between the bottom and 2nd hole..there is a "C" stamp. Mr. Wentworth..
    Rip saw rehab, wentworth.JPG
    Was needed for a bit...
    Rip saw rehab, dental work.JPG
    handle was cleaned up, brass shined up, pieces put back together....bolts filed flush with the nuts..
    Rip saw rehab, almost done...JPG
    And then the test drive...
    Rip saw rehab, test drive.JPG
    Not too bad of an old saw?

  7. #7
    Join Date
    Jun 2010
    Location
    twomiles from the "peak of Ohio
    Posts
    12,169
    In order for the new screwdriver to get a better grip on the next set of bolts...
    IMG_4253 (640x480).jpg
    needed to enlarge the slots a bit...
    Disston No.7 , dremel.JPG
    Put a small cutter in the Dremel....was then able to remove the split nuts..
    Disston No. 7, split nuts.JPG
    Sorry, didn't find any patent dates under these....I did find square shanks, though..
    Disston No. 7 , medallion.JPG
    handle will need a lot of repair....somehow a Curly Maple one just doesn't seem right....
    Disston No. 7 , split handle.JPG
    Much prefer the Apple instead. There is a second split at the bottom edge of the handle....half afraid to remove that friction tape patch they installed...
    Disston No. 7 , J stamp.JPG
    Once the handle was GENTLY removed, I did find a stamp...."J"?

    Plus there is this stamped further along the plate..
    Disston No. 7 , etch.JPG

    So, have shined up the brass, will try to clean the plate up a bit better....not sure IF I can see them tiny 10 ppi teeth....then try to decide about repairing the handle...
    stay tuned

  8. #8
    Join Date
    Jun 2010
    Location
    twomiles from the "peak of Ohio
    Posts
    12,169
    Ok...Disston No.7 handle needs repaired ( NOT replaced)....has a few cracks
    Disston handle, medallion side.JPGDisston handle, nut side.JPG
    Then i removed the cloth friction tape, gently..
    Disston handle, tape.JPG
    Wonder it didn't run away....part of the handle felt a bit loose, after the tape was removed..
    Disston handle, tape removed.JPG
    Took a look at what the tape was holding..
    Disston handle, bad crack.JPG
    We have work to do....trying to decide on how to glue this mess back together. And then clean the finish up/off...and what finish to apply when done...
    Hmmmm...

  9. #9
    Join Date
    Jun 2010
    Location
    twomiles from the "peak of Ohio
    Posts
    12,169
    Ok....have bought a 2-part epoxy glue....need to sit and read the instructions. Then figure out a routine that gets the glue in places needed (and not on me)and then figure out how to clamp things in place.

    Also bought a small jug of Murphy's Oil Soap. Intend to clean the wood up a bit, rather than sand it down. Wondering IF I should clean the wood first with the soap, then glue things up, or wait until the clamps come back off.

    May need to pick up a few "Tongue Depressors" from the Kraft Section....to apply the glue with....or, just use a bunch of plain wood toothpicks.

    BLO or just a varnish when done? BLO takes a LONG time to dry..

  10. #10
    Join Date
    Jun 2010
    Location
    twomiles from the "peak of Ohio
    Posts
    12,169
    Took the handle apart...had a small nail to pull. Sanded mating surfaces. Apply the epoxy, once I got it to come out of the nozzle. messy...
    Sanded the handle, after the epoxy was dried....DNA to wipe things clean.

    "Washed" the handle with Murphy's Oil Soap ( Smelly stuff..) then wipe down and dry it off...

    Set up a pin in the vise, to hold the handle, while a coat of varnish was brushed on. letting the varnish dry a while.

    Dremel with a buffing wheel, and a stick of green compound....polished the brass hardware.

    Cold Blue Paste, tried to raise a bit more of the etch...."7" started to show. Parts of "WARRANTED" also started to show....

    waiting on the varnish. saw is from before the 1st Disston son started with dad.

  11. #11
    Join Date
    Jun 2010
    Location
    twomiles from the "peak of Ohio
    Posts
    12,169

  12. #12
    Join Date
    Jun 2010
    Location
    twomiles from the "peak of Ohio
    Posts
    12,169
    Near as I can tell...the Disston was before his first son joined the company....so maybe about the 1850s, or so. The 6 pointer seems to be a tad "newer", as the patent dates on the spanner nuts are 1867....Never found an etch on the rip saw. have sharpened the teeth on the rip saw, seems to work. has an"English" feel to the handle.

    Whether to use these two, or merely to display them.....

  13. #13
    Join Date
    Jun 2010
    Location
    twomiles from the "peak of Ohio
    Posts
    12,169
    Patent dates? ever see 4 of them at once?
    Stanley 358, patent dates.JPG
    Well....now you have..

    Working on a rehab..
    Stanley 358, frame.JPG
    Rest of the parts were in a bunch of baggies, inside a box.. dumped out one such baggie
    Stanley 358, better view, parts.JPG
    Couple more had other, larger parts..
    Stanley 358. feet.JPGStanley 358, foot bolts.JPGStanley 358. depth stop rulers.JPGStanley 358, cleaned guides.JPG
    Kind of a jigsaw puzzle? One rod in each set of guides has a "ruler" etched on them...goes from 0" up to 7"
    Stanley 358, missing anything.JPG
    Hope I have the locking arm put back together correctly...
    This might take a while...still missing a few parts....might get those in a week or three.

    Stanley No. 358.
    Will post as things come together...been a few years since I rehabbed one of these..

  14. #14
    Join Date
    Jun 2010
    Location
    twomiles from the "peak of Ohio
    Posts
    12,169
    King bolt was rusted tight...gave a bath in PB for a few hours....BIG screwdriver, with a pair of visegrips as a cheater bar.....FINALLY able to remove the swing arm.Stanley 358, frozen bolt.JPG
    Had enough trouble getting the bolt for the guide's block to release....and get the block removed....
    Dried the frame off....let it sit a while in the sun...then a coat of Rustoleum Gloss Black..
    Stanley 358, frame painted.JPGStanley 358, frame back, too.JPG
    While the swing arm headed down to the shop...had parts to remove and clean up.
    Stanley 358, swing arm apart.JPG
    Even cleaned up the weld bead...
    Stanley 358, weld clean up.JPG
    Stanley 358, cleaned part 1.JPG
    Have since got the rest of the parts out, and cleaned those up....between the rust, and the greasey gunk...was a bit messy.
    Stanley 358, new deck.JPG
    Need to trim this down to size...add a bevel along the back edge, so it sits against the back wall.
    IMG_8376.jpg
    have also polished the brass a bit, and installed it on the end of the frame, with the 2 bolts they used.
    Stay tuned..

  15. #15
    Join Date
    Jun 2010
    Location
    twomiles from the "peak of Ohio
    Posts
    12,169
    Swing arm needs taped off, where I don't want any paint to go. Then I'll add a coat of the rustoleum black.

    Have also trimmed the new deck...
    IMG_8379.JPG
    1/2" thick Pine....may use it as a pattern, and do another one in Poplar...

Posting Permissions

  • You may not post new threads
  • You may not post replies
  • You may not post attachments
  • You may not edit your posts
  •