Results 1 to 14 of 14

Thread: 1840's bed M&T joint repair

  1. #1

    1840's bed M&T joint repair

    I need some advice on an historic M&T repair. I have a pair of 1840s twin beds in my son’s bedroom. The one he doesn’t sleep on has a loose mortise and tenon on the frame. It’s the rear lower rail on the right. The turned foot rail above is still solidly glued. The back end of the bed is attached to the side rails via rail bolts so I can remove it and take it down into the basement shop if necessary. I can get about 1/8” of separation in the joint right now and I’m guessing I could at least double that if I remove the rear of the frame from the rails. Given the date of these beds, this obviously must be hide glue. But you can see there is some discoloration on the wood around that joint (greatly exaggerated by the lighting) and I’m unsure if this was from a repair or just from trying to clean a stain. If it was a repair, I don’t know when, only that it would have had to have been prior to 1970 if it happened at all. To be honest I think this joint has been loose since as early as then because I remember my bed always being a little more wobbly than my sister’s (not doubt this wasn’t helped by all the jumping I did on it either!) I have both hot hide glue and liquid (titebond) as options. how do I go about this?

    Can I somehow get the glue in there without undoing the footrail M&T? I did an experiment undoing a joint I made (just two blocks glued together) using heat and water/steam. It was not as easy as people who write articles make it seem. I am also very fearful of damaging the wood with the steam. I believe this is mahogany (not very good at wood identification so feel free to correct me) and I have no idea the finish, but should I have to fix a bunch of raised grain and damaged finish I’m afraid of the color underneath all the aging. I’ve also read that you can “shock” a hide glue joint loose with a sharp whack, although this sounds overly optimistic to me. I have read that you can dribble the glue into an open joint and work the joint back and forth to kind of spread it around in there without total disassembly, but I’m not sure if this is one of those “only if you have a lot of skill and practice” kind of things – although if that failed to hold I would be right back where I started with no damage. And if I am able to dribble in glue, would it be better to make hot hide glue and add salt so I have plenty of time to dribble it in there, or should I just go with the liquid stuff? I find the liquid stuff not all that runny (kind of like fake maple syrup, as opposed to hot which is like real maple syrup).

    Thoughts? Advice?

    Pic of the frame. Lose joint is lower right.
    bed 1.jpg


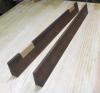
    Close up of the joint. The discoloration is greatly exaggerated by the light I used. In fact, I never noticed it until right now.
    bed 2 closed.jpg


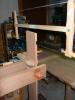
    Forcing it open 1/8". I'm restricted by the side rail and also the floor. If I remove this section of the frame, I'm pretty positive I could get at least a 1/4" or more.
    bed 3 open.jpg

  2. #2
    Join Date
    Jun 2008
    Location
    So Cal
    Posts
    3,765
    I would spend the time working the joint completely apart. Cleaning out old glue and adding shims to the mortice or tenon.
    Dont rely on glue to hold that corner tight.
    Dribbling glue in there sounds like hocus pocus. I would recommend Old brown glue before titebond hide glue.
    It does look like mahogany well worth the effort to do a proper repair.
    Good Luck
    Aj

  3. #3
    Join Date
    May 2007
    Location
    Newburgh, Indiana
    Posts
    918
    Andrew, care to share with us why your preference for Old Brown. I have and use both. Thanks, Bob
    Life's too short to use old sandpaper.

  4. #4
    Join Date
    Jun 2008
    Location
    So Cal
    Posts
    3,765
    Sure Bob I bought a bottle of titebond hide glue from Rockler. I tested the glue on to freshly prepared pieces of wood I applied the glue on the two long grain surfaces.
    Clamped over night there was no bonding of the wood fibers. The joint broke at the glue line.
    Unreliable glue to me.
    Aj

  5. #5
    Join Date
    Mar 2015
    Location
    SE Michigan
    Posts
    3,225
    I agree with Andrew - take the time to get it apart, clean/shim and re-glue. I’ve had good luck loosening up old joints (provided it’s hide glue) with nothing more than a hair dryer (no steam). Be patient. Get it good and hot...like almost too hot to handle without a glove hot (traditional hide glue melts at 140*). Heat, wiggle, heat, wiggle.

  6. #6
    Join Date
    Sep 2007
    Location
    Longview WA
    Posts
    27,428
    Blog Entries
    1
    +1 on what has already been said.

    Doing it right means not having to do it over.

    jtk
    "A pessimist sees the difficulty in every opportunity; an optimist sees the opportunity in every difficulty."
    - Sir Winston Churchill (1874-1965)

  7. #7
    Join Date
    May 2019
    Location
    White Lake, Michigan
    Posts
    41
    Hot water should work better than a heat gun.

  8. #8
    Join Date
    Dec 2010
    Location
    South Coastal Massachusetts
    Posts
    6,824
    This joint has held (in it's current state) since the 1970's?

    Does anyone actually sleep on the bed?

  9. #9
    Join Date
    Aug 2007
    Location
    Dickinson, Texas
    Posts
    7,655
    Blog Entries
    1
    I would consider gluing the joints. You might tale a long bar clamp and see if you can gently close the joint.

  10. #10
    Quote Originally Posted by Jim Matthews View Post
    This joint has held (in it's current state) since the 1970's?

    Does anyone actually sleep on the bed?
    Yes. As far back as I can remember when I was a little kid it was loose. I slept on that bed until I went off to college and when I would come home to visit after that. My son sleeps on its twin and only guests use this one now. This is a testament to the power of mechanical joinery.

  11. #11
    Join Date
    Mar 2015
    Location
    Virginia
    Posts
    1,211
    Quote Originally Posted by Andrew Hughes View Post
    Sure Bob I bought a bottle of titebond hide glue from Rockler. I tested the glue on to freshly prepared pieces of wood I applied the glue on the two long grain surfaces.
    Clamped over night there was no bonding of the wood fibers. The joint broke at the glue line.
    Unreliable glue to me.
    Titebond hide glue holds the handle on my jack plane. Holds up to some pretty heavy use.

    Not a glue guru, but I would assume you got a bottle that was out of date, or had not been stored properly or something. Can happen with any glue, and is a good reminder to always test before using it on something important.

  12. #12
    Today was the day to tackle the bed. Here’s a photo of the frame sans bedding.
    1.jpg

    I ran into two BIG problems. I discovered that the foot rail was not only glued, but also nailed. So that’s not coming off without causing major damage.
    2.jpg

    Not that it mattered, because the rail was also nailed.
    3.jpg

    It turns out that both sides of the rail were loose. One didn’t want to give much at all, the nails seem to be keeping it fairly snug despite the glue obviously failing. The other side, that I posted about before, I would get a solid 1/8th inch gap so those nails are not really holding tight and have worked somewhat loose in the tenon. So this really changed my strategy on how to deal with this because disassembly was absolutely not an option. I decided to dribble in hide glue. Worst case scenario, if it won’t hold, I’ll be right back where I started with no harm done.

    I put the bed in the vise to keep gravity in my favor and cut a length of poplar to use as a spreader getting the M&T joints open as much as possible. I also set up a rope so it was ready to go when it was time to clamp it together.
    4.jpg

    I keep pre-made hide glue in the freezer so I grabbed a few ice cubes and added a smidgen of salt to increase the working time slightly so it has a little more time to (hopefully) run into the joint. While this was happening I had my 7 year old son hold a hair drier to the joint to warm it up. I used a syringe with a curved tip to squirt the glue right into the joint.
    5.jpg


    The joints were actually pretty tight, so I don’t have the highest of hopes, but it is what it is. I did the better joint first since it needed less holding power and then flipped it over and did the worse one. Then I removed the spreader and tightened the rope. In hind sight, I could have glued them one at a time so to allow the full effect of gravity for each joint. But alas, I do not have a time machine. At least the joint that was the major concern got gravity working it it's favor the entire time as I did that one second.
    6.jpg

    So I’m not exactly sure how to proceed here and could use some advice. This bed is only used by guests (my son sleeps on it's twin) so I’m not super concerned. Like I said, the bad joint was bad pretty much my entire life sleeping on the thing until I moved away from home. But given how surprisingly tight the M&Ts were I’m doubting that much glue really got in there. I’m guessing that at this point, if I want a more robust joint, I’ll need to put in a few more nails; although I’m not really sure about the condition of the tenon wood. What I could see looked good. I don’t really feel like there’s enough real estate to put in dowels between the existing nails, rail nut, and rail alignment holes.

    Any thoughts?

    BTW – little kids love cleaning up the gelled hide glue squeeze-out!

  13. #13
    Chris,

    Waiting to know the outcome. Whatever it doesn't sound like you made anything worse. BTW, I like your hot hide glue solution, I need to start doing that, while Old Brown is good, hot is better.

    ken

  14. #14
    FINISHED!

    Here’s a pic of the side that was barely loose at all. I’ve marked the location of the nails. There are only two.
    nails 1.jpg

    Here’s a pic of the side that was very loose. As you can see, there are a LOT of nails. So clearly this side was either repaired before, or had issues during manufacturing. The additional nails are cut nails, so if it’s a repair it was likely done during the earlier part of this bed’s life.
    nails 2.jpg

    What I’ve decided to do is drive a pair of nails. The plethora of nails that clearly aren’t holding leads me to believe there’s probably issues with the wood, either splitting or some other problem. I could see the first 1/8th of the tenon and I know that wood looked perfectly good, so I decided to drive the nails between that front row and the edge of the leg. That way I increase my chances of hitting good wood. I don’t have cut nails and no place around here to get the correct size, so I faked them with 6d finish nails to make them look like the existing cut nails in the bed – same shape and size. This involved using a hammer on my *cough* anvil to reshape the head, and then filing down the top flat. This process only took about 60 seconds per nail. Then I dropped them in vinegar to remove the extreme shine. This might seem overkill for something that nobody will ever see unless they take the bed apart, but I figure I might as well get practice for the future if I need to do something like this that IS visible.
    nails 3.jpg

    I drilled pilot holes to keep from splitting the leg, and to keep from splitting the tenon as I don’t really know the condition of it inside the leg. Luckily, as I was drilling I didn’t get that dreaded “ca-thunk” feeling when you suddenly hit something very soft.
    nails 4.jpg

    I clamped the leg while driving the nails as extra precaution against splitting. The result is pretty convincing, minus more than a century of patina.
    nails 5.jpg

    This is about the limits of what I can do with this repair. I feel pretty good about it because a) visually it looks fine and b) it feels incredibly solid now. Hopefully it will last another 180 years…. or at least long enough for my son to become a daddy and inherit the beds – then it will be HIS problem LOL!
    nails 6.jpg

Posting Permissions

  • You may not post new threads
  • You may not post replies
  • You may not post attachments
  • You may not edit your posts
  •