Page 2 of 4 FirstFirst 1234 LastLast
Results 16 to 30 of 49

Thread: How do you cut dovetails

  1. #16
    Join Date
    Jul 2016
    Location
    Denver, Colorado
    Posts
    79
    Quote Originally Posted by Andrew Pitonyak View Post
    For certain, it is much more difficult to tilt if it is wide; as is the board on which i am currently working. The Moxon vise made dovetails much easier to cut for me for a few different reasons. The two primary reasons:


    1. For me to cut comfortably, the bench is too low. The Moxon vise raises the height.
    2. The Moxon allows for wide boards. OK, if I had a better (wider) vise on my bench, that would take care of it, but, I do not. In fact, my bench vises are not very wide (less than 24 inches) and there is a screw in the middle and a support thing on each side.


    Patrick,

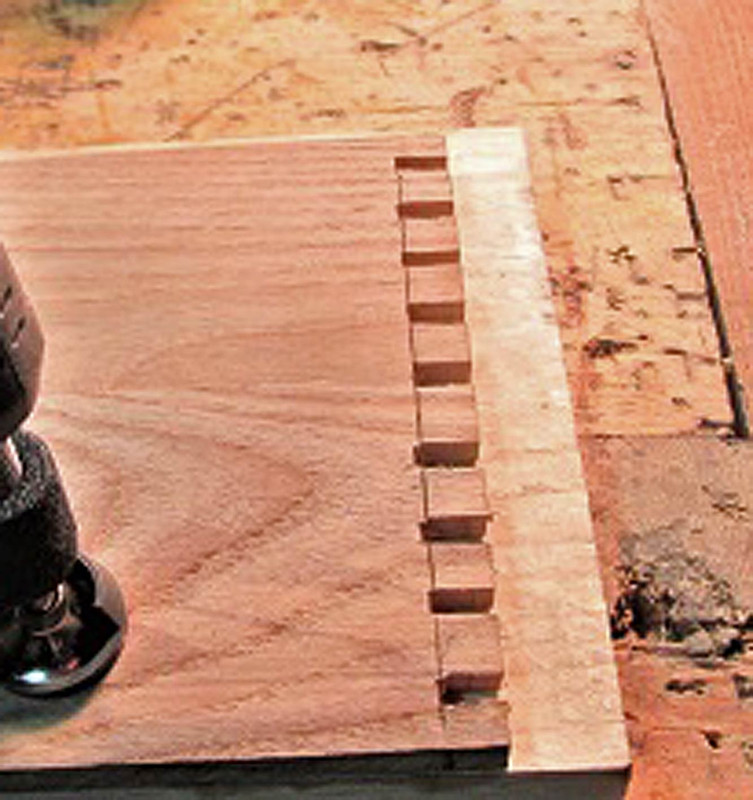
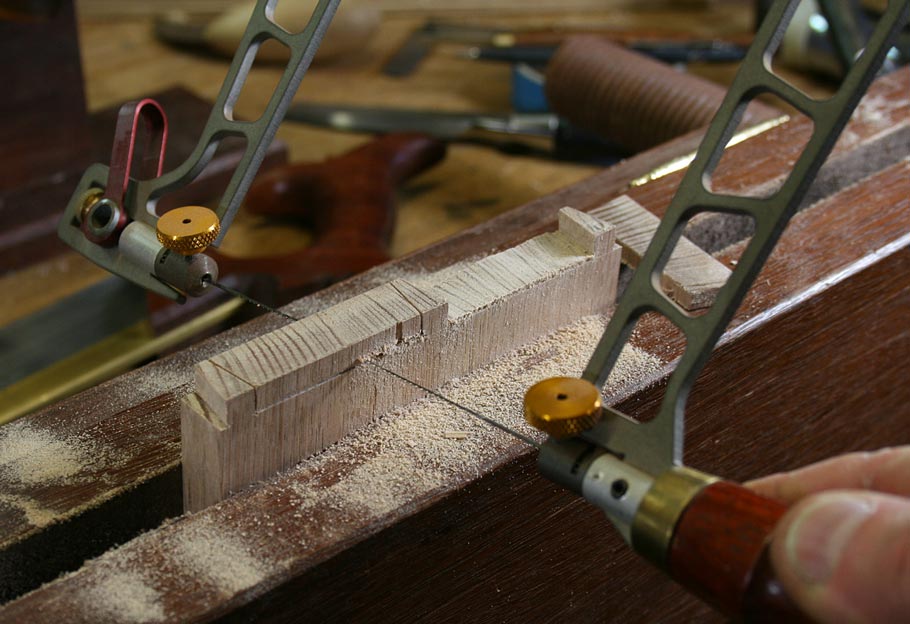
    How are you holding your boards? Do you cut out the waste or chisel out the waste? I have heard people say that it takes about the same amount of time for them to chop the waste as to cut out the waste, but I cut it out way faster than I can chop it out. That is probably more a testament to my poor chopping ability than any other reality.

    I use a very fine blade to cut out that waste. If it is helpful, I am happy to see what blade I use. When I first started, I was using larger blades (I had no idea they were large, what did I know about it? Almost nothing) so it was very difficult for me to control the cuts. With my current blades, I can drop them directly down into the cuts, rotate the saw a bit, then cut almost straight across; well, as straight as I can cut anyway.

    Also, be sure to post a few pictures of your first attempts. I remember my first few, I was lucky if I could cut a single drawer in a couple of nights. I am still nervous when I cut something that will be highly visible, especially when I do it in something like maple or oak, which is not forgiving.
    Andrew,
    I am still in the process of building a bench (with plans to build a Moxon very shortly thereafter) and so my workholding is very haphazard. For instance, my current "bench" is a couple of foldable sawhorses (from Wood magazine plans) onto which is screwed an old, heavy (MDF), table top. The way that the top sits and the sawhorses are built, I have a 90 degree corner between the leg of the sawhorse and the folding leg of the sawhorse (the sawhorses fold perpendicular to the ground, like a gate); I clamp the boards vertically in that corner and go to town.

    As for cutting them, I do the same as Robert in that I cut all of one direction before I cut the other direction and I do the tails first. I also am wasting with an Olson coping saw - I swoop down as close to the baseline as I can and saw across from right to left and then come back and cut out the remaining waste left to right. Then I pare. And pare. And curse and sharpen and pare. (You might have poor chopping ability; I have poor sharpening ability! <laughs>)

    Once my project is done, I will try to remember to come back and post some pictures of the completed dovetails.


    Patrick

  2. #17
    Join Date
    Feb 2004
    Location
    Perth, Australia
    Posts
    9,494
    Once you have made a few, and the layout and sawing of dovetails is understood, the next stage is to master the sawing ergonomics, and find efficiency in what you do.

    1. Saw at a comfortable height. A Moxon vise helps.

    2. Hold the dovetail and fret saws lightly to allow them to do the work. No more death grips.

    3. Light and visibility is important. If you can see the lines, you can cut to them. The opposite is also true.

    4. I saw tail board first. It is just easier for me to visualise the end result by doing this first. I rarely gang saw, so this is not a factor. I do not see an advantage for one way or the other. Just stick to what works for you.

    5. I remove Tail board waste with a fret saw. Planning ahead is important. I create a knife/chisel wall at the baseline for each tail before fret sing waste, as it is easier to do at this point. The chisel wall aids in maintaining the baseline.

    6. I use blue tape to transfer the tail board as this maximises accuracy of line position. All woodworking is really no more than working to a line. The more accurate these are the better the end result.

    Through dovetails: http://www.inthewoodshop.com/Furnitu...ovetails3.html

    Half blind dovetails: http://www.inthewoodshop.com/Furnitu...hBlueTape.html

    The #140 trick is dead: http://www.inthewoodshop.com/Furnitu...ickisDead.html

    Regards from Perth

    Derek

  3. #18
    Join Date
    Apr 2007
    Location
    Columbus, Ohio, USA
    Posts
    3,441
    Quote Originally Posted by Patrick Whitehorn View Post
    Then I pare. And pare. And curse and sharpen and pare. (You might have poor chopping ability; I have poor sharpening ability! <laughs>)

    Once my project is done, I will try to remember to come back and post some pictures of the completed dovetails.


    Patrick
    This made me laugh, I really enjoyed that...... If you live close by (Middle of Ohio), let me sharpen a couple of chisels for you. In my experience, it is easier to keep them sharp than to get them sharp. If you really think that you cannot sharpen, drop me a PM and I will see if I can send you a couple of sharp things that i will not miss from my shop and then they can clutter yours. You will then need to figure out how to keep them that way!

  4. #19
    Join Date
    Apr 2007
    Location
    Columbus, Ohio, USA
    Posts
    3,441
    Quote Originally Posted by Derek Cohen View Post

    5. I remove Tail board waste with a fret saw. Planning ahead is important. I create a knife/chisel wall at the baseline for each tail before fret sing waste, as it is easier to do at this point. The chisel wall aids in maintaining the baseline.
    Hmm, I had forgotten that you do more than just knife your line. I have never tried chiseling the baseline.

  5. #20
    Join Date
    Apr 2007
    Location
    Columbus, Ohio, USA
    Posts
    3,441
    Quote Originally Posted by Jim Koepke View Post
    Now either setting up a pre-squared marking station or clamping a small piece of straight stock to the base line seems to work quicker with less chance of error.
    I have never tried clamping a piece of straight stock at the baseline. I noticed something in one of your pictures and I wondered what you had clamped; and now it makes sense. I should give that a try.

  6. #21
    Join Date
    Jun 2010
    Location
    twomiles from the "peak of Ohio
    Posts
    12,181
    Sometimes..
    Ash Box 2, dovetail saw, pins.JPG
    I just let the wooden jaws guard the baseline...
    Ash Box 2, dovetail pins lay put.JPG
    Layout a few lines...
    Ash Box 2, last pins.JPG
    I usually just chop the waste away...
    Ash Box 2, chopping tools.JPGAsh Box 2, halfway.JPGAsh Box 2, pins chopped.JPG
    saw them, chop halfway, flip over, finish the chops...dry fit..
    Ash Box 2, last corner dry fit.JPG
    K.I.S.S ....

  7. #22
    I don't always use dovetails, but when I do. . . . I just do them Frank Klaus style. Pins first, fast, and adequate for the task. Tage Frid style if they are half blind.

    I never really understood the woodworkers' quasi-religious obsession with dovetails. They are just one joint of many to choose from for a given application, and not always the best choice for a task. This "height of craftsmanship" nonsense has always baffled me.

    Ducking now before people start hurling their 0.002" side bevel chisels, 1:6 templates, and $200 back saws at me

  8. #23
    Join Date
    Sep 2007
    Location
    Longview WA
    Posts
    27,453
    Blog Entries
    1
    Quote Originally Posted by Andrew Pitonyak View Post
    I have never tried clamping a piece of straight stock at the baseline. I noticed something in one of your pictures and I wondered what you had clamped; and now it makes sense. I should give that a try.
    This thread has me pondering a way to make a quick clamp setup with a straight edge. Made a straight edge from a piece of scrap ash today. Now to find a nice piece of wood to make a fence or head for the thing. Then figure out a clamping method.

    jtk
    "A pessimist sees the difficulty in every opportunity; an optimist sees the opportunity in every difficulty."
    - Sir Winston Churchill (1874-1965)

  9. #24
    Join Date
    Feb 2004
    Location
    Perth, Australia
    Posts
    9,494
    This thread has me pondering a way to make a quick clamp setup with a straight edge. Made a straight edge from a piece of scrap ash today. Now to find a nice piece of wood to make a fence or head for the thing. Then figure out a clamping method.

    jtk
    Many years ago I made a jig for paring baselines that involved a fence clamped across the baseline. This was published by Pop Wood at the time ...


    Andrew: I have never tried clamping a piece of straight stock at the baseline. I noticed something in one of your pictures and I wondered what you had clamped; and now it makes sense. I should give that a try.
    There are variations of this around that simply involve clamping down a straight edge.

    It has been a very long time since I used something like this. I am not a fan of them - they offer the illusion of keeping all straight, but setting them exactly on the baseline is not that simple. The fences can move.

    Steven: I usually just chop the waste away...
    Unless one works carefully, there is a danger of chopping over the baseline. Simply placing the chisel bevel-forward in the baseline can drive the chisel back over the baseline ...


    For this reason, I first pare a chisel wall ...


    Then only saw away the waste ...


    .. and then chop away the remaining waste. The chisel wall prevents the chisel moving backwards and over the baseline.


    This ensures a straight and cleanly cut baseline, and the amount of extra effort is negligible in the grand scheme of things.

    Regards from Perth

    Derek

  10. #25
    Join Date
    Oct 2014
    Location
    Poughkeepsie, NY
    Posts
    207
    Quote Originally Posted by Derek Cohen View Post
    ....Unless one works carefully, there is a danger of chopping over the baseline. Simply placing the chisel bevel-forward in the baseline can drive the chisel back over the baseline ...
    If the overall dimension of the piece is not critical, this is another advantage of doing tails first and gang cutting them. If I over-chop the baseline, I can strike a new baseline on the pair of parts (both tail or both pin boards), and extend the tails or pins to the new baseline. I just have to fix both tail boards before I mark the pins, which is critical for joint fitment. On the pin boards, the baseline depth isn't critical for joint fitment. It is important for the squareness of the piece, that the baselines on corresponding parts match (both tail or both pin boards).
    Last edited by John Schtrumpf; 04-10-2019 at 6:31 AM.

  11. #26
    Join Date
    Sep 2007
    Location
    Longview WA
    Posts
    27,453
    Blog Entries
    1
    Many years ago I made a jig for paring baselines that involved a fence clamped across the baseline.
    Derek, your creation is a useful means for guiding a chisel when chopping waste. Though since the time this was developed many have discovered the ease of removing the waste more like you later method of sawing out the bulk of the waste first.

    The clamping a piece to the baseline Andrew mentioned from my A Box From Firewood is clamped along the baseline as an aid to marking the pin board from the tail board:

    Marking Pins.jpg

    My pondering over this is to make a small square that can clamp to a tail board and be used to align it to two edges of the pin board for marking.

    jtk
    "A pessimist sees the difficulty in every opportunity; an optimist sees the opportunity in every difficulty."
    - Sir Winston Churchill (1874-1965)

  12. #27
    Join Date
    Feb 2004
    Location
    Perth, Australia
    Posts
    9,494
    Jim, I would love to see the fence to chisel out the baselines for your lovetails!

    Regards from Perth

    Derek

  13. #28
    Join Date
    Aug 2007
    Location
    Dickinson, Texas
    Posts
    7,655
    Blog Entries
    1
    I learned to cut dovetails from this man at Homestead Heritage in Waco Texas.

    https://images.search.yahoo.com/sear...ails&fr=mcafee

    https://www.sustainlife.org/heritage...f-woodworking/
    Last edited by lowell holmes; 04-14-2019 at 2:05 PM.

  14. #29
    Join Date
    Aug 2007
    Location
    Dickinson, Texas
    Posts
    7,655
    Blog Entries
    1
    See this Paul Sellers dovetail template.
    https://mycrafts.com/diy/how-to-make...-paul-sellers/

  15. #30
    Join Date
    Jun 2010
    Location
    twomiles from the "peak of Ohio
    Posts
    12,181
    I need to go and chop a few more...pins first, of course..
    Ash Tote 2, dovetail pins.JPG
    Just a backsaw and a chisel....then lay out the tails to match....nothing too complicated....just saw, chop, and fit...

Posting Permissions

  • You may not post new threads
  • You may not post replies
  • You may not post attachments
  • You may not edit your posts
  •