Page 1 of 2 12 LastLast
Results 1 to 15 of 16

Thread: Sheraton Table Build Part 2: Table Legs – String Inlay and Carving

  1. #1
    Join Date
    Feb 2011
    Location
    Carlsbad, CA
    Posts
    2,230
    Blog Entries
    2

    Sheraton Table Build Part 2: Table Legs – String Inlay and Carving

    This is part 2 of a folding, mahogany table build – roughly in the style of Sheraton, I plan to use my office as a work surface. The bulk of the work in this build is focused on the legs which when complete will include string inlay, 3 different types of carving and some marquetry, that is if my eyesight and patience holds out!

    In part one I detailed most of the shaping of the legs – here’s a couple pics:


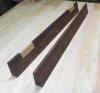
    I attempted string inlay based on recent article in Fine Woodworking. There is a fair bit of geometry involved in getting the arcs/intersections to line up that I couldn’t begin to describe. Steve Latta’s Article does an excellent job providing the details. String inlay will cover 2 sides of each of legs – total of 8 show surfaces. Jig Latta describes is essential in aligning all the work surfaces consistently with pivot points for the arcs. I don’t have much confidence in my geometry so I used a compass to layout where I hoped the inlay would go.
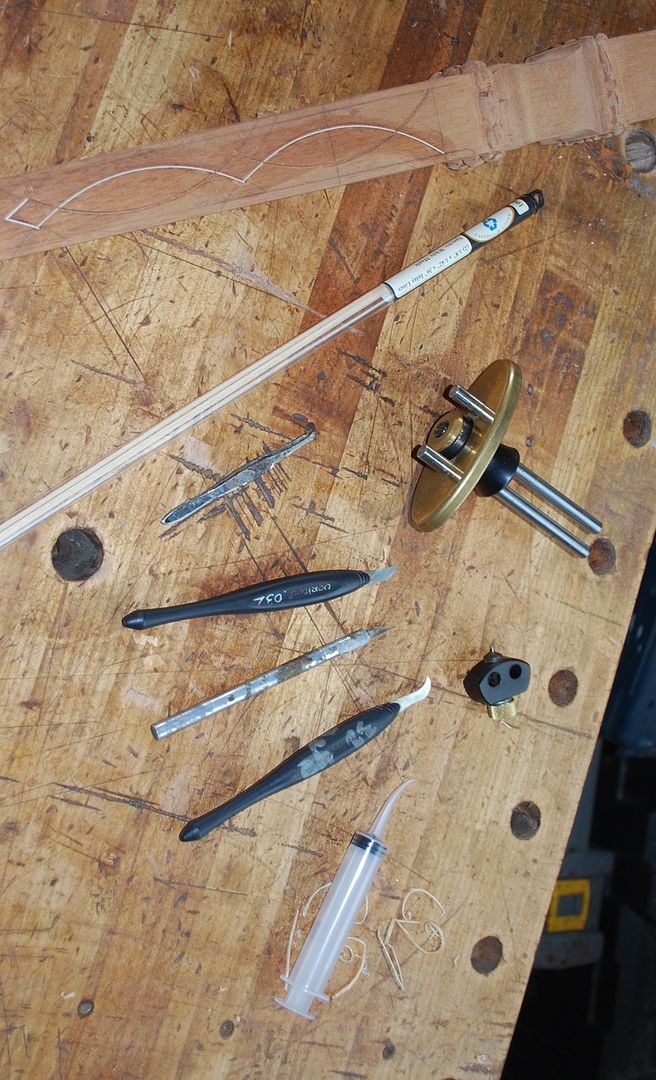


    Here’s some pictures using the LV string inlay tool to cut the arcs. A super narrow Japanese saw file is helpful for keeping the cutting edges sharp. Try not to sharpen the outside of the cutters as that will decrease the width of the groove. I just sneak up close to the endpoints and finish the arcs with an X-Acto knife.


    Here are the LV inlay tools I use that for me are pretty much essential. The black handle tools are a chisel and scribe sized to the same width as the cutter – you definitely need these.


  2. #2
    Join Date
    Feb 2011
    Location
    Carlsbad, CA
    Posts
    2,230
    Blog Entries
    2
    One of the biggest headaches for me in string inlay is creating the stringing. You need to have a consistent with so that it fully seats all the way to the bottom of the groove. If the width isn’t consistent, then the width of final line won’t be uniform and/or inlay won’t seat to the bottom of the groove and when you do final surfacing you’ll go right through it – don’t ask me how I know that!

    I have a LV scraping tool I use to try and get uniform width stringing – sometimes it works and sometimes not so much (definitely operator error). I recommend erring on the side of making the stringing a bit too narrow versus too wide – glue and sanding can help fill in any gaps, but if too wide see problem above. I found some pre-cut, maple string inlay – about $4 for 28” pieces – for me tricked tremendous return on investment. Because the string inlay will intersect, I glue in one side at a time, and then after leveling excess stringing cut the overlapping grooves so I get clean intersections.


    Final trimming of inlay flush to the surface is a fun “reveal” – kinda like planing dovetails after assembly – you get to see how everything fits.


    Next is the straight string inlay referencing off the side of the table legs – this is much easier. Chief challenge is ensuring you trim the stringing to correct the length in the corners.


  3. #3
    Join Date
    Feb 2011
    Location
    Carlsbad, CA
    Posts
    2,230
    Blog Entries
    2
    The design I’m using for table legs is a combination of 2 different tables – a Sheraton and Heppelwhite. There are 2 main areas of carving; top of the leg just below the apron and the foot. String inlay is in between. I think I’m likely overdid it with too many design elements/details. I should’ve known better than to try and “improve” on historical examples!


    Top of the leg has beading above and below a central acanthus leaf design. I’m really not much of a Carver – no artistic sense, really more of a “cut by numbers” approach. One thing I have learned from my limited carving experience is razor-sharp carving tools are required! Once the tools get dull, small details breakout rather than cut etc. Here’s a couple pics of my sharpening station. Most important for me are the shaped Poplar strops and the electric rotating sharpener. I made platinum’s with Plexiglas/epoxy/bolts, topped with 3M abrasive film that fit in the sharpener and give me excellent results. If you’re interested in getting started with carving, it’s super helpful to connect with someone who can help you get your carving tools really sharp.


    Here are some pics of the initial setting out of the beading, which is really small may be ¼” wide. The fluted leaves were cut with an X-Acto knife.


    Here is incising the perimeter of floral elements on the foot. You don’t want to push too hard here or small parts of carved elements will break off – I hate when that happens! Iterative steps of incising vertically and relieving the waste horizontally is the way to go.


    Here is template for carved floral elements at the top of the legs. I use graphite paper to transfer the design to the work piece. True carvers would just bang this out using the consistent sweep and size of individual gouges to layout duplicate parts- that's waaay over my head.


  4. #4
    Join Date
    Feb 2011
    Location
    Carlsbad, CA
    Posts
    2,230
    Blog Entries
    2
    After the initial outlining, I use of a V tool to carve along the edges and relieve the waste. – Sorry the pictures are terrible!


    Once the rough two-dimensional outline of the carve shape has been established and the background surface has been relieved, the fun part is using inverted gouges to “model” or shape the upper surfaces. I use riffler’s and a saw file shaped into a scraper to clean up the background. After primary shapes have been established, and Ex-acto knife is great for some of the fine detail that creates the 3 dimensional image.


    The last carved element is a repetitive, serpentine pattern. Has a specific French name that I won’t attempt to spell.”Gouioche”- sic? If you’re interested in getting started adding some carved elements to your work I highly recommend this form as its simple, symmetrical design lends itself to working directly from your carving tools. This semicircular profile is created using ~ ¼” wide, # 6 gouge vertically – makes it easy to consistently space the curved elements.


    Here I’m using an almost flat, number 2 sweep Japanese gouge to clean out the background. I don’t know what kind the steel this gouge is but it’s probably the sharpest tool in my shop.


    I use an X-Acto knife to create boundaries of the “serpentine” chain elements followed by the same shallow sweep gouge used upside down to blend them into a flowing shape. A small drill bit creates the central circles.


    I

  5. #5
    Join Date
    Feb 2011
    Location
    Carlsbad, CA
    Posts
    2,230
    Blog Entries
    2
    t’s probably hard to see here, but there’s a recessed “square” shape in the area above the serpentine beads. Maybe I should color this in black or red – what you think? BTW, try not to notice the carving on a couple of the upper beads – that wasn’t supposed to happen! You can also see some of the superglue remaining from repairs I made to carved elements that broke off. A lot of these patterns are realistically intended for much larger scale work like architectural applications, trying to execute them in small scale for furniture is probably not what initial makers intended.


    Now that the carving is complete, I’m excited to get back to some actual cabinet making creating the MTs to join apron to the legs with curved front drawers. I’ll keep you posted on progress.

    Thanks for looking.

    All the best, Mike

  6. #6
    Join Date
    Apr 2017
    Location
    Clarks Summit PA
    Posts
    1,745
    Beautiful project Mike! You are right about getting the string inlay the correct width. I have cut my own inlay in the past, and when the width was not uniform, it was a headache. I purchased some holly on line last year and it was very nice. I took a class with Steve Latta almost 20 years ago and it was very enjoyable. We made our own tools, including a "thicknesser". It worked OK. I am looking forward to more details on your build.

  7. #7
    Join Date
    Jul 2015
    Location
    Broadview Heights, OH
    Posts
    714
    Not completely a hand tools only exercise, but I needed to make some holly stringing for a federal project a few years back.

    The method I used was to joint the face and edge of the board and then resaw an 1/8” thick flitch with the bandsaw. I then took the flitch and using a few pieces of double stick tape fixed it to a sled made of lumber core plywood. This allows you to run it through the thickness planer to get it exactly the thicknesss you need.

    Finally, I sawed off a piece of stringing slightly oversized that I could plane flush once it was glued into the stock. A quick pass across the jointer gets the flitch ready for another slice on the bandsaw to make another piece of stringing. It’s very precise and you can get perfectly square pieces.

  8. #8
    Join Date
    Jun 2008
    Location
    So Cal
    Posts
    3,775
    That’s a very ambitious project Mike. You must good eyes to take on all those small details.
    I like the string inlay. I going to try to incorporate some my upcoming builds it’s looks very rewarding.
    Thanks for sharing
    Aj

  9. #9
    Join Date
    Jun 2007
    Location
    Clinton Township, MI, United States
    Posts
    1,554
    Really nicely done!
    Please keep us posted on the progress.
    Mike
    From the workshop under the staircase, Clinton Township, MI
    Semper Audere!

  10. #10
    Join Date
    Apr 2017
    Location
    Clarks Summit PA
    Posts
    1,745
    Quote Originally Posted by Pete Taran View Post
    Not completely a hand tools only exercise, but I needed to make some holly stringing for a federal project a few years back.

    The method I used was to joint the face and edge of the board and then resaw an 1/8” thick flitch with the bandsaw. I then took the flitch and using a few pieces of double stick tape fixed it to a sled made of lumber core plywood. This allows you to run it through the thickness planer to get it exactly the thicknesss you need.

    Finally, I sawed off a piece of stringing slightly oversized that I could plane flush once it was glued into the stock. A quick pass across the jointer gets the flitch ready for another slice on the bandsaw to make another piece of stringing. It’s very precise and you can get perfectly square pieces.
    That seems to be a nice technique Pete. I will try it next time I need stringing. Thanks. Mark

  11. #11
    Join Date
    Mar 2015
    Location
    SE Michigan
    Posts
    3,225
    Really nice progress, Mike. The leg profile and detail is really going to make this a great piece. I buy my stringing online, and the guy I use provides pretty consistent width. I see where the Veritas tools you have would be nice. I have used their inlay accessories for the router plane and I have the Latta radius tool...all of them get you there one way or another.

    It’s fun doing the curved stringing and I have challenged my way through setting up the jig. I have very little aptitude for figuring the curves and go with a lot of trial and error to get it right. I know many say you don’t need to miter the corners on stringing, but I do as well. Nice attention to detail, I think. Look forward to the next installment.

  12. #12
    Join Date
    Nov 2007
    Location
    Edwardsville, IL.
    Posts
    1,673
    Well, as always, speechless and impressed.

  13. #13
    Ooh Mahogany, it carves like nothing else, god I love Mahogany..

    Mike, those legs are a very ambious undertaking, usually the inlay and carving camps were mutually exclusive (thankfully). The most wicked difficult carving is that done in small areas. Thanks for sharing..

  14. #14
    Join Date
    Mar 2008
    Location
    Between No Where & No Place ,WA
    Posts
    1,340
    Nice working and I appreciate your comments and pictures about the string inlay.

  15. #15
    Join Date
    Feb 2011
    Location
    Carlsbad, CA
    Posts
    2,230
    Blog Entries
    2
    Thanks all for your very kind comments.

    Pete, I appreciate your suggestion about using thickness planner to get uniform stringing. Yes his application that makes me regret getting rid of some of my stationary power tools.

    Phil, if you don't mind me asking where do you buy your stringing online? I would prefer to buy it rather than spend the time to make it w/ limited consistency.

    Robert, completely right about Mahogany being great for carving- soft yet dense grain allows it to accept details. Interestingly this was sold as Sappele at one of the better lumberyards on me area who also sells "African mahogany".

    O would appreciate advice from my fellow Creekees- for the top of the legs I was originally planning oval marketry of a simple thistle and I'm wondering if maybe shallow relief fan would look more consistent ? Perhaps altogether too busy - maybe I leave plain?

    I really appreciate your advice and suggestions!

    Best, Mike

Posting Permissions

  • You may not post new threads
  • You may not post replies
  • You may not post attachments
  • You may not edit your posts
  •