Page 2 of 3 FirstFirst 123 LastLast
Results 16 to 30 of 45

Thread: Schooling on dados

  1. #16
    Join Date
    Oct 2010
    Location
    Australia
    Posts
    2,534
    Quote Originally Posted by Derek Cohen View Post
    Nicholas, you are correct. I misread that. Warren did write 1/16 wider than the blade, and not 1/16 each side. My apology.

    Regards from Perth

    Derek
    Derek; attached is a thread that Warren replied too back to 2015. https://sawmillcreek.org/showthread....den-dado-plane

    Stewie;

    Warren Mickley

    The nickers have to be wider than the cutting iron. If they are very close to the same width, the alignment has to be perfect to avoid trouble. The nickers also have to be wider than the body of the plane. If they are too close in width there is danger of the plane stock rubbing the walls of the dado, which gives problems also. You should not narrow the nicker blade unless you would consider narrowing the stock of the plane also. If there is 1/32 or less between the nicker and the edge of the blade on each side, you should have no trouble.

    5/16 is a common size for a dado plane. In historic times, rather than have a set of different size planes, they often got a 5/16 and made two cuts on the board, one for each edge of the dado. So for 7/8 they would make two 5/16 cuts and chisel out the 1/4 in the middle. This enables one to make a dado 7/16 or 27/32 or whatever with one tool. If you want a 1/4 dado, I would get another plane.

  2. #17
    Join Date
    Aug 2012
    Location
    Missouri
    Posts
    2,152
    Quote Originally Posted by Christopher Charles View Post
    Hi all,

    I'm making very slow progress on a NBSS-style tool chest for under my bench. I just noticed that it was exactly a year ago that I finished the rough milling of the lumber. Once I have more to show, I'll post a build thread.

    I purchased a LV Combo plane a bit over a year ago for the project, in part because I wanted to try dados by hand, and in part to upgrade my grooving plane. I fondly call it "The 17" because it has 17 adjustment knobs and it has proven to be a definite improvement over my vintage Record 043.

    This weekend, I final had a chance to work on figuring out dados with the plane. I did learn several things and discovered a potential issue with my copy of the plane. My spotty results were a combination of learning a new technique, tuning a new (complex) tool and a set screw that isn't quite up to snuff(?).

    Many, many thanks to Derek for his fine tutorial here:

    http://www.inthewoodshop.com/ToolRev...ane-dados.html

    Go read that and you'll know what to do. Read on for tips on what to avoid...

    First, Derek is spot-on in noting that the nickers are critical. I tuned mine before starting, rounding the tips and getting them sharp. However, I also seem to have nickers that are soft and they rolled after the six short dados I cut (see below). Fortunately I have a friend with a metal shop and won't have to fly blind for my first adventure in tempering.

    Second, Derek is also correct that getting everything dialed is tricky, especially the first time (or first several times).

    Third, dados are hard! Most of my issues I chalk up to user error in set up and technique. I did hit the sweet spot a couple times and could feel the magic, but it was fleeting. Lesson: while I did do a several practice dados, more practice was in order when trying a new trick.

    Lastly, at least some of my poor results stemmed from the blade moving, despite much checking of adjustments. Eventually I noticed that when the skates are perfectly aligned to the outside edge of the blade on both sides (so the nickers are also aligned), the lateral set screw does not quite engage the blade on my specimen. Only about 0.5 or 1 mm short, but enough that at least once it shifted and tore into the side wall of the dado, with nasty looking results. Anyone have thoughts on this? Would be straightforward to file down the casting so the screw could engage, but...

    Fortunately, the nappy sidewalls will be inside the carcass, so I'm not too worked up about it, but am keen to get it all dialed in. I found the process quick once I got rolling and oh so much nicer than the table saw. I did manage 1 out 6 that wasn't totally embarrassing.

    And again, thanks to Derek for his tutorial as I'm much further along than I would have been!

    Thanks all,
    Chris

    Nicker afterwards

    Attachment 404946

    Batten set up. Quick to set accurately with a combo square. Did one side then the other for each dado off the top as a reference side.
    Attachment 404947

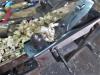
    Avert your eyes if you have a queasy stomach...here's the carnage:
    Attachment 404948

    And finally a photo showing the gap between the lateral set screw and the blade:
    Attachment 404949
    Be careful before taking a file to anything. The knob your trying to adjust is for wide blades to help set the skate to the blade. The smaller blade adjuster is on the other side.
    Jim

  3. #18
    Join Date
    Jun 2010
    Location
    twomiles from the "peak of Ohio
    Posts
    12,181
    After reading all of this....makes me glad all I have to work with is a Stanley 45, and the No. 39 3/8" Dado plane....

  4. #19
    Join Date
    Aug 2012
    Location
    Missouri
    Posts
    2,152
    Quote Originally Posted by steven c newman View Post
    After reading all of this....makes me glad all I have to work with is a Stanley 45, and the No. 39 3/8" Dado plane....
    Well by golly Steven. If your 45 is in full dress there are only two les screws to adjust than the 17 on the Veritas. That is if you have one with the fine fence adjustment. The two more screws on the Veritas includes the one mentioned above and the small blade adjuster
    Jim

  5. #20
    Join Date
    Jun 2017
    Location
    Raleigh, NC
    Posts
    210
    All this talk makes cutting dados with the combination plane look like a very fussy affair. Does it produce noticably better results in the end than sawing the side walls against a fence and chiselling/routing the waste out?

  6. #21
    Join Date
    Feb 2004
    Location
    Perth, Australia
    Posts
    9,494
    Quote Originally Posted by Stewie Simpson View Post
    Derek; attached is a thread that Warren replied too back to 2015. https://sawmillcreek.org/showthread....den-dado-plane

    Stewie;

    Warren Mickley
    The nickers have to be wider than the cutting iron. If they are very close to the same width, the alignment has to be perfect to avoid trouble. The nickers also have to be wider than the body of the plane. If they are too close in width there is danger of the plane stock rubbing the walls of the dado, which gives problems also. You should not narrow the nicker blade unless you would consider narrowing the stock of the plane also. If there is 1/32 or less between the nicker and the edge of the blade on each side, you should have no trouble.

    5/16 is a common size for a dado plane. In historic times, rather than have a set of different size planes, they often got a 5/16 and made two cuts on the board, one for each edge of the dado. So for 7/8 they would make two 5/16 cuts and chisel out the 1/4 in the middle. This enables one to make a dado 7/16 or 27/32 or whatever with one tool. If you want a 1/4 dado, I would get another plane.
    Well Stewie, you should recall the old adage of "let sleeping dogs lie". You cannot resist stirring. If you are going to cite that thread, then include a bit more than just Warren's comments.

    Fred Skelly had been asking about a 1/4" dado plane he was setting up. He wanted it to cut a 1/4" dado. I offered advice that, in a nutshell, was that he needed to adjust/fine tune the blade and knickers together so that the knickers still prevented any spelching. If you are up to it, it can be painstaking work setting this up, but it does work.

    After some trial-and-error work, Fred reported back with success. "As others said - the cutter, the sides of sole and those doggone nickers MUST all be coplanar. Correcting this was another noticeable improvement". What I should caution her is that the nickers need to extend wider than the body of the plane, otherwise the plane will bind along the straight edge. However one side can be coplanar.

    I spent a little time looking through my references last night. There really is not much available on setting up a dado plane on the Internet. In my own library there is a chapter by Michael Dunbar in his book, "Restoring, Tuning & Using Classic Woodworking Tools". He does not offer any useful advice on the width/placement of the nicker.

    The other reference I had was a video by Bill Anderson, who works with Roy Underhill at his Woodwright School. His recommendation was to have the nicker and blade at the same width.

    I believe that one will find few opinions these days because few people actually use these planes. I use them, but not that often. I tend to make more stopped dados, and a knife, chisel and router plane work well here. As noted above, my recommendation has been to create a closer relationship between the nicker and blade than Warren does. I have no doubt his method works. Mine does as well.

    For reference, I gave the HNT Gordon dado plane a few quick swipes across a board to measure the width of the dado created. I followed the set up procedure in my article. The result was a very clean dado without any spelching (I am happy to take a photo, but this is written in a lunch break, and I did not have time). Recall that the width of the blade is 12.7mm (exactly 1/2"). The dado measured 12.84mm. In other words, the nicker projects 0.07mm each side of the blade. Note that this is a standard set up for a modern dado plane (one reason why I asked Warren if we were setting 18th century or 21st century expectations).

    The reason I do not use the nicker screws on the Veritas Combo Plane is that I set the width with the skates instead. The nicker can remain flat against the sides of the body. The skates are opened (along with the body) to ensure that the blade is aligned a smidgeon inside the outer edge of the nicker. This is easier to do than is sounds. The result is, as I demonstrated in the article, very clean dados. (Keep in mind, Stewie, that I completed three dados alongside one another with three different planes. There was no room for error or fudging the result. any error would have been easily noticed).

    The best advice I can give at this point is that you go and practice yourself and decide what works best for you. That is NOT a choice between Warren or myself. I do get what Warren is suggesting. I am simply stating that it is possible to dial it in if you want to go to the trouble and are using a sympathetic dado plane.

    Regards from Perth

    Derek

  7. #22
    Quote Originally Posted by Steven Mikes View Post
    All this talk makes cutting dados with the combination plane look like a very fussy affair. Does it produce noticably better results in the end than sawing the side walls against a fence and chiselling/routing the waste out?
    The results for either method depend on the skill of the worker. For someone who can do either method, the dado plane is considerable faster. I think it also would have been easier to explain the need for clearance to an 18th century worker than someone today.

  8. #23
    Join Date
    Jun 2010
    Location
    twomiles from the "peak of Ohio
    Posts
    12,181
    Mine does in indeed have the fence fine adjuster....used it a couple days ago.

    However....note on the 45 on how it places the spurs/knickers...they are ahead of the cutters, outside edges of both are coplannar . And, I usually drag the plane backwards a few times, for the spurs to do their job first, then push to make the first cut...

    The 39s have spurs about the same as this new fangled plane....biggest trouble I have with those is they like to move a bit, inspite of 2 bolts holding each...

    Warren....post a photo of the spurs on a wood bodied dado plane...and how those line up with the iron....
    dado.jpgdrag lines.jpg
    Second picture shows the spurs doing their job, before a cut was started with the #18 cutter..
    set up.jpg
    set up....to avoid any "blowouts " where the plane starts and stops at..
    sawn lines.jpg
    Backsaw cuts just at the start, and at the exit points...I let the spurs handle the middle area..
    fit.jpg
    To aid in getting a filled drawer into the case, I cut a little "ramp" at the back corners...
    spurs.jpg
    Spurs..
    Last edited by steven c newman; 03-06-2019 at 10:36 AM. Reason: show & tell

  9. #24
    Join Date
    Feb 2004
    Location
    Perth, Australia
    Posts
    9,494
    Steven, to clarify what I wrote about setting up the nickers on the Veritas Combo, essentially I do it the same way as on the #45.

    Regards from Perth

    Derek

  10. Quote Originally Posted by Christopher Charles View Post

    And finally a photo showing the gap between the lateral set screw and the blade:
    Attachment 404949
    Christopher, this gap should not be there. The screw needs to laterally plate support the blade otherwise it will tend to wobble side to side as you plane (no matter how solid your fencing and plane movement).

    Do share a picture showing you full sliding section configuration in relation to the blade. I suspect your sliding section is not properly positioned. It needs to be pushed closer to the body so that your blade is symmetrically supported from below by 1) the support plate in the main body (this positioning is fixed) and 2) the support plate in the sliding section (this positioning is done by you by loosening the two sliding section locking knob screws and sliding the sliding section closer to the blade).

    Good luck!

    Another suggestion I would add is to make sure your cutting spur and your tool is overall very clean of splinters, shavings and sawdust. A lot of things can go wrong so go slow, take light passes, and remove shavings and splinters every two or three passes. Also make sure everything is pristine before inserting your blade into the plane. Splinters or sawdust will cause misalignment.

    Phil

  11. #26
    Join Date
    Feb 2019
    Location
    Seattle, WA, USA
    Posts
    1
    No, I don't set up all my planes with micrometers. I did the following exercise strictly to find my own answer to the question(s) I had about this thread. And, just because I at least try to be helpful on occasion, I hauled out a camera and recorded my efforts.

    Materials: Veritas combination plane, 1/2" cutter, scrap piece of dried (brittle) fir, digital depth gauge & digital caliper.

    1--With the cutter fully inserted and engaged I measured how far it extends beyond the skate of the main body, 0.010" (That's a function of the design of the plane - it's non-adjustable)
    1.jpg


    2--I adjusted the sliding section to get the same amount of cutter standing proud of the skate, also 0.010"
    2.jpg


    3--The width of the cutter itself measures out to 0.5000" and the width at the outside of the skates is 0.4980".
    3a.jpg 3b.jpg


    4--I get best results with thin cuts, so I set the blade to a depth 0.0025" beyond the runners of the skates.
    4.jpg


    5--When I first tried this plane I started out with deeper sets of the nickers and had problems with drag, bent tips, and waste wood wedged between those nickers and the skates. All we need to do here is slice ever-so-slightly deeper into the wood than the sharp edge of the cutter. I've found that the somewhere around 0.015" does just fine, but this is not a highly critical measurement! In other words, the business portion of the nicker only needs to extend about 1/64" beyond the cutter depth. Yes, the tips of the nickers look pretty rough - but that doesn't seem to have much of any effect on the fir I used. Whether they need to be more finely dressed for dadoing other species is beyond the intent of this post. As for the width - the nickers are in line with the outside edge of the skates. I removed and tossed those little set screws that allow one to flare out the nickers.
    5a.jpg 5b.jpg

    I did this in the backroom of my studio - not at my workbench. You can see the quick and crude setup I used, as well as the results of the cuts. I leave it to your imagination what you can do with a plane such as this - set up properly - with better wood, clamps, etc.
    6.jpg

    I hope this helps!
    Brent
    Last edited by Brent Kane; 03-06-2019 at 1:25 PM. Reason: Correct links to properly sized images / mistakes...

  12. #27
    Join Date
    Sep 2008
    Location
    N. Idaho
    Posts
    1,621
    Hi all,

    Thanks for the lively discussion. I'm finding it useful.

    I heard back from LV customer service. Here is their recommendation on the nicker (=spurs) issue:

    The Scoring Blades (05P5902) are quite delicate and should only protrude slightly below the skate (to a maximum of 1/32”) when cutting across the grain. It is possible that they rounded because they were protruding too far. They should always be sharpened to a point.

    As is typical, they have shipped replacements, which was not necessary (nor did I request) but I do appreciate.

    Here is the guidance with respect to aligning the blade, skates and nickers:

    In order for the lateral adjustment screw to make contact with the blade, we recommend not aligning the blade perfectly with the edge of the skate. Depending on which blade you are using, make sure that the skates are supporting the blade. This means that the blade will sit a hair out from the edge of the skates. As see in Figure 7 in the instructions (http://www.leevalley.com/en/wood/page.aspx?p=76198), the Spur Adjustment Screw can be used to set how far the spur protrudes from the face of the skates. What this means is that you can line the spurs up with the edge of the blade. After tweaking your adjustments, this should allow the lateral adjustment screw to make contact with the blade as well as keep the blade from wandering.

    This guidance is in line with Warren's and means the set screws would be needed to push the nickers outboard.

    Brent, thanks for the measurements and examples. Those measurements match what I got when I took calipers to my plane this morning. I suspect part of my issues may have been I had the nickers extended too far. Unfortunately, I won't have time to practice for another day or two.

    Derek, could I ask if your 'blade guide knob' engages the main blade on your plane when you have the skates aligned to the edge of the blade (as I had in my set-up above)?
    "You can observe a lot just by watching."
    --Yogi Berra

  13. #28
    Join Date
    Feb 2004
    Location
    Perth, Australia
    Posts
    9,494
    Christopher, the blade guide knob is tight against the blade.

    This situation reminds me of the efforts to quantify the distance of a chipbreaker from the edge of a blade. You do just enough to get the desired effect. An exact number, per se, can confuse the matter. As we find, the number for the nicker is very small.

    Regards from Perth

    Derek
    Last edited by Derek Cohen; 03-06-2019 at 6:55 PM.

  14. #29
    Join Date
    Sep 2008
    Location
    N. Idaho
    Posts
    1,621
    Hi Derek,

    Thanks and I agree this discussion has gone down a rabbit hole! Nonetheless, your reply gets me back to my original question.... With my plane, the blade guide knob will not reach the blade when I have the skate even with the edge of the blade (as per your tutorial).

    Thus,
    1) the blade remains unsupported if aligned with the skate on both sides (following your method with my particular plane) or
    2) the blade is outside the skates (as recommended by Warren and LV) and the nickers must be set outside the skate using the set screws or
    3) the nickers are inside the blade if the nickers are used without the set screws and are set in-line to the outside of the skate (undesirable all around).

    While it is picking nits a bit, I was unclear if the gap between the blade and blade guide knob was an intentional part of the design (apparently 'yes') or a short-coming of my particular plane. Mine appears to be in spec.

    I truly do appreciate the guidance here and am positive the best approach is practice. Nonetheless, it is helpful to know the best staring point(s) in terms of set up. At least I know two (three?) of the roads to Rome

    Steve, thanks for posting photos, I like your method of saw kerfs to limit spelching.

    Best,
    Chris
    "You can observe a lot just by watching."
    --Yogi Berra

  15. #30
    Join Date
    Oct 2010
    Location
    Australia
    Posts
    2,534
    The following measurements were taken from a dedicated 3/8" (9.52mm) wooden dado plane.

    9.01MM (sole width.)

    9.32MM (cutting iron width.)

    9.60MM (spur width)


Posting Permissions

  • You may not post new threads
  • You may not post replies
  • You may not post attachments
  • You may not edit your posts
  •