
-
Due to the nasty weather outside....had to reschedule the Doctor's appointment for today....which leaves the entire day to hide out IN the shop.....anyone want to stop by and help out?
Need feet profiles cut on the posts. Need a small cove bit run along a few edges...
Need to cut a few plywood panels.....and maybe try a bit of assembly later?
Film when I get done....may get started here, after Lunch?
Stay tuned..
-
Lets see...rebates needed cleaned up on the corner posts..
rebate cleaner.JPG
Mainly the ones to house the back of the case...set up a pattern, to cut a detail
new glue bottle.JPG
Has a nice, easy to cut curve...
pattern.JPG
Then over to the bandsaw (old style would just be a straight line, tablesaw cut)
two feet.JPG
Needed to get this done, before the cove cutter came along..
cove cutter.JPG
Not much room...
depth check.JPG
Got all 4 posts milled, and sanded down smooth. Then set up to cove the rails..
mid rail coved.JPG
Top rail and a mid rail. Top rail only gets one cove. All the rest get two.
rail set up.JPG
Tried to hold the rails between dogs....wanted to rock...mid rails at least.....stuck that skinny part on their back into the vise...had just enough room.
All the coves were now done.....took a short break, had to sweep the floors and general clean-up....
Stay tuned, BRB
-
Ok, clean up done....Installed that new saw blade in the tablesaw...
new tablesaw blade.JPG
And made all the plywood panels...once I remembered which way the grain was to go..
plywood panels done.JPG
Then cleared the top of the saw....and set up to assemble one side of the case..all parts are face down, during assembly..
assembly start.JPG
Top rail installed. Added a couple clamps to draw things tight...Square to check the corners...3 nails each side. then added a panel and a mid rail..
first panel installed.JPG
Panel sits in a bead of glue, all the way around. 3 nails at the corner posts, one nail into the mid rail. Mid rail checked for square, and nailed. Then work the rest of the way down..
all done (2).JPG
can set this one aside...
first side done.JPG
And start on the other side of the case...
second side start.JPG
Since the nails were only 1/2" long, I needed those pliers to save me fingers....
both sides done.JPG
Got both sides of the case assembled....
Taking a very LONG break, right now...might have done just enough for one day. Still have to drill pilot holes one the ends of the webframes, and attach those with a few 2" long screws.
Stay tuned
-
Had to return to the shop last night....cold fingers had somehow allowed the wedding ring to come off the finger...somewhere. While IN the shop, looking through the sawdust ( nothing..)I also got the clothes out of the dryer, to bring upstairs....decided to try out a pilot drill and bit...and a countersink and brace...wound up attaching three webframes to one of the sides..screws, and glue...have a Doctor's appointment this morning....will see how I am doing when I get back home.....may try to finish the case?
I worked a LOT faster, back then....I would have only needed 4 hours to get this far into a build....kind of taking my time, nowadays? Hope nobody minds this slower pace...")
Stay tuned
-
Took a while....but
2 done, on the lines.JPG
With a bead of glue under each frame...2" screws. Got one side assembled..
side 1 attached.JPG
Working with the rebate towards me, as I wanted each frame flush with the rebate..
location at the back.JPG
So the back panel has some support..
back panel fit.JPG
About like this. Then the tricky part....set this assembly aside, set the other side onto the "work table" and add a bead of glue to each frame, lift the assembly up onto side 2, line up all the marks....and add a few screws. Added a few clamps, while the glue and screws cure out...
both sides assembled.JPG
Letting this sit awhile, before I can set it on it's own four feet. Then cut a back panel to size, and install it....and keep the case squared up. Then, maybe work on a face frame?
Tool?
tools, drills.JPG
Pilot hole drill, countersink brace...nothing fancy. Screws sit in a counter sunk pilot hole
countersunk.JPG
Old days, these were counter-bored with a spade bit....with a strip of masking tape as a depth gauge. 
Stay tuned
-
Need to set this down onto the floor, without the clamps. need the tablesaw to cut a panel for the back of the case, then see about attaching the back, while getting, and keeping the case square...anyone want to stop by, and help out? May need to use a chalk line to mark one edge. Cut-off from that will yield two drawer bottoms..IF I cut it just right..
May attach the face frame parts to the front, with a dovetail connection...and a single, counter-bored screw in the center. Olden Days, in the North Main Street Shop, I was just using a bead of glue, and a few ring shanked nails ( think those nails used to install wall paneling). Problem was that a gap appeared where the posts and the face frame met....
Stay tuned...the cussing is about to start..
-
Ok..clamps removed..
unclamped.JPG
Set it aside, for now...hauled the plywood to the shop...at least the one for the back of the case..
too big.JPG
Hmmm, ok...IF I cut this just right..I'll have a 1/4" x 26" x 40" panel, and a strip i can cut in half for 2 drawer bottoms...in theory....but, it won't be with this tablesaw...
cut for width.JPG
26" wide panel...need to chalk a second line and cut the 40" length...
cut for length.JPG
Clamped to the saw, so it won't move. Set the case up on the bench...barely
onto the bench.JPG
Barely..
rocky.JPG
Plan is to attach that panel to the back of this case, while pulling the case into square....bead of glue down one rebate, and 1/2 way out on to the webframes, made a mark at the side of the case where each frames center line is. Run a few 1-1/8" screws....spin the case around, pull into square (1/8"out) and glue and screw that edge down, after marking where the frames are..
Then add screws to the frames..
back is installed.JPG
And set this onto the floor..for a bit....sized the top pail rail of the face frame...set the case back onto the bench...
chip makers.JPG
As these two had some work to do.....
Stay tuned.
-
Last I looked, these chips were falling..
chips.JPG
Had the top rail ripped for width, and cut for length...along with a couple other cuts....to fit here..
half a tail.JPG
managed to get both ends to fit...bead of glue, and a few clamps...
detail dovetail.JPG
Actually, a bunch of clamps...
done for the day.JPG
Ok, how about a look at the outside of the case?
end view, outside.JPG
And a close-up?
details, outside.JPG
Thought I was done...until the work coat, and the shop apron needed to go in the washer...getting a bit "gamey"....decided to cut and install the 4 corner blocks, to allow me to attach the top..
NOW, I'm done for the day...Stay tuned
-
Corner blocks?
corner blocks.JPG
Had a problem today...needed to cut a few more rails for length...
miter saws.JPG
Unable to even get to the miter saws, let alone the tablesaw...dug around in a drawer...
GEM mitre box.JPG
A folding miter box by GEM...couldn't reach the backsaws..but there was a saw on the side of the saw til..
D8 panel saw.JPG
Disston D8 ( no hyphen) 10 ppi panel saw...worked great.
wide apron.JPG
Had one board a bit wide....clamped it in place.
cut to length.JPG
All rails, cut for length. Dovetail "Tails" needed marked out..
tail layouts 1.JPG
Dovetail bit to find the angle, bevel gauge to repeat the angle, bandsaw to split the lines..
easy ones done.JPG
The 4 skinny rails were easy enough to do...
-
Ok..the wider rail at the bottom of the case..took a few more cuts, to do...
not so easy one done.JPG
needed a better way to set the case on it's back, so I can chop the sockets these tails go into...
plan B.JPG
Hmmm, finish cleaning this off, open the top all the way, and..
workmate joinery bench.JPG
A Work Mate Joinery Bench....Side being chopped is clamped down to the top of the "bench"
another socket done.JPG
Hammer and chisel...worked my way down one side..
one edge done.JPG
Then rotate this mess around, and work back up the other side...
start back up the other edge.jpg
Figured I could glue them in place as I went...one problem..
ran out of clamps.JPG
Ran out of C clamps after the first three rails....have two more to glue up....waiting on the glue to dry, first.
Stay tuned..
-
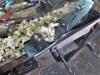
The story on that Work Mate. A neighbor a few years back, decided to clean out his garage.....and WAS going to just throw the Work Mate in the dumpster....wound up in my shop, instead..free.
Final two rails are now clamped up....bottom two are now planed and sanded flush to the sides of the case. A cove detail was run along the bottom edge of the bottom rail. Will try again tomorrow. Maybe I can get those folding feet to actually fold...and lower the work to where I can reach things better?
-
All dovetail connections are now finished....even the tall one...
worst for last.JPG
Took a while this morning, to get them all smoothed down...
dovetail cleaned up.JPG
Even that tall one..
last one done.JPG
Cove details?
bottom rail details 2.JPG
and..
details,bottomrail 1.JPG
Finally removed all the clamps, set the case down on the floor, dumped out all the chips, shavings and sawdust crud out, swept the shop, and put away the Work Mate..
face frame done.JPG
face frame is done....need to work on a top, later...3 board glue-up of a 1 x 10...after I get the 8' long board to the shop, cut it two times, joint the edges....And get it into a few clamps.
Might even get a start on the drawers? Hmmm, which drawer to do first...top one, or work from the bottom up?
Stay tuned....
-
hauling a 1 x 10 x 8' plank to the shop, wasn't a lot of fun....Kitchen ceilings are 7', the header near the bottom of the stairs is shoulder high on me...Used the case as a place to cut the board down a bit...Saw Table?
saw table.JPG
needed a couple sections, 28-1/2" long...first part of this plank wasn't too bad..
good section 1.JPG
But, there was this little bit right after...
knotty split.JPG
Cut the knot out, and it split...next section wasn't too hateful...set it over on the bench with the first one..
blanks for top.JPG
18-1/4" wide, by 28-1/2" long....will give mea 3/4" overhang along the front of the case...I even had some leftovers...
leftovers (2).JPG
Will save this, in case a drawer needs better parts..flipped and flopped the two blanks, looking for the best match, and made an X
x marks the spot.JPG
Fold this up..
fold it.JPG
run the Cordless Jointer..
jointer.JPG
And glue them up..
Stay tuned..
-
Blank for the top, is in the clamps, will let it sit overnight..
top glued up.JPG
Thought about starting in on a drawer...but would involve hauling another plank to the shop...
hang the apron up.JPG
Instead, I hung up the apron, and called it a day...
Stay tuned..
-
Need to get this out of the clamps...but....the "Monday thing" .....might wait til tomorrow....we'll see...depends on how bored I get..
 Posting Permissions
- You may not post new threads
- You may not post replies
- You may not post attachments
- You may not edit your posts
-
Forum Rules


 Reply With Quote