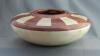
5 1/2" dia. poly finish.


 [OP]
Member
[OP]
Member
5 1/2" dia. poly finish.
C&C WELCOME
 Contributor
Very pretty, Allan. I gotta try one of those
~john
"There's nothing wrong with Quiet" ` Jeremiah Johnson
 Member
Nice bowl. Is the feature rings epoxy and what is your process of doing the ring??
Fred
[OP]
Member
The rings are maple and Paduk . If you are working with a block of wood, you can cut off a slice from what would become the top. Glue in the colored layers making sure that all surfaces are flat and wood grains are aligned . Clamp in the lathe. If starting with a round stock , mount in lathe and remove the top portion, true up, then glue in the colored layers. You may have to glue one layer at a time . Trim the layers and turn. Not for end grain turnings.Originally Posted by Fred Belknap

C&C WELCOME
 Moderator
As for flattening, Frank Penta does a lot of pieces with glued veneer and thin resawn slices. He uses Performax drum sanders to flatten thin pieces as needed. I do that as well and also flatten the large blanks before gluing. If flattening a piece turned on the lathe it's easier to use coarse sandpaper glued to a flat block of wood after it is hollowed at least a little. (One reason for this method is to pre-hollow a deep lower section before gluing on other layers. This is the way I usually make Beads of Courage boxes/lidded bowls from dry wood since hollowing the thinner individual layers is a lot easier than deep hollowing the entire glue-up. For example, this is three layers, each pre-hollowed before gluing except for a thin web to keep each on the lathe, flattened with the sandpaper stick trick:
BOC_A_CU_IMG_5374.jpg
Harvey Meyer has some BOC youtube videos where he shows this technique with two layers, including the sanding block trick.
But you can actually glue end grain together with a trick. For example, I wanted to do some chip carving on a layer of basswood on a goblet. It's important to chip carve on side grain so the basswood layer needed to be in end grain orientation to have side grain all the way around. The other pieces for the goblet, such as the stem, needed to be end grain as well. I knew gluing end grain to end grain can be a problem, so I called and asked Frank. He said it will work fine if I simply glue a layer of cross grain between each end grain pair.
This goblet has cherry top and bottom and basswood in the middle, separated by thin layers resawn from a walnut board. Tightbond III.
chip_goblet_glueup.jpg chip_carved_goblet_c.jpg
No sign of separation after several years of seasonal changes.
JKJ
 Posting Permissions

 Reply With Quote