-
Have now been informed by Grandson#3, that he has a decent computer desk....so....we will change the intended design a bit....GrandBRAT Diva loves to sit and draw,,,and sit and watch her ipod. Does not have a computer of her own...yet....so this desk will be more for her. Like a Underhill "Rachel's Standing Desk" but one she can pull up a chair to.....
This being a Monday...shop is closed. I can do a little re-design work....mainly on the desk part. Right now, I still have about 12bf of that Ash....four 1 x 6 x 6' planks,,,,should be enough..also have a decent stack of cut-offs....
shop.jpg
Sitting back there on the sanding center...have a brand new 1/2" wide bandsaw blade, in case I need to do any resaws...don't have to worry about fitting a keyboard into the desk, now. Which leaves the entire inside of the desk to build "cubbies" into, for drawing supplies...
First, I need to get the base done...one thing at a time, right?
-
Last night, while down in the shop on Laundry Detail (clothes from the washer into the dryer sort of thing) removed a few clamps. Added some glue, added some corner blocks..
corner blocks.jpg
Used a hammer/driver to install the screws....
hammerhead.jpg
2 screws to each blocks seems to do just fine. Drill will drive the screws in, then will hammer them tight enough to raise a bead of glue.
Diagonals show things were a tad out of square....maybe an 1/8"......
diagonal clamp.jpgPulled the "long" side back a bit
Thought about shop clean up....pile of sawdust was swept up...bench was cleaned off..
messy.jpg
Shop Cat likes a pile like this, to take a nap on.....
After the Boss gets her errands ran today....I need to add the cross stretchers that will serve as a foot rest....then start on the reading/drawing desk parts....
Stay tuned 
-
This may be a two-parter....not boring anyone, am I?
Anyway, clamps came off this afternoon...Laid out and drilled two holes..
IMG_7284 (640x480).jpg
One center, the other about halfway to the back leg...Counterbore first, then a pilot hole. 1-1/8" screw and some glue...will mill a few plugs later...while the pilot hole drill was handy..
IMG_7285 (640x480).jpg
Made a slotted hole in each corner block...set the base aside...
IMG_7287 (640x430).jpg
View from the front of the desk. Brought a plank down to the shop cross cut for lengths needed...had to find the exact center of the boards..
IMG_7288 (640x480).jpg
Center of the saw blade at 3"....had to joint one edge, set up the rip fence, and rip two longs and two shorts..then the fun could begin..
IMG_7290 (640x427).jpg
Mitered the ends...mill a tongue on the ends of the shorts
IMG_7289 (640x480).jpg
Fun part was doing the matching grooves
IMG_7291 (640x480).jpg
Trying to get it the right wide....
Need to clean the grooves out..
IMG_7292 (640x480).jpg
Stay tuned for part 2....
-
Part 2: cleaned out the grooves..then had to do a bit of trimming on the tongues
IMG_7294 (640x416).jpg
Then a test fit...
IMG_7293 (640x464).jpg
Repeat for the other corners...tried some old corner clamps...and some other clamps, and a bit of glue..
IMG_7295 (640x480).jpg
Will let this mess sit a spell....I even swept the floor, today!
IMG_7296 (640x480).jpg
Even put this old Buck Brother chisel to work....
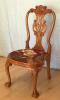
Next time in the shop? Build the desk/hutch.....something like this one..
SDC14915.jpg
Hmmmm.....
-
Ok, frame is out of the clamps, slotted holes in the corner blocks aren't needed ( missed anyway)....8 counter-bored holes drilled...screws installed, plugs made, glued in place, and trimmed flush
attached.jpg
Plugs?
hide a plug.jpg
There IS a plug there..where?
pointer.jpg
Why, right here, of course. Ran the cove bit around
molded edge.jpg
May fill in the joint, later....dug up a piece for across the front..
desk front.jpg
needs trimmed for length, edges jointed....the usual S4S thing....need to bring the last 2 planks to the shop....and cobble up a few sides, and a back....and the lids....need a plywood panel, set into a rebate I need to mill around the inside of the frame...FUN is about to begin....after I get rid of this chest cold...
Stay tuned....
-
had 3 boards still upstairs....picked out one, and hauled it to the shop....used that narrow board to figure out the lengths needed....and, once the issues with a mitre gauge were ironed out..
back and front.jpg
Used these two to mark out the lengths for two side/end pieces...fought the mitre gauge again...about ready to toss it....used a 3-1/3 to 4" as the top shelf wide....draw a diagonal down to where the 2" wide front is....bandsaw to make a cut..
1 end.jpg
Used this as a pattern to lay out the other one..
2 ends.jpg
Now, all 4 parts are still a bit rough sawn...had to S4S all 4 of them...the ends were ganged up, so they would match...
jointer.jpg
After a while, that old #6c started to get a bit heavy....set all 4 parts aside..
4 parts.jpg
Until tomorrow...too tired and sore...battling a chest cold, too boot...
Stay tuned...may try some through dovetails, next...")
-
Dovetails have been started...would have been completed, except for a very bad Maigraine Headache attack
IMG_7320.jpg
Dry fits
IMG_7321 (640x480).jpg
Nay try to finish the front ones..whenever the eyes return to normal..
IMG_7325 (640x480).jpg
Spent last night in Lima Memorial Hospital for Observation ( possible light stroke) Not a "fun" evening..
-
Hope you get well soon Steve!
-
Trying to....somehow lost an entire day....Friday....Now have the computer "issues" cleared up....what I have from the shop is from Thursday's efforts....before I had to stop...
High stress levels = High BP....triggers the Migraine attacks....to the point they act like a T.I.A. mini stroke....throw in a chest cold....not a fun day..
Anyway, this is about building a desk of some sort....GrandDaughter loves to sit and draw....Grandson doesn't need a new computer desk....so....we be doing a Rachel's Standing Desk that GrandBRAT Diva can sit down at, and draw all she wants. She will have to provide the chair of her choice....
Through dovetails: needs a few toys laid out, to do the layouts, so..
tool kit.jpg
That bevel square? Seems the end had been trimmed to almost the exact angle I needed to start laying out the pins. I thought about using those dividers...merely marked off the spacings from each end, towards the center. Blue knife to do a "knife wall", marking gauge to strike a line or two...combo square to mark the cut lines for my dovetail saw..
dovetail saw.jpg
As I do pins first. Then a bit of chopping, first one face..
first chops.jpg
Halfway down, leave the tab for support, flip the board over..
pins.jpg
Clean things up. I also worked on the other end of this board, tried to match the pins on each end...tried. Marked the sides for which side goes on which end...stood one end up, traced around the pins..
sawn.jpg
I used the bandsaw for these cuts, mainly because I could see ( barely) where I was cutting, trying to leave the lines, cutting on the waste side.....extra cuts to help in chip removal..same as with the pins, chop halfway down from each face....finally..
tails chopped.jpg
Added the board to save the top of my bench...then a dry fit...
dry fit.jpg
A little snug, better than too loose...got the other end done..
front pins.jpg
Then tried to get the pins done for the front rail....and this was as far as i got....vision issues, was only seeing 1/2 of what was going on...closed the shop...
Then lost Friday...not much going on today...beyond sitting and watching it snow.
Stay tuned...will start back when I feel better...
-
Not much in the way of photos, this time....more of a plan session.....need a lid made....I had a fancy grained plank for the lid.....had. IF you sight down an edge of the board, you will see way too many waves going on....grain was a bit too wild, I guess. May cut the flatest section out, and use it as the top "shelf" where the lid will hinge to. I have a second plank that does look a lot straighter....
Need to do a glue-up. 2 pieces 30" long, or at least that long....width of the panel needs to be 11-1/2". Plank is 5-3/4" wide, and 70" long...should be enough. The "fancy grained one will be cut for the 30" long shelf. May be able to save a couple strips for use as a bread board edge (2) maybe 1-2" wide?
Still working on the inside plan....not sure what I'll have to use.....will need some LONG, but thin stock...we'll see.
-
Back at the start of this project, when I was cutting stock for the legs....I had a stack of thin pieces that were resawn off the legs. Decided to keep them around, at the time....have now found a use for most of them...couple might be a tad too thick....we can fix that. Need a shelf at the back of the desk, with a front "rail" to keep things from rolling off. Need a "pencil box" up at the front....may get pencil grooves?
Some versions have a couple drawers at the back....Follansbee had four tiny drawers. I have enough cut-offs, I can resaw a few into drawer parts...and can just nail them together...maybe the size of pens?
Well. I have the long thin taken care of....need dados for them to sit in..then do the full glue-ups..by about next weekend...brain ain't bad to full speed..yet...may give it another day...
Stay tuned
-
Decided to try a bit...work until I get tired out, then head back upstairs.
Needed to at least finish up the dovetails on the front of the desk....
Used the pins to lay out the tails..
IMG_7327 (640x480).jpg
Make a few cuts on the bandsaw..easier for me, than a handsaw....do a bit of chopping from both faces..
IMG_7328 (640x480).jpg
Not the easiest things to clamp down....then a dry fit, or three..
IMG_7329 (640x480).jpg
Until things fit. Then repeat for the other end.....then dry fit all the sides..
IMG_7330 (640x480).jpg
A look at the side?
IMG_7331 (640x480).jpg
Just a dry fit. Clamped to hold things still, while I get some of the thins cut for length...thins needed to be planed S4S
IMG_7335 (640x480).jpgIMG_7337 (640x480).jpg
Had some 1 x 6 scraps....needed ripped..
IMG_7340 (640x480).jpg
Will resaw these to 3/8" or so, to build a couple simple drawers. Also sized a few pieces for the pencil well....
That was about it for today....been coughing hard enough, ribs are hurting...
Stay tuned...will see what an hour tomorrow brings..
-
Inside the front of the desk. Will be a pencil tray/well. Got pieces milled for the pencil holders..
pencil holders.jpg3 pieces.
These will go on the inside. Two will get a pencil groove or two, center square will not. May dig out the old router table and set up a fence and a small cove cutter bit. Run the holders through a few times.
Holders and the center will be glued in place. There will be a thin "backer" strip behind them. Ends of which will set in a stopped dado, then glue and nails to attach to the holders.
IMG_7337 (640x480).jpg
Surfaced S4S, may round the top edge a little bit. Need to change the bandsaw blade...1/4" to a 1/2" wide 6tpi....and rip drawer parts for thickness. Then surface those S4S. Follansbee merely naile his drawers together...may do the same.
Stay tuned
-
OK...dug the router table out of storage, tracked down the 2 wrenches to change the bits with...set it up with my do-everything fence/guide...
IMG_7345 (640x480).jpg
Added a small cove bit..
IMG_7347 (640x480).jpg
Set up to mill a couple pencil grooves..
IMG_7348 (640x480).jpg
Had a second piece that also needed these done..
IMG_7349 (640x480).jpg
And that was it for the router table....used the wrenches to take the bit back out..
IMG_7350 (640x480).jpg
As this $5 router needs them for it's collet
IMG_7351 (640x480).jpg
When was the last time B&D made all metal routers? Metal part of the table is by SKIL...so, all done, put this away
IMG_7357 (640x480).jpg
Until needed again. Rest of the limited shop time today? Involved chopping these..
IMG_7352 (640x480).jpg
Will cover this in Part 2...coming right up
Stay tuned
-
Part 2.....Decided to chop out places for the "thins" to go into...
IMG_7354 (640x480).jpg
This one was a bit easier to do...saw and chop until a decent fit occurred,,,
IMG_7353 (640x480).jpg
This is for behind the pencil holders. The other "thin" was chopped out, as well...
IMG_7355 (640x480).jpg
Drawers will ride on this one. Doesn't NEED to go all the way to the back....drawer sides will be long enough. I want the drawers to slide out enough that you can get into them, without taking the drawer all the way out..Had a bunch of chisels at work, today...
IMG_7356 (640x480).jpg
Much better than a screaming router....
Got this one side done. Decided that was enough for today. IF I get bored, and rested up....I may go and do the left side's mortises...
Stay tuned..
 Posting Permissions
- You may not post new threads
- You may not post replies
- You may not post attachments
- You may not edit your posts
-
Forum Rules


 Reply With Quote