Looks great Jim....


 Contributor
Looks great Jim....
Army Veteran 1968 - 1970
I Support the Second Amendment of the US Constitution
 [OP]
Moderator
[OP]
Moderator
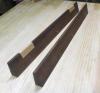
And so it begins...
IMG_3550.jpg
--
The most expensive tool is the one you buy "cheaply" and often...
 Friend of the Creek
That turned out great, Jim. The manufactured live edge looks very natural. I actually like the mix of the lighter boards. Wouldn’t bother me at all if it didn’t age to the same tone. So did you end up doing anything on the outer edges to lighten them up?
[OP]
Moderator
Phil, thanks. Following the same line as the original natural edge when I cut off the nastiness made things continue to look "natural" because everything still is in alignment with the grain pattern. I decided not to try and do any lightening on the edge...I needed to move this along because of other work. Small shop. Big table top. Etc. It will work well for the intended purpose.
--
The most expensive tool is the one you buy "cheaply" and often...
Member
Very nice. I dont have a domino but I always use dowels to line up glue ups like that. Makes is a lot easier imo.
[OP]
Moderator
Yes, being able to index "something" from one surface (the top in this case) make for a much easier glue-up as well as the subsequent sanding steps. Domino, dowel, biscuit, whatever...doesn't matter.Originally Posted by Dan Baginski

-----
I shot more coats of finish on this afternoon once the shop got a little warmer. The overnight outside temps got down to that point of single digits where the MiniSplit, while still keeping up reasonably, was not able to keep things at the set temperature. (The wind-chill is still horrible outside...should mitigate by tomorrow morning) I'll have a little leveling/polishing to do but I think this should soon be done.
Last edited by Jim Becker; 01-21-2019 at 4:36 PM.
--
The most expensive tool is the one you buy "cheaply" and often...
 Contributor
I love using old wood. The end result can be far better or worse than planned. That puts adventure into the build.
Charlie Jones
 Contributor
That looks great Jim. Can’t wait to see it on the base once you’re done.
[OP]
Moderator
I should be able to do that by the end of the week or so...the top is "finished" (literally). I had some troubles with that because of finish not laying down (gun issue) and had to move to an alternative after leveling it carefully. So uncharacteristically for me, it now has an oil based polyurethane varnish on it and I had to work around my CNC activities to avoid dust issues. I didn't have any more of the water borne product and my budget is a bit tight right now. If this was for a an external client, I would have stripped it back to bare and started over, honestly. And I ordered a new spray system...ching...ching...
--
The most expensive tool is the one you buy "cheaply" and often...
 Member
Hey Jim, Many years ago you recommended the Wagner conversion gun and that is what I bought and have been satisfied with. I am currently looking for a new spray system and would appreciate your insight this time around also. May I ask what you picked?
[OP]
Moderator
My Wagner served me well for a long time, but it's just getting long in the tooth. I'll dedicate it to shellac and also keep it for a spare. I also have the remote pot version for when I need to get into tight spaces. On John T's recommendation, I ordered the QualSpray AM-6008 HPLV Spray package with the PPS cup system from Homestead Finishing (Jeff Jewitt) to be my new main spray system. The package was $385 shipped from his EBay store and I should have it Thursday or so.
--
The most expensive tool is the one you buy "cheaply" and often...
Member
Thank you!
[OP]
Moderator
My pleasure, Art. The Wager was (and is) a decent gun for the money. I need to up my game a bit and cannot afford issues at this point because I'm now producing stuff for others and getting paid for it. For personal things, I can dance around issues; not for paid work. I'm looking forward to the QualSpray setup and what it brings to the table based on John's comments over time and in direct correspondence.
--
The most expensive tool is the one you buy "cheaply" and often...
Contributor
Very impressive. A great addition to your home.
Charlie Jones
[OP]
Moderator
Just to close this out, the table was "installed" today...I'm really pleased with the final result in most respects. There were some struggles with the finish due to an issue with my gun, but I overcame that using alternative products and application methods. Once the cherry sits here in the sun for awhile, the contrast between it and the base will be great. It's nice that my CNC got to help with both the base and the top, too. Tosca (Senegal Parrot) and Sammie (Cockatiel) approved of the table as you can see...
IMG_3652.jpg IMG_3654.jpg IMG_E3655.jpg IMG_E3657.jpg
--
The most expensive tool is the one you buy "cheaply" and often...
 Posting Permissions

 Reply With Quote