Page 1 of 2 12 LastLast
Results 1 to 15 of 19

Thread: A Pair of Three Legged Stools

  1. #1

    A Pair of Three Legged Stools

    MsBubba decided I needed to make a pair of shop stools for the boy child and the SIL's Solstice gift. Of course that was announced the day before yesterday and we leave for Houston Friday week*. It's doable if I make staked stools and the legs do not take too long to form. I like octagon legs on staked furniture but being old, slow, and not liking to be over a plane more than an hour or so before taking a long break. Making the needed six legs could take a couple or three days to form because I'm working right up to the time we leave. I could turn 'em but boring.

    Machines to the rescue. I made a jig, simular the one I use to form the legs with a plane, to hold the leg blanks so I could run 'em through the planer. A day for the glue to dry on the jig and a hour running the six blanks through the planer and I have six octagon legs that just need five or ten minutes on the lathe to turn the tenon.

    The jig:

    legJig.jpg

    The Legs:

    stoolLegs.jpg


    An hour or so drilling the mortises. A couple or three more fitting, wedging, and cleaning up and those suckers will be finished. An ataboy from MsBubba? Not a chance it is just expected :-).


    ken


    *Texan for the Friday a week from the coming Friday.

  2. #2
    Join Date
    Jun 2010
    Location
    twomiles from the "peak of Ohio
    Posts
    12,166
    Hmmmm, seen in a store window a while back..
    SDC15210.JPG
    Something a little different..

  3. #3
    Quote Originally Posted by steven c newman View Post
    Hmmmm, seen in a store window a while back..
    SDC15210.JPG
    Something a little different..
    Steven,

    Interesting in a train wreck kinda way. :-)

    Mine will not be quite as primitive but who knows which works better.

    ken

  4. #4
    Join Date
    Aug 2007
    Location
    Dickinson, Texas
    Posts
    7,655
    Blog Entries
    1
    Interesting concept on the leg horizontal braces.

    I started to say leg stretchers, but I was not sure of the definition of stretcher.

  5. #5
    Join Date
    Feb 2004
    Location
    Perth, Australia
    Posts
    9,491
    Ken, what length the legs, and have you decided in the angle you will offset them? How do you plan to drill the holes?

    Regards from Perth

    Derek

  6. #6
    Quote Originally Posted by Derek Cohen View Post
    Ken, what length the legs, and have you decided in the angle you will offset them? How do you plan to drill the holes?

    Regards from Perth

    Derek
    Derek,

    Legs will be about 650mm. I'm not sure yet but I expect the sightlines will be close to 25* with the resultant around 10* for two of the legs. The third something less than 10*. The mortises will be drilled with a brace and then reamed. I'll know more tomorrow. I guess I should add the seat will be rectangular and stool height low for working at the bench not bar stool height.

    ken

  7. #7
    Join Date
    Jun 2010
    Location
    twomiles from the "peak of Ohio
    Posts
    12,166
    Not my design....there was even a second one in that window...that matched the first one...

  8. #8
    Quote Originally Posted by steven c newman View Post
    Not my design....there was even a second one in that window...that matched the first one...
    Steve,

    I figured that.

    I like vernacular furniture but that one is a little too vernacular.

    ken

  9. #9
    I didn't do any tick tock photos of the the first stool drill and fit of the mortise and tenons. Did a little today on the second stool. After shaping the legs I marked out the position of the mortises and the sightlines on the bottom of the seat. Once marked I drill the mortises. The first step is aligning the sight line with references. I like three, the location of the mortise center, a mid reference, and then a far reference.

    stoolLiningUpSightLine.jpg

    Next I aline the center of the brace with the other two references.

    stoolBraceWithSight;ine.jpg

    Then check the resultant and start drilling. I will stop and check the sightline and the resultant every two to four turns.

    stoolBraceAlineWithResultant.jpg

    Last a photo of the legs dry fit to the seat.

    stoolDryFit.jpg

    The tenons on the legs are very easy if you have a lathe, get 'em close on the lathe and then use a hand held tenon cutter for final fitting. Next up is shaping and cleaning up the seat, sawing slots for wedges in the tenons, and then a little hide glue and knocking those suckers home. Once the glue dries trim the legs so the seat is level and put some finish on. More than likely Danish Oil because it cures quickly and I do not have a lot of time.


    ken

  10. #10
    Like the tick tock photos.

    I like to drill using Peter Galbert’s mirror method. Keeps me honest in two dimensions.

    I use the same method as u for doing the tenons. However, am finding lately it’s easy to get perfect off the lathe. Especially since The tenon can be slightly undercut if it being wedged.

  11. #11
    Join Date
    Aug 2012
    Location
    Missouri
    Posts
    2,152
    Interesting build. The design seems interesting too. Care to explain your design requirements? Good to see your bench at work also. It looks to be right at home with the gear layed out.
    Jim

  12. #12
    Quote Originally Posted by Prashun Patel View Post
    Like the tick tock photos.

    I like to drill using Peter Galbert’s mirror method. Keeps me honest in two dimensions.

    I use the same method as u for doing the tenons. However, am finding lately it’s easy to get perfect off the lathe. Especially since The tenon can be slightly undercut if it being wedged.
    Prashun,

    I've thought about using a mirror but I'm use to just checking often, old dog new tricks don'tchknow but I may give it another go..

    I'm not that good with the lathe, bad spendels, chisel handles, and tenons are about the end of my ability.

    ken

  13. #13
    Quote Originally Posted by James Pallas View Post
    Interesting build. The design seems interesting too. Care to explain your design requirements? Good to see your bench at work also. It looks to be right at home with the gear layed out.
    Jim
    Jim,

    I wanted a workbench height not bar height and I didn't want a round seat. I figure you can buy a round seat stool made in China all day at the local unfinished furniture store for $19.95 USD. Also because the boy child does a lot of outdoor cooking I wanted three legs for stability on any surface.

    Thanks for noticing, yep it has been my goto bench from day one. I may swap bench positions with the French/English bench in the near future.

    ken

  14. #14
    Some days the magic works, some days it doesn't.

    Both seats split when I set the legs. When setting the legs you should tap 'em in just until they sound "right". If you add a tap a split is likely. The first seat split in two places. I did not think I had done the extra tap but the results tell the truth. I was able to save the legs, they will live to be used on another day.

    I was extra careful with the second stool, so careful when I turned it over the back leg fell out. Back to the tap-tap-tap drill. When I turned it over everything looked ok so I started wedging the legs. The wedges drove in true and everything looked good up to the last wedge just as I finished the seat split.

    I'll probably keep the second stool, butterfly the crack and use it in my shop.

    There isn't enough time to start over so I'll have to figure out something else to give this year.

    ken

  15. #15
    Join Date
    Nov 2018
    Location
    Coffee City, Texas
    Posts
    169
    Ahhhh...now I know why that shave horse design I saw had the legs mortised into bearers which were then fit into sliding dovetails in the seat! It all looked so unnecessary until now. 
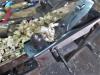
What wood did you use for the seat Ken? Do you think a less split prone species would have made a difference?
    Dojo Kun, 1: Be humble and polite.

Posting Permissions

  • You may not post new threads
  • You may not post replies
  • You may not post attachments
  • You may not edit your posts
  •