Page 1 of 2 12 LastLast
Results 1 to 15 of 18

Thread: Cutting Tenon Cheeks on Sliding Table Saw

  1. #1
    Join Date
    Dec 2010
    Location
    Lafayette, CA
    Posts
    204

    Cutting Tenon Cheeks on Sliding Table Saw

    Hello,
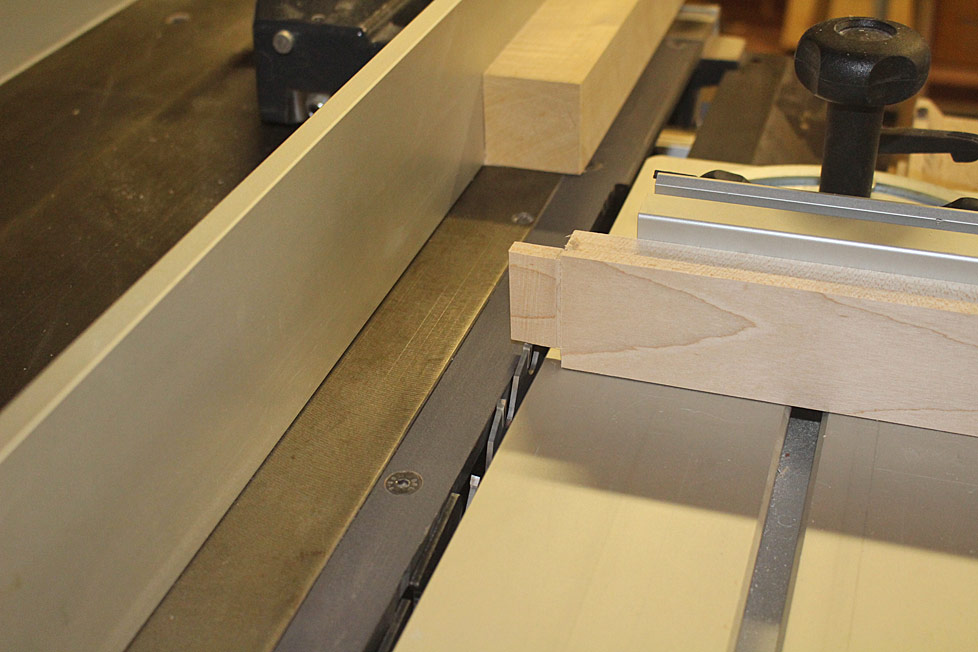
    I'm still getting "acquainted" with my Hammer K3 slider, and wondered if others with sliders have come up with jigs that ride on the slider for cutting the cheeks on tenons? The slot in the K3 slider does not take standard miter gauges, and this makes things a bit more difficult...but I suspect others have come up with clever solutions...
    Thanks for all advice,
    Izzy

  2. #2
    Join Date
    Mar 2003
    Location
    SE PA - Central Bucks County
    Posts
    65,854
    Just mill a piece of stock that fits the slot in the top of the wagon just shy of snug and it will serve the same purpose as a miter bar on a cabinet saw. With the slider, you have the option of locking the wagon and sliding your jig in the slot or using bolts in the slot up through your jig to fix it in place on your slider while using the wagon for movement "normally". There are many types of jigs that can and do leverage that tee-slot on the top of most sliding saws' wagons. Nothing too clever about it! Aside from the ever-popular Friz and Franz jig, I also, for example, have a shop-built tapering jig I use for tapering table legs and have often made temporary jigs for whatever I was working on at the time that clamp to the wagon and use the slot for alignment.
    --

    The most expensive tool is the one you buy "cheaply" and often...

  3. #3
    Join Date
    Feb 2004
    Location
    Perth, Australia
    Posts
    9,492
    Hi Izzy

    Here is a sequence you can use on your K3 ( photos taken on my K3) ...

    1. Saw the shoulders. Use a stop block or the rip fence:


    2. I prefer a bandsaw for the cheeks:


    Use a spacer for the other side (blade + thickness of kerf) ..


    3. Back to the K3 to remove the sides of the cheek. Simply push the side across the centre of the blade:


    Regards from Perth

    Derek
    Last edited by Derek Cohen; 11-29-2018 at 6:57 PM.

  4. #4
    Join Date
    Apr 2016
    Location
    Tasmania
    Posts
    2,162
    I do basically the same as Derek but do it all on the slider. No jigs required. Cheers
    Every construction obeys the laws of physics. Whether we like or understand the result is of no interest to the universe.

  5. #5
    Join Date
    Oct 2005
    Location
    Helensburgh, Australia
    Posts
    2,710
    Using a jig, German audio, bad video quality but you will get the idea.

    Chris

    Everything I like is either illegal, immoral or fattening

  6. Quote Originally Posted by Chris Parks View Post
    Using a jig, German audio, bad video quality but you will get the idea.

    I use the badsaw for cheeks like Derek. The main reason i'd never use the table saw for cheek cuts is the inability to run proper over-head dust collection whilst doing so.

    Cheers, Dom

  7. #7
    Join Date
    Oct 2005
    Location
    Helensburgh, Australia
    Posts
    2,710
    Quote Originally Posted by Dominik Dudkiewicz View Post
    I use the badsaw for cheeks like Derek. The main reason i'd never use the table saw for cheek cuts is the inability to run proper over-head dust collection whilst doing so.

    Cheers, Dom
    Dom, as we both know dust control is not a priority for a lot of people.
    Chris

    Everything I like is either illegal, immoral or fattening

  8. #8
    Join Date
    Dec 2006
    Location
    Toronto Ontario
    Posts
    11,274
    Quote Originally Posted by Chris Parks View Post
    Dom, as we both know dust control is not a priority for a lot of people.
    Very true Chris however I don't do it for a similar reason, I can't run a guard and that operation at the same time.

    I either use the band saw or the shaper.............Rod.

  9. #9
    Join Date
    May 2008
    Location
    MA
    Posts
    2,258
    I am learning the transition to a slider as well, so just went through this same thought process. On the cabinet saw I had a tenoning jig. What I liked about it was that it references the same side of the wood each time, so the tenon comes out uniform thickness independent of material thickness. I dont like 'flipping' the workpiece. I have done some on the bandsaw as suggested, but here again i use a spacer block to be sure the same surface references the fence each time (no flipping!). (part of the reason I dont like flipping is that most of my projects do not start with perfectly uniform square material off of uniform thicknesses - am always doing different sections of the project at different times)

    So I cut the shoulders as Derek does. Then I made a sled with a miter slot in it that clamps to my sliding table, then the tenoning jig rides in this same as before. You could just as easily bolt it in. It becomes essentially the jig shown in the video (albeit the purchased Delta one). I have a tapering fixture I do the same with.

    The only downside to this is that it is another layer of material between the workpiece and fixture, which puts it higher off the table. But it is all held firmly in place and the slider takes care of the motion (plus the 12" blade gives mroe depth potential)

    Having said all that I have been knocking out tenons on a completely different machine so am gravitating away from the tablesaw for it. Really deep ones though still using the table saw for the added depth of cut.

  10. #10


    for cheeks i use the fence on this home made jig on the sliding PK

    for shoulders i use the slider and this home made jig


    that is if i am using the slider to make a tenons but i do most work with a trenching head on the RAS


    scale is 3" stave core and the cut is 2" wide


    Last edited by jack forsberg; 11-30-2018 at 10:26 AM.
    jack
    English machines

  11. #11
    Join Date
    Feb 2004
    Location
    Perth, Australia
    Posts
    9,492


    Jack, that is gorgeous. Did you make it?

    I have yet to come across a quicker method than the following. This includes set up and accuracy. The following is to add to the pictures I posted before ...

    1. saw the shoulders, as presented earlier.

    2. Now, keeping the reference side against the fence, bandsaw away the further saw line ...


    3. I have a few spacers of different thicknesses ...


    Place this against the fence and the workpiece against it. Now you will be rewarded with a exact, repeatable cheek thickness ...


    Regards from Perth

    Derek

  12. #12
    Quote Originally Posted by Derek Cohen View Post
    .


    Jack, that is gorgeous. Did you make it?


    Regards from Perth

    Derek
    yes that is home made Derek

    here is my process

    jack
    English machines

  13. #13
    Quote Originally Posted by Rod Sheridan View Post
    Very true Chris however I don't do it for a similar reason, I can't run a guard and that operation at the same time.

    I either use the band saw or the shaper.............Rod.
    its not the best for safety but a push stick and a short position fence plate with riving knife do help :0

    jack
    English machines

  14. Quote Originally Posted by jack forsberg View Post
    its not the best for safety but a push stick and a short position fence plate with riving knife do help :0

    No doubt it's effective/efficient, but it also shows just how much dust is generated and fired out the front of the blade - basically a worst case scenario due to the high depth of cut coupled with no dust collection. I suppose it comes down to whether you worry about dust/health.

    Cheers, Dom

  15. #15
    It's just saw dust. Life is long enough as it is.

Posting Permissions

  • You may not post new threads
  • You may not post replies
  • You may not post attachments
  • You may not edit your posts
  •