I use the Amana RC-2250. 1/2" shank, 1.5" diameter. High price of entry, but the insert cutter design pays off in the long run. They have a 2.5" bit, but I don't feel comfortable using it in a handheld router.


 Member
I use the Amana RC-2250. 1/2" shank, 1.5" diameter. High price of entry, but the insert cutter design pays off in the long run. They have a 2.5" bit, but I don't feel comfortable using it in a handheld router.
Moderator
If you are doing this a million times, you'll want something faster than my method:
- Use a track and a circular saw to cut a joint line as deep as each slab will allow.
- Use a hand saw to rip the remainder. This goes surprisingly fast.
- Use a hand plane (#7 jointer) to true up the edge, using a square to check for 90 degrees, and a straight edge to check for local flatness.
IMHO, it's worth it to train yourself to do this by hand. It's not hard if you take your time and will teach you a great deal; I would argue that the biggest joy I've ever had in this hobby was pulling the joint closed on two slabs jointed this way...
Unless the slabs are twisted, I wouldn't take too much thickness off using a router sled. It's incredibly messy, and the few times I've done it, I've had more subsequent movement than on the slabs that I just flattened with a hand plane and jointed this way. Of course, there's a million factors here. So, YMMV.
Contributor
Sigh, what he said.Originally Posted by Terry Hatfield

 [OP]
Member
[OP]
Member
Thanks for the link. That looks good.
[SIGPIC][/SIGPIC]
Member
Thats the article I built mine from. I did order the wider bit that came about after watching the Stone Coat Countertop link.
I got the cheap one , the Uxcell 1/2 shank one.
3BBFF181-D0EB-4053-9E94-E48E76A935C1.jpg
872E2BEB-4E28-4A6F-9B14-DC1A6431992E.jpg
5F49DFDF-FA6F-45BD-A37B-A9676AAA4804.jpg
Ill report back when I get to use it , which should be next month. On these Madrone live edge slabs.
9A821DB6-389D-49D4-B0BA-81C8BBC80424.jpg
[OP]
Member
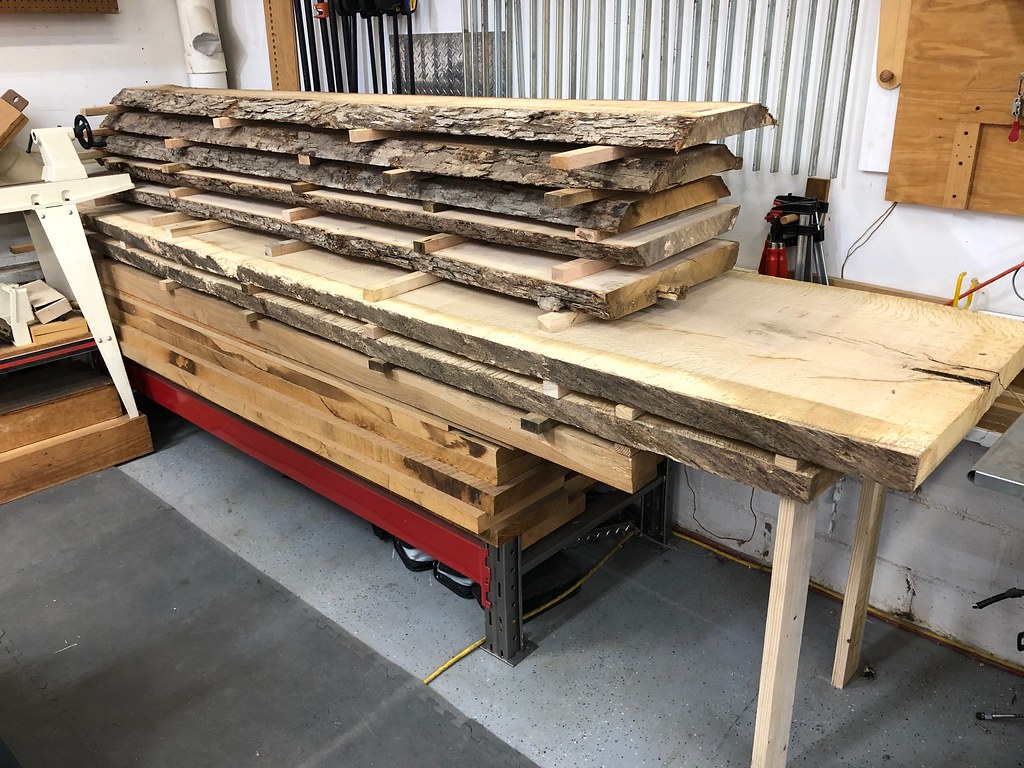
Very thankful for my large and strong son to be here for Thanksgiving. He helped me move the stack of slabs from my bench over to the wood storage area where they will reside until they are dry enough to work with. What a project just to move the crazy things!
[SIGPIC][/SIGPIC]
 Member
Just installed a semi built-in desk made of large slabs of red oak.
The planks started at about 2-1/8" thick +/- and finished down to 1-3/4". Each slab was ripped to 15" wide and just over 9' long. Had they been any larger I would have had my local mill joint and plane them - and in retrospect, wish I had. Instead, I man-handled these through all the machining processes using my own equipment (slider, jointer, planer). I estimated that each plank weighed perhaps 100+/- pounds to start and finished at about 85 pounds. Used the slider to initially machine the edges, then hand planed. I think there are many ways to "skin this cat" (so to speak) but the weight (still fresh on my mind) makes me think getting it milled by folks with the proper equipment and setup makes the most sense.
This was a short lead budget job so there wasn't a lot of opportunity for thinking. Finished with GF Endurovar (using a brush) to match some other naturally finished red oak detailing. First time brushing Endurovar and I was surprised at the success. The desktop was assembled using Festool's KD fasteners – the combined anchor/cross connector - and that worked quite well. Chamfers accentuated the joinery. Only regret was that when I got to the end of the finishing I wished I'd made the chamfer larger.
Client is happy.
"the mechanic that would perfect his work must first sharpen his tools. Confucius
Member
I did some straightening of one of my slabs , a small one thats going to become a shelf in a house Im building right now.
I used a 2x12 thats pretty flat. And some cleats that trapped the live edge piece held onto the 2x12.
56DF48BE-185C-4FAD-A7D1-9E6D2C3E4755.jpg
It had some twist in it, about 1/2 , so I put 1/4 ply under the two opposite corners to make it flat
E8520C50-C3C3-469E-B7CA-34990F82ED0E.jpg
Once I had it trapped where I wanted it I fed the whole works thru the surface planer, taking a strong 1/16 off with each pass until the first side was flat.
076CF4E4-4813-4FBA-AD04-EA790536C105.jpg
Then once the one side was flat , I just ran the other side side thru taking light passes.
56DF48BE-185C-4FAD-A7D1-9E6D2C3E4755.jpg
Once it was flat I attached it to a piece of plywood that I could run against the fence on my tablesaw, to square up and straight line the edge that will be attached to the wall.
08CA623C-AE1A-442A-AEB2-0D3BB6F4C59B.jpg
[OP]
Member
Beautiful work on the desk Bill. After moving them for the second time I am quite concerned about trying to mill them myself even with help. I don't even know if there is someone local to me that can or even would do the work and I really hate to farm it out. One thing for sure is that I see now why old men build jewelry boxes.
[SIGPIC][/SIGPIC]
[OP]
Member
I like your methods Paul. Very good plan of attack. I see you epoxied an inclusion. What product did you use?
[SIGPIC][/SIGPIC]
Member
Some West System stuff left over from making a 1 x 15 x 36 long curved fascia we glued up with summer.
We laid the first curved beam on the floor with the crane and traced out the radius on the floor.
We ripped 2x6 Clear Cedar to 7/16 thick , and used the wood right angle cleats we use when doing curved handrails.
871B4698-741A-4D22-A3C1-2AA76FF102AF.jpg
We brought the brand new company surface planer right to the jobsite so we didnt have to have the local lumber yard haul the board around for us. It just fit thru the 15 surface planer.
5A5F2EDB-9068-43B5-8FFD-99AEB4524110.jpg
Fit perfectly.
3140A976-25EB-4C8E-956D-12FC3B5271AE.jpg
BFD82BC7-476B-4B0A-80F7-E3B5D2F82C82.jpg
Member
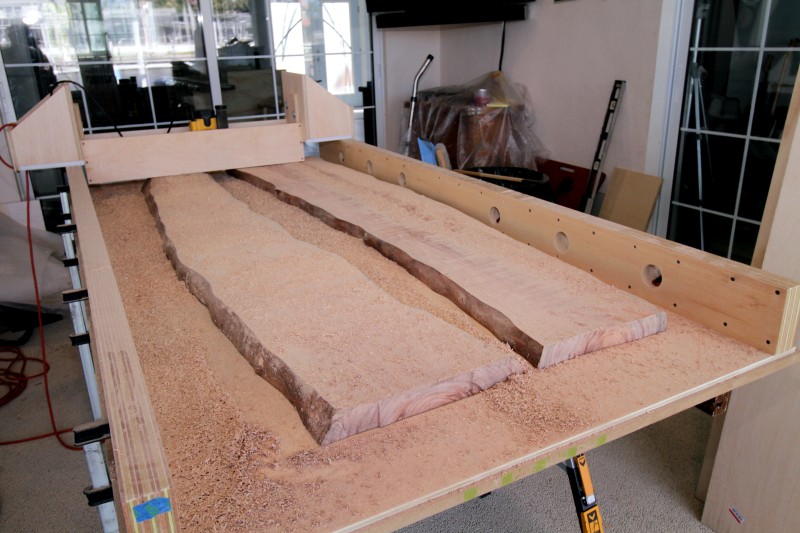
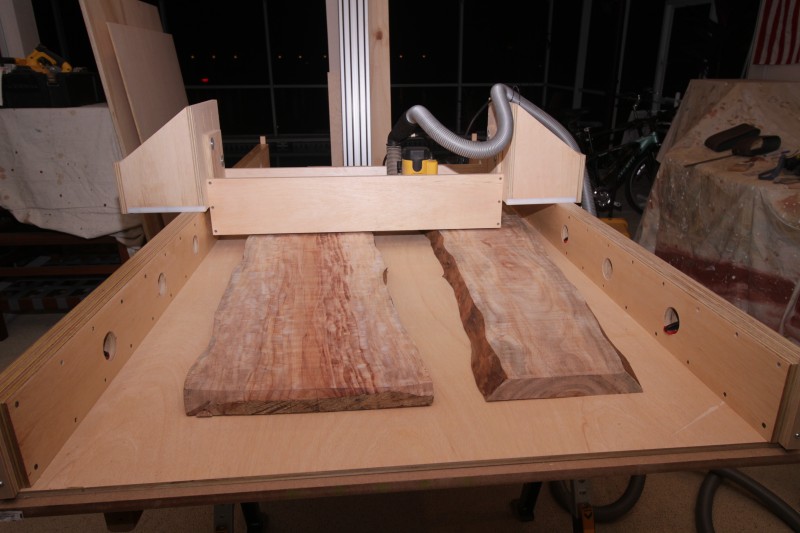
Possibly the easiest and cheapest method of tackling big slabs it the router sled. Not only can you flatten practically any size slab but you can create any edge you want.
Some flattening pics
Travel is fatal to prejudice, bigotry, and narrow-mindedness..." - Mark Twain
Member
I have a sled similar to yours, but setting it up and doing the routing on a piece the size I did today, was about twice as fast maybe more than setting up , routing , taking down restoring , and all the sanding Id have to do.
That why I came up with this idea, which is limited to the size slab a person could do by the surface planer a person has.
I did just get a 1 1/2 bottom cutting bit that Ill be using when I tackle the larger slabs I need to work on later for the same project.
33158403-277B-4D63-A561-F4CCB1EBB0D6.jpg
[OP]
Member
Wow! That's crazy! Thanks for posting those pics.
[SIGPIC][/SIGPIC]
[OP]
Member
Thanks Julie! What bit are you using in the router?
[SIGPIC][/SIGPIC]
 Posting Permissions

 Reply With Quote