Hi Folks,
I found this forum during a web search on laser marquetry and simply had to join. Even though I just got here, the place feels like home already. Hope to make all your aquainances soon!
I purchased a laser engraver to enhance my woodwork. One of the things I like to do is marquetry. I have the basic skills down using the fret saw/scroll saw double bevel method but want to try my hand at some more intricate pictures using the laser to cut the veneers and hopefully speed the process up some. I have a 35W Epilog Legend 24TT and all the usual software (Corel 12, Photoshop 6, Photograv 2.11 etc.).
I've spend quite a while reading through tons of really informative and highly useful threads on the forum - many thanks to all you experienced laser/Corel experts! Most, but not all, of my newbie questions have been answered in the threads. Here goes with the two big questions (with lots of sub-questions!) that are still bugging me:
a) Laser "Kerf" and how to deal with it?
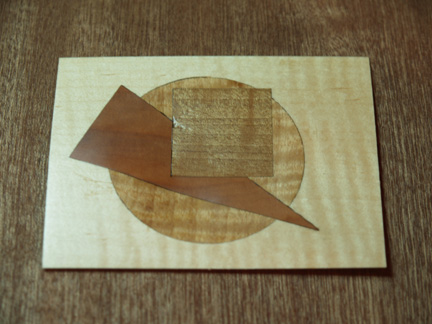
I made a very simple picture (a square, triangle and circle on top of each other) as a test piece. I vector cut the veneer pieces easily enough (one sheet of veneer at a time), but when I put them together to make the picture, the laser "kerf" (gap between the pieces) seems much larger than I was led to believe it would be.
I ran another test job with a bunch of vector cut lines, each one mapped (via color) to a different speed setting on the laser. I tested cuts from 20% speed in steps of 10% up to 100% (power was 100% for all cuts) and found that there is quite a bit of difference in the kerf width. As expected, the 100% speed / 100% power cut gives the narrowest kerf and easily cuts the thin veneer material. I measured it at about 5 mil on the top of the veneer and about 3 mil on the bottom. Why is it thicker on the top?
I had ran the initial test piece using 30% speed / 100% power, so the kerf was about 15 mil per the second test - no wonder it was "sloppy" marquetry! I re-ran the square/circle/triange job using 100% speed / 100% power, but even with the narrowest possible kerf, the gap is really too big for good quality marquetry.
I imagine that some of you have already come across this issue and solved it. The solution I plan to try is to increase the size of the inlaid piece by a fraction (how much? how to do in Corel Draw 12?) so that the pieces fit snugly together. Is there a simpler way? What am I missing?
b) I have the rotary attachement for my laser, but it's only any good for round objects up to about 6" in diameter. That will work fine for vase-like turned objects, but most of my turnings are much larger bowls/vessels.
What I think I need is a turntable rotary attachment, and another mirror (prism?) to turn the laser beam through 90 degrees. Then I could use the z axis motor (table height) and rotary turntable to engrave stuff all the way around much larger diameter bowls.
Has anyone done anything like this before? I realize it would probably be very difficult, requiring firmware changes in the laser as well as driver changes on the PC. Is this something I/we should lobby the laser engraving machine manufacturer's for?
Cheers for now,
Dave

 Reply With Quote


 The question of "how much" will be answered by the kerf figures you get from further experiments.