Good evening!
This post might almost be more appropriate for the projects forum but I was going to talk about some of the new techniques I taught myself so I thought Id post here.
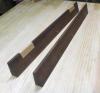
Ive been making little boxes out of big box store pine to practice some new techniques, etc. and finally decided to take a scrap of 4/4 cherry I had and have a friend resaw it (no bandsaw yet!) so I could make a box out of it.
In addition to the dovetails that I always enjoy practicing I ran grooves for top and bottom panels with my plow plane and also used it to plane rabbets on all sides of the top and bottom pieces. I dont yet have a rabbet plane (though I may have found a source for a vintage Stanley 78 at a good deal) I scored the end grain rabbets and used my plow plane on those with no issues! On a few other boxes Ive made with similar lids I cut and chiseled the end grain rabbets and I much prefer the result of these.
Additionally, this wa the first box Ive ever made where I glued it up totally enclosed and then sawed off the top half for the lid. At first I tried to rig up a straight edge to saw against and when that proved a bit frustrating (slow going and I was spending way too much effort just focusing on keeping the saw against the fence as it was clamped a bit awkwardly) I decided to just throw caution to the wind and saw it freehand. Once I got started it was really kind of a duh moment - just saw between the lines (I had scribed two lines about 1/8 apart with my marking gauge). I planned down to the lines after the fact and with just a bit of sanding on a flat surface I had a perfectly mated top and bottom.
On other projects Ive flocked the interior and that has been a finicky, sometimes frustrating process - two projects ago I found out the hard way that the flocking adhesive becomes very run if you leave it out in the garage in Texas heat...had to reflock that project twice! For this one, I decided to pick up a piece of quilting fabric and batting from a fabric store and try my hand at making a fabric liner. As simple as the box is I like the pop of color that the fabric provides.
Earlier today I posted in the general forum asking about finding sources for thinner stock. A few people said get a planer or just go for a bandsaw and while Im saving up for a bandsaw Id frankly just like to spend less time resawing thicker stock and more time making things. I did get a few good suggestions and may try one of those sources out soon as Id like to make a few more small boxes - I know I will be paying a bit of a premium but from what Ive researched so far the prices seem pretty reasonable.
Apologies for the out of order photos...cant seem to figure out how to rearrange posting from my ipad. Anyway, enjoy!

 Reply With Quote