Thanks gents, the regulator has a drain.


 [OP]
Contributor
[OP]
Contributor
Thanks gents, the regulator has a drain.
Bumbling forward into the unknown.
Contributor
For the chips, I set up a 2" dust collection hose right at the point where the chips exit. The chip spray from this machine is pretty consistent through the cut, compared to other machines with moving cutters.
To lessen blow out on the right side of the chisel, I would mount a 5/16" thick backer over the work. This seemed to support the wood well enough. The dust collection hose would be attached to this backer stick.
Guest
Just picked one of these up with a ton of tooling.
I was more excited about the tooling.
[OP]
Contributor
Thank you, William!
Darcy, I can certainly understand why. Carbide, HSS or a mix of both? By the time I’m stocked up on tooling to cover a good range of mortises it will likely quadruple the costs involved in buying the machine.
Bumbling forward into the unknown.
Guest
Tooling I got with mine.
20181108_091752.jpg
Contributor
I still wonder how the tooling gets sharpened.
David
[OP]
Contributor
Yeah, that is pretty sweet,Originally Posted by Darcy Warner

Bumbling forward into the unknown.
Guest
Finally got my operational. Still needs a few things, plus that stupid foot pedal.
https://youtu.be/doV9L_2UTEI
[OP]
Contributor
Is it leaking at the hoses or in the mechanism?
I’m going to put air to mine soon, and then bleed the hydraulics. I’ve got the line complete but need to build out the clamp before proceeding.
Bumbling forward into the unknown.
[OP]
Contributor
Slow but steady progress, been mostly planning and collecting fittings and so forth. I've been wanting to be careful about my modifications, the machine is very thoughtfully designed so hopefully my changes compliment that, minor as they are.
I'm making a part to hold the clamp out of a big chunk of aluminum, I'm separating this into two at the end then using the cutoff to make another part. I don't have a lathe, so instead I'm using my rotary table. Not the fastest way to machine a round part, but it works. It will come in handy for placing the bolt holes accurately.
Next I will hog the center out. Unfortunately I spent a good portion of the evening debating how to hold the piece while it was in the rough, so little machine work was done.

Back at the shop, I picked up an air manifold and adjustable lines to use for the chip nozzles. This mimics the other manifolds on the machine and maintains the same tubing diameter, so myself of anyone else in the future need not use multiple size air lines.
I also have a solenoid on the way for this, I plan to bury that in the electrical box. I want the nozzles to spray only when the machine is cutting so to minimize how much air they consume. I planned a solenoid for that action. This has been a bit of PITA, however, as the conduits running to the box have room only for one line, so I will have to increase the size of those conduits or run the lines separately from those conduits. Likely I will simply increase the conduit size and run a modern type of liquid tight conduit, but I'm not 100% sure of that being my approach just yet.
I had to change my air setup a bit, I wanted a branch very early on in the line so that the chip blasters don't interfere with how the machine works. I've yet to run the second line yet, due to my contemplations above.
Here is the drain.

Bumbling forward into the unknown.
[OP]
Contributor
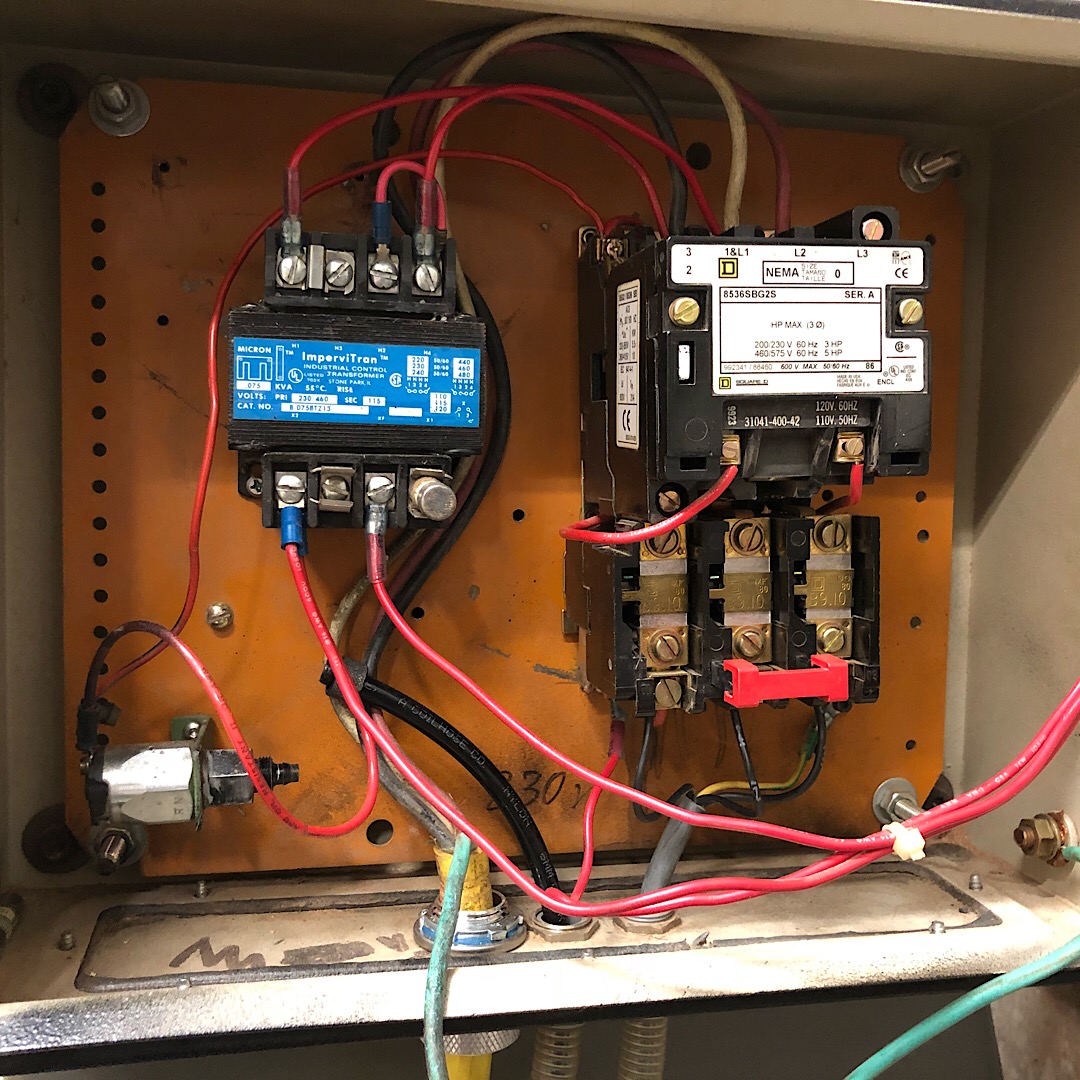
I have a request; if any of you would be so kind to take a photo of your wiring (240v) it would be greatly appreciated. This stuff has obviously been touched by someone prior to me and so I just want to compare notes to see what was changed if anything. I sincerely doubt that they simply ran new wires without touching anything but who knows. I did remove the jumper from the pressure switch but that's it so far.
Someone left the box on the right just swinging there by one bolt and mangled all of the surrounding threads. I needed to move it in any case to account for the addition of a solenoid so I took the board out and cut new holes, then painted it.
I tidied up the wiring for the moment, but plan to actually remove all of it and start fresh and use more than just red. Ideally I'd like to bring the colors back to whatever was there originally.
Thanks gents.
Bumbling forward into the unknown.
 Contributor

It appears that someone stripped out the original electrical equipment and replaced it.
This is one of the ones that i rebuilt. i am doing a new website so i have taken everything down from my old one and slowly rebuilding it so the machine rebuild pages are all down for a while. I will see if i can find a few more photos if you need.
SAM_3373.jpg
Contributor
Brian,
there is a transformer, disconnect switch, reverse switch, contactor with thermal overload, a second contactor and and air switch.
www.solidwoodmachinery.com MakaSM6-033a.jpg
Last edited by Mark Hennebury; 11-17-2018 at 1:04 AM.
[OP]
Contributor
Thanks, Mark! That explains a lot. I have forward and reverse, contactor, transformer and air switch. Looks like I’ll have to investigate the wiring a bit more with my electrical tool. The machine functions properly aside from the air switch which was jumped. Once I get everything connected I will be able to check that switch to see if it functions.
I think I’ll put a distribution bar in so that I can delete the double stacked connections, they’re bugging me more than anything.
Last edited by Brian Holcombe; 11-17-2018 at 1:24 AM.
Bumbling forward into the unknown.
Guest
Yeah, I was going to say there is a lot missing compared to factory.
 Posting Permissions

 Reply With Quote