Yea, ya gotta love how builders leave garages looking like a kindergarten class did the mud work...Originally Posted by Brian Holcombe


 Moderator
Yea, ya gotta love how builders leave garages looking like a kindergarten class did the mud work...
--
The most expensive tool is the one you buy "cheaply" and often...
 [OP]
Contributor
[OP]
Contributor
Bumbling forward into the unknown.
[OP]
Contributor
Moving forward, got some odds and ends out if the way.
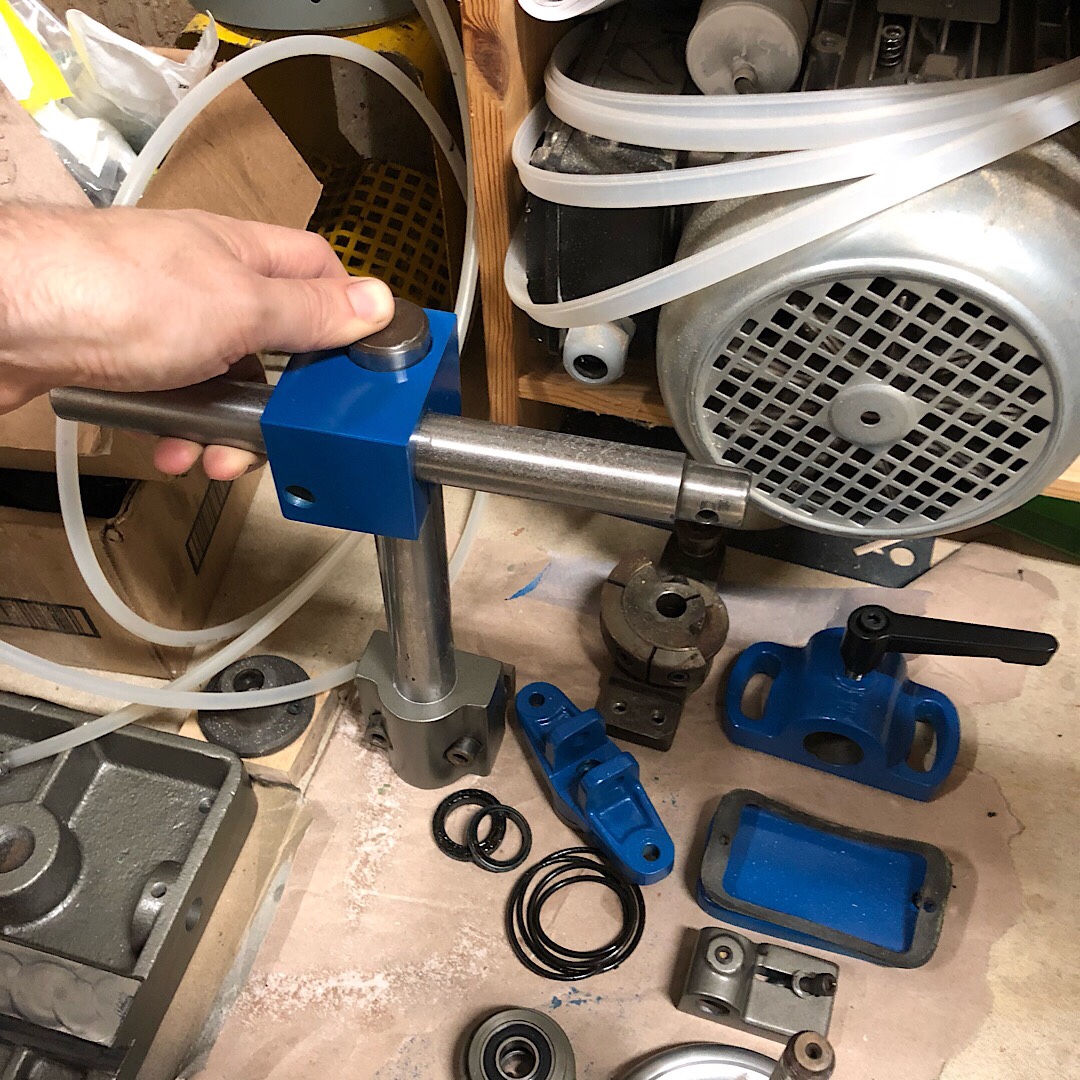
Cleaned up the arm for the clamp and replaced the hardware. This was brutal to take apart but now works with ease.
New Krupp handles in zinc, these things I like. Replaced the bolt with a button head so that it is out of the way and does not score a line around it’s perimeter in use.
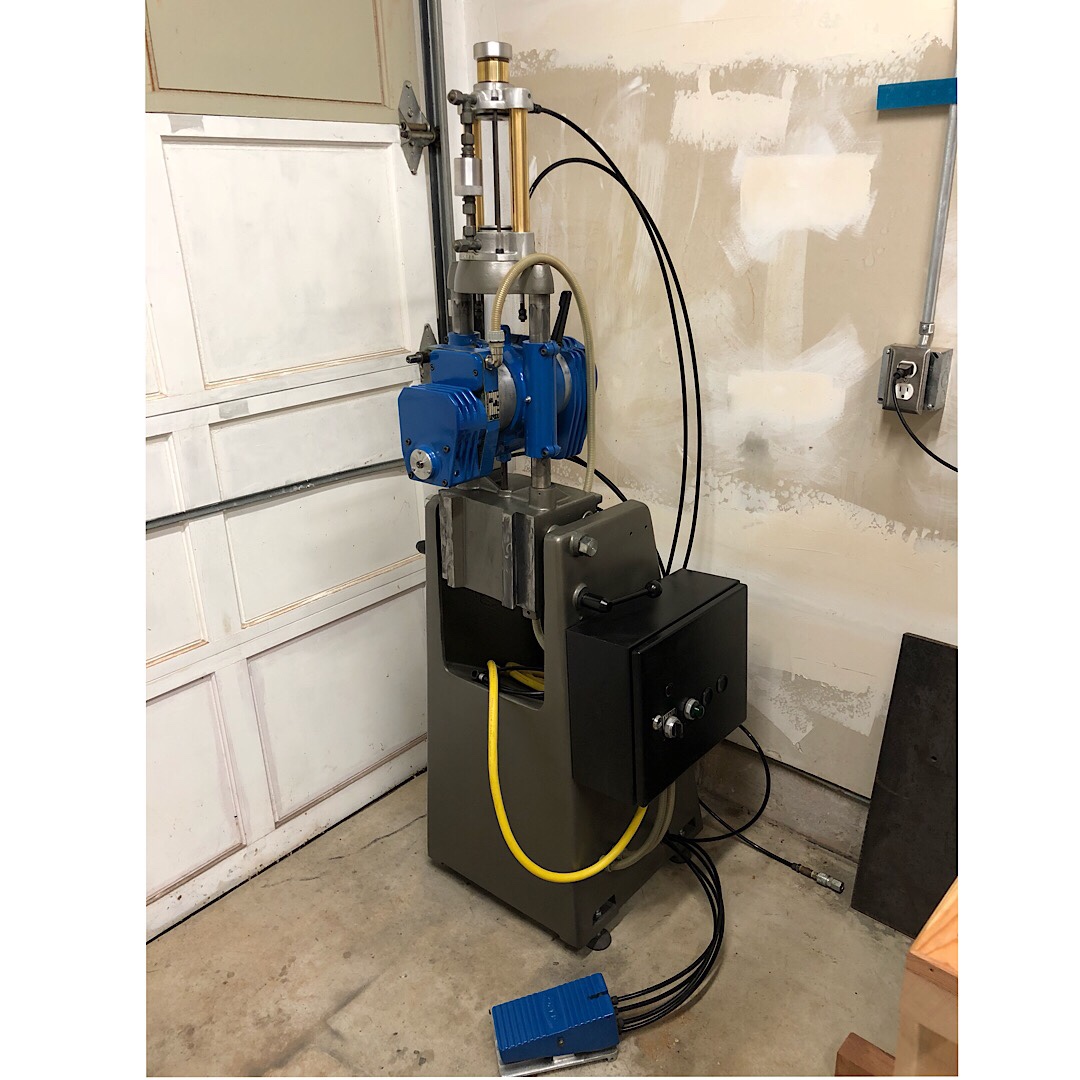
New hoses along with straightening out some of what’s in the electrical box. That I will go through in greater detail before I run it for any length of time. Someone jumped something to remove the pneumatic switch from operation so I will repair that. The machine does not have a fan so I don’t believe it is made to be continuously running.
Also working out a new way to group the hoses together, that plastic coil junk is something I hate so I’m searching for a neater solution that doesn’t collect dust as readily.
More Krupp handles, putting them on anything that gets constant adjustment.
Steel handles here, not searching for the 30mm wrench when I need to adjust these to lay the table flat.
Last edited by Brian Holcombe; 10-17-2018 at 8:43 AM.
Bumbling forward into the unknown.
Contributor
Is all of the major re machining done on the tables/ways/beams/arms/whatever so that everything is now flat, square and parallel? I seem to recall something need re doing so that things stayed lined up and you needed to outsource the work.
David
[OP]
Contributor
I remachined the ways, but the tabletop surface will be done by a machine shop near me.
Bumbling forward into the unknown.
Member
Perhaps consider a 2-position 'Bypass/Interlock' switch in the enclosure door..?? This would enable you to easily (or make it keyed, so it's not so easy) either use the pneumatic switch (interlock), or not use it (Bypass). ...Sometimes people supplement the OEM features for a good reason.
[OP]
Contributor
I suspect they decided to bypass the air switch for safety reasons in that the cutter is either fully on or fully off. I would, however, prefer it to function with the foot pedal so that I don’t have it constantly on during production runs. I’m aware of how the machine cycles so I know to keep myself out of the way when it is armed.
Bumbling forward into the unknown.
 Contributor

;
Hi Brian, the motor switches on and off automatically at the beginning and end of each cycle. It is not set to run continuously.
You press the foot valve, it locks in the down position, that starts the cycle,
That runs air to the feed unit to start the feed.
The head feed starts, and as the head moves it releases the air switch, which runs air to the air /electric switch to start the motor and engage the clamps.
The feed continues until it hits the depthstop, which the trips and resets the foodpedal, reversing the feed.
When the head returns to the top it compresses the switch turns off the motor and releases the clamp.
I have on occasion set it up on some machines so that i can set the clamps separately, that gives me the option of clamping the wood prior to pressing the footpedal, and the clamps remain engaged after the cycle ends, and until you release them. I should add that you should make sure that you set it up so that you cannot start the feed with the clamps off.
Last edited by Mark Hennebury; 10-18-2018 at 12:19 AM.
[OP]
Contributor
Thanks Mark, very much appreciate the clarification on how it should be operating. Thinking through it, my guess is that they simply bypassed the switch since both wires are connected to one side of the switch. Good chance that the switch may have failed and that was the 'keep it cutting wood' way of running the machine after that. So, I will test the switch and attempt to source a replacement if it is indeed bad.
I'd certainly prefer the machine to operate as intended, having it constantly on would be dangerous and having to manually turn it off between cuts seems like a nuisance.
I've been combing over the pneumatic and electric diagrams that you provided and comparing to what I have on the machine.
Bumbling forward into the unknown.
Contributor
My STV operates as Mark describes except that I have two buttons to activate the cycle. So hands away from the workpiece. There is a foot pedal to pre activate the clamps but you have to keep it pressed. This all takes some getting use to. It’s for good safety reasons but inconvenient. It’s ugly if the movement starts and clamps are not touching. For sure you don’t want to have fingers close to the cutter. I would like to change mine to work as Mark describes with the feed and clamps controlled separately.
Contributor
Hi Brian,
I often just rip all of the electrics out of machines when rebuilding them, and start from scratch; it is too difficult to trace all of the wires and figure out what people have done.
The air system is pretty simple when you break it down.
The foot switch comprises three parts; the pedal, switch and piston.
And four air lines.
One air line is the supply in to the switch and two lines out, both go to the feed unit. one of these goes to the forward feed and one to the return feed.
The fourth line is to the piston that resets the foot pedal.
The foot pedal has three positions. up, down and midway.
1.Up and the air goes to the return feed to return / keep the head at the start position.
2.Down and the air goes to the forward feed of the feed unit to feed the head into the cut.
3.Midway and the feed stops, no air goes through the switch.
The depth stop sends air to the piston on the footswitch to reset it to the UP position, which reverses the feed and returns the head to the start position.
The switch that is activated at the end of the return stroke, powers the motor control and clamps
when compressed at the end of the feed return, it shuts of the motor off by deactivating the motor contactor and releases the clamps,
When the feed starts and the head moves forward releasing the switch, air goes to the air/elecrtic switch to activate the contactor and to the clamps to activate the clamps.
Contributor
I have had couple of the larger machines like Joe's and the foot pedal holds the clamps on while you have your foot on it, and you have two start buttons, to make sure that your hands are not in harms way. I have had a few machines with safety clamps that release if you happen to clamp your hand under one. The two start switches always annoyed me. The foot pedal clamp is good, but like Joe said , takes a little getting used to.
I find the separate clamp handy in some circumstances;
If you only have a few mortises to do and don't want to set up stops. You mark out all of your mortises on your stock. Then you put a piece of masking tape on the table edge approximately where your mortise will be, place a scrap of your stock, (always have extra stock for test and setup) on the table, clamp it, cut a mortise, without releasing the clamps, transfer (with a square and knife of pencil ) the position of the mortise onto the tape. release the clamps and remove the test piece, and cut all of your mortises by lining up with the marks on the tape that is on the edge of the table.
It is also good to set your chipbreaker with the mortise cut in the scrap and still held, you can accurately position your chipbreaker, (and stops if you want.)
Last edited by Mark Hennebury; 10-18-2018 at 10:17 AM.
[OP]
Contributor
Thank you both! Very much appreciate the support in doing this as it can be a bit daunting.
I can imagine the stock not being clamped would not do well at all, hah. It would be exciting though, I'm sure of that.
Digesting this information and checking over things again tonight. I've been waiting on some wipers and seals, once they arrive I can reassemble the hydraulics and go through that system to see if it does indeed function properly when the air is applied through the standard sequence.
The motor starts and runs, I ran it yesterday. It is considerably quieter than when I took it apart. The new bearings and belts helped considerably. Prior to taking it apart I would have liked to run it with ear protection (without cutting anything, just running) now it seems unnecessary though I'm sure I will feel differently when it is actually cutting.
I do like the idea of a wholesale re-wiring, I may well do that given how simple the system is overall even though the details are a bit confusing at the moment.
I have to run an air line out to the shop also, so I'll be doing that soon enough. I did manage to purchase a good regulator however so that is one thing down. This gives me the excuse to plumb a line for the Felder as well in preparation for setting that up with air clamps.
Bumbling forward into the unknown.
Contributor
Brian, more than happy to help.
The electrical is pretty straightforward and i can run you through that when you are ready if you wish.
The feed unit is easy to bleed if you know how to do it, and a real pain if you don't, (peanut butter jars are your friend.) I can help you with this also.
Your doing a great job.
[OP]
Contributor
Thanks Mark! Much appreciated.
I’ve been thinking about how to bleed it. I know that is one if the purposes of setting it horizontal. I’ll definetly be reaching out soon.
Bumbling forward into the unknown.
 Posting Permissions

 Reply With Quote