
-
Insert arrived today, while I was at the Cardio Doctor's office. We ordered and paid for ONE insert.....two inserts arrived? Smart phone that connects my heart monitor to their web site....went brain dead...
Computer issues all night, last night....1/2 the night to to to fix....grrrr.
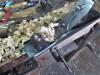
Ok, got home, decided to go and hide out in the shop, for a while.....had a lot of counter-bores, and pilot holes to drill. Clamps and sticks, to push or pull things into alignment..
clamped.jpg
Had a cord reel set up..
cord central.jpg
to power a couple vintage drills..
2 drills.jpg
why change bits, when I can just change drill and all. Had a third one set up..
hammerhead.jpg
To make sure the screws were tight...worked from right to left..
halfway.jpg
Had to slide this thing out a ways, to get my fat...foundation in there...old back does not like bending over too much, either...old knees do NOT do "kneel" anymore....so..
tippy.jpg
Tip this over as far as I can...and finish along the bottom edges...the set this back on the floor....something missing?
missing.jpg
Well, I could at least sweep up the mess..
mess.jpg
So...where did that slab of Ash go?
Stay tuned...
-
We now have a "Flight Deck"?
topside.jpg
Before this could happen...I used the pilot hole drill, to make slotted holes in the top frame, so a few screws could attach this thing. Just "tacked" in place, right now...will add the rest of the screws later, as soon as I get some more washers. I was also test fitting the drawer front, to see IF it still fits...Maybe Sunday, I can start on the rest of the drawer?
flight deck.jpg
Once an insert is fitted on the bottom shelf, I can build a fixed shelf above it. I can then cover the mounting flanges with molding.
IMG_5894 (640x480).jpg
Used the square to square a line on the end..then a compass..
curve.jpg
I get tired of hitting sharp corners as I walk by things...besides, every Aircraft Carrier needs a compass, right?
It took about three tries, to get that edge knot to where it will go...over the "port side" of the deck. Glue joints need a bit of work..
jack plane.jpg
The way this thing was doing tear outs...I doubt IF it will see much use for this job...may just land the Old No. 7c and let it work..
scraper.jpg
May give this a try out..need to buy ear plugs first,,,screeches as load as a beltsander....
Was getting soaked, and a bit tired and sore..called it a day. Maybe tomorrow, I can get a decent day in?
Stay tuned...
-
4 hours in the shop...had to stop for the day...top is planed flat..
IMG_5897 (640x480).jpg
One end is shaped....was cleaning a few spots up..
IMG_5900 (640x480).jpg
After the No.8 and No.7c got done.
IMG_5905 (640x480).jpg
Put this to work, door stiles needed a groove made. A little bit of candle wax goes a LONG way...
IMG_5907 (640x480).jpg
Stiles for one door are set up...needed to size the rails..
IMG_5909 (640x480).jpg
And cut them to length..
IMG_5910 (640x480).jpg
Then joint a few edges, so three wider rails all match..
IMG_5908 (640x480).jpg
And set up for a few more grooves..
IMG_5918 (640x480).jpg
The older plough was alright, for the longer stiles...was way to long for these rails. Set up the Stanley 45. And a jig to hold the rails in place..
stay tuned, BRB..
-
Case of plough a groove or two, lay out for the tenons....
IMG_5911 (640x480).jpgIMG_5912 (640x480).jpgIMG_5913 (640x480).jpgIMG_5914 (640x480).jpg
Depth stops set. Mitre box is a Langdon 75 ACME. Saw is a Disston No. 4, made expressly FOR this mitre box. Even has the Millers Falls etch.
Set up a way for the bandsaw to make decent cheek cuts...
IMG_5915 (640x480).jpg
Keeps the part from tipping to a side.
IMG_5921 (640x480).jpg
After a while, all three wide rails were done....which left these two..
IMG_5923 (640x480).jpg
Well, after a fight, I got the first one done of the skinny rails. They got two grooves...had to redo the jig a bit, wasn't much room under the fence...
IMG_5924 (640x480).jpg
If you don't think a Stanley 45 can bite...this is from the front of the skates, running into my hand...
Had one more, maybe two tasks to do..for today..
BRB
-
Got to the point I was tired of walking around in ankle deep junk..
IMG_5922 (640x480).jpg
Tracked down that second skinny rail..and finished the two grooves on it, and the tenons. Which left four panels..
IMG_5925 (640x480).jpg
Will make these into raised panels...may have to keep an eye on the grain...
IMG_5926 (640x480).jpg
Uncle Charles is in the house...working on a glass or two of Gatorade...yeah, been one of those days..
Stay tuned..
-
Hmmm..which to do today....raised a few panels ( each door needs 4 panels)...or...chop 8 mortises.....or....buy more Gatorade?
Left thumb is a bit sore....a bruise the size of a quarter is starting to show...good thing it was just the skates, and NOT the 1/4" cutter.
I suppose I had go and make a jig, to raise the panels. Sellers just sticks a panel upright in his vise.....may try it that way....or just jig the panels flat on the bench. May need to add a rebate around the inside edges of the panels...may help "center" them in the frames.
Film @ 2300 hrs ZULU......
-
Got ONE stile's mortises done, today...too tired, too sore. Made the haunched tenons,,,
haunched tenon.jpg
Top and bottom rails get these...middle rails do not need them..
Mortise jig.jpg
Mortise jig set up..
other chisels.jpg
Chisels laid out..
IMG_5931 (640x480).jpg
One mortise done....I worked on both ends first...needed to center the third wide rail between these two.
wide rails.jpg
THEN I could center the two skinny rails.....Doing all this chopping standing up, back was getting mean..
5 done.jpg
Skinny rails fitted. Set the second style in place, to help with the layouts..Tuesday.
Mondays, the shop is NORMALLY closed....will need the day off to rest. Motivation has left the building..
Stay tuned...
-
Well, for once, the shop stayed closed for Monday.....however, this being Tuesday..I guess I had get back to work?
IMG_5935 (640x480).jpg
Un-written Law of the Shop: Any flat stretch of space will soon fill up, with just..stuff.
Ok, Got the rest of that frames mortises chopped..
IMG_5940 (640x480).jpg
Set aside, for now...made a jig to hold a panel...and grabbed a few planes.
IMG_5941 (640x480).jpg
Goal here was to bevel all four edges, doing the end grain first, on each end, then the long grain sides....tends to be quite a work out, too.
IMG_5943 (640x480).jpg
Flip the bevel panel over. Wards #78 and the Auburn #181 were used to add a rebate all the way around.. Fine tune the edges with the Stanley #3...and do a dry fit.
IMG_5945 (521x640).jpg
One down...three to go?
Repeat for panel #2..
IMG_5948 (640x480).jpg
Quitting time, already....maybe get the other two done, tomorrow?
IMG_5947 (640x480).jpg
Swept this mess up, and closed the shop....I am soaked clear through. 4 hours was just enough, for one day...
IF I get the other two panels done, I may try a glue up. Then either the other door, or the drawer....
Stay tuned...( welcome to come over and lend a hand, BTW)
-
Late last night, was told to bring up a load of towels from the drier....about an hour later, I hauled the basket of towels upstairs...there was also another panel done.
3 panels.jpg
But, instead of messing around with the jigs....went back to the way Sellers does his..
last panel start.jpg
By standing them up in the vise ( jointing the edges on Panel #4, here) I even used a #4 like he does..
British No. 4.jpg
Actually a #4c...made in England.
Rest of the cast of characters was about the same.
broken chisel.jpg
This is what I USED to clean out the chips from the bottoms of mortises...until about 1/8" of the curved end snapped off. may just regrind a new end.
panel shavings.jpg
Panel #3 had issues..."good face" had a bit of snipe....board was 4/4, so a bit of plane work brought the thickness done enough that the snipe blended in with the bevel.
The face that was to be the inside of the panel...was bowed a bit...right down the middle...planed that flat. #78 and this plane...
woody.jpg
Auburn Tool Co. No. 181, Skewed Rebate plane..to form the rebate all around the edge of the panel. then install it into the frame. Prepped the last panel for this door, and stopped there.
door parts.jpg
All the parts I need for the other door is sitting in a pile, for now.
Trying to decide whether to build Door #2 next, or..build the drawer...
Stay tuned..
-
Apparently. this Heart Monitor does not like it when I get all sweaty, from doing a bit of work...keeps sliding off.
Made yet another mess..
IMG_5958 (640x480).jpg
Both on the floor, and..
IMG_5959 (640x480).jpg
On the bench...it's there, somewhere....just to get one panel done, and do this..
IMG_5956 (640x480).jpg
Finally spread some glue around, and clamp a door together....
Taking a break, until I cool down, and dry off....will let this thing set overnight...and see how it came out. Then fit this door in it's opening? Hinges? Knob? Stay tuned...
-
used that "different" tonight, to cut a few parts. Dug out all the Ash 1x 6 stock I have left. Couple chunks will be heading for the fire pit...
big knot.jpg
Not sure IF there is anything worth saving in this one..
little big knot.jpg
This one is too short for anything in this project, and is basically one lousy knot.
Used the fancy pants plane tonight..
end grain shooter.jpg
Some ends were close enough to "shoot"....for others..
mitre saw.jpg
"Ve haft vays.."
IMG_5973 (640x480).jpg
May get to use these things tomorrow...we'll see.
two sides.jpg
Now have two sides for the drawer build, will use a pine 1 x 6 for the back of the drawer.
door parts.jpg
There is also enough blanks to build the second door. Total about of Ash bought so far? six 1 x 6 x 12'.....going to be close.
Will try to start cutting through dovetails, tomorrow....have to watch the Heart Monitor, to make sure it stays put ( super glue?) or at least not work so hard that I am soaked from sweat...
Stay tuned...
-
Going to drop way back here, was getting a bit long-winded anyway. I may yet have a use for those flooring scraps, too..
Ok, today the door came out of the clamps....needed a bit of fitting..
edge work.jpg
Both edges had a slight bow to them...No. 7c took care of that. One end was a bit out of square...got that trimmed.
Was having issues with the cordless drills' batteries....chucked the VIX bit into a corded drill..needed something to drill hinge screws with..
hinge install.jpg
Works for me. At least to drive the screws in, removing them doesn't go too well. carted the door and some drills to the case..
IMG_5981 (640x480).jpg
VIX bit and a pilot hole drill, and the "screwdrivers" Once I got the top screw installed, things just fell into place..
door install.jpg
Even installed the knob, so I can open the door to work on it, some more. There WAS a predrilled hole...was too close to the edge...drilled a second hole beside it, more centered, this time.
knob install.jpg
washer to keep the knob from burying itself into the woodwork. And, to cover the older hole up.
That was the first part of today's follies...stay tuned for the second part..
-
Ok, the other half of today's work...Drawer making.
Blank for the front of the drawer had a rough edge...was still rough sawn..
drawer front jointed.jpg
Stanley No. 5-1/2 took care of that. There are some who say a 5-1/2 and the #62 are the same size?
two jacks.jpg
hmm, not even close. I also face planed the blank, trying to see which looked the best..
face planed.jpg
And it was this #3c that seemed to work the best. Flip this side down, jig up for the #45 to get all groovy..
groovy.jpg
Then set out some toys, and do some layout..
toys.jpgNo. 4 Disston.jpgpins.jpg
Once the saw was done, chisels to chop away the waste..
other end.jpg
Managed to get both ends done. Used these "pins" to lay out the tails..
But, that can wait for the next episode.,,Stay tuned BRB...
-
Ok, bandsaw to cut on the waste side of the lines, plus a few extra cuts in-between..
tails.jpg
More chisel work to remove the waste...cut in half way from one face, flip the board over, and complete the chop...pare as needed..
dry fit 1.jpg
Meh....work on the other end. Did a dry fit after this first corner was done, to see IF it still fits...
dry fit 2.jpg
Then haul these two back to the bench, and complete the other side...and try again...fingers crossed.
Dry fit 3.jpg
Will do, for now. Still need to groove the sides for the drawer bottom. And a dado for the drawer back. And cut the back to size for the drawer....maybe add the knob?
Then it is back to door building. Need to make 5 fixed shelves. 4 behind the doors, and one above the fireplace insert ( electric type) and make a boat-load of plugs. Hmmm, there MIGHT just be a use for those two scraps of 1 x 6s....IF I can work around them knots.
Maybe tomorrow, I can get the drawer into some clamps? Stay tuned...
-
Got about an hour in today....dealing with a furnace that won't start up. The hour of actual shop time?
IMG_6003 (640x480).jpg
Running a plane around, to get the two drawer sides flat on both faces...and add a hint of round-over along the top edge
IMG_6004 (640x480).jpg
Stanley 45 to mill a groove for the drawer bottom to sit in..on both..
IMG_6005 (640x480).jpg
Walls for the dados were sawn by..
IMG_6006 (640x480).jpg
Then the waste was chopped out..
IMG_6007 (640x480).jpg
12mm Mortise chisel and the hammer, to hog things out. Then the Stanley No. 39 3/8" to plane things smooth and level
IMG_6011 (640x480).jpg
This $10 chisel came from Okinawa...the No. 39 has a pair of spurs..
IMG_6009 (640x480).jpg
But they weren't needed for this sort of work.
IMG_6001 (640x480).jpg
This is the insert for this project. Lights up like a real fireplace...but is electric.
Stay tuned..
 Posting Permissions
- You may not post new threads
- You may not post replies
- You may not post attachments
- You may not edit your posts
-
Forum Rules


 Reply With Quote