Results 1 to 9 of 9

Thread: Given the grain, how should I chop this mortise?

  1. #1

    Given the grain, how should I chop this mortise?

    I'm working with red oak.
    I only have stanley sw 750 bevel edge chisels. Chisels are sharp, er, at least as sharp as I can get them with my current skill level of sharpening (honing guide, 1000/8000/strop).

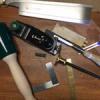
    Photo Aug 17, 9 36 03 PM.jpgPhoto Aug 17, 9 36 27 PM.jpg
    The mortise is drawn by placing the ~ 1.25" x 0.5" tenon in the center and drawing/knifing the outline.

    I've tried three methods for chopping the mortise.

    Method 1: 1" chisel along the long side, in the knife line, hit it a little, then come back at a 45 towards the edge and knock out the waste. then work it deeper. Use 1/2" chisel on the short side. Basically making the trough around each of the 4 edges deeper and wider.

    Method 2: First drill out three 3/8" holes to remove most of the waste. Then work back towards the line instead of working directly on it for all 4 edges.

    Method 3: Paul Sellers cutting a mortise with a bevel edge chisel video: https://www.youtube.com/watch?v=q_NXq7_TILA

    Problems I've encountered:

    Method 1: Takes a long time. The cuts along the long edge, that are in the direction of the grain are not clean at all, and I tend to get splinters that shear off if that makes sense.

    Method 2: Faster but my lines aren't as clean. Same splintering problem on the long edges.

    Method 3: Faster still. Only used a 1/2" chisel but my wood ended up splitting and cracking right down the middle once I got close to finishing. Too much leverage I'm guessing.

    For all three methods I can only work from one side as I do not have an accurate way to trace the tenon on both sides of the work piece.

    So, given the grain, is there a recommended method?

  2. #2
    Join Date
    Mar 2015
    Location
    Virginia
    Posts
    1,211
    You will get some of that splintering effect I think you are describing because it is red oak. I do not understand what you are doing to cause it to split. If you follow “Sellers method” (using a chisel the width of the mortise) you never have the chisel parallel to the grain, so do not get the wedging action that leads to splits.

    If that is what you you are doing and it is still splitting, you could mortise and then cut to size, or perhaps clamp in one of those large wooden clamps to help prevent the splitting while you mortise. I have never had that problem, so no promises, but those are the two things that occur to me.

    Does your tenon have a shoulder? If so, do not obsess over the edge of the mortise. The shoulder will cover it anyway. You want the sides straight and clean, but if the edge has a little ding here or there it should not be the end of the world.

  3. #3
    Join Date
    Nov 2017
    Location
    Winston Salem, NC
    Posts
    133
    If that's the actual piece, it would probably be better to do the Sellers method as Nicholas described. You really don't want to do anything except cleanup paring on the long side. But if time is an issue, drilling out the majority first, and using the chisel to clean corners is probably the neatest option. Take a small diameter drill bit and drill straight through first, then use a second one that gets most of the waste out, but drill it halfway from each side - centered on your original pilot hole. Then when you pare/chisel - again approach from both sides so that any splintering is w/in the mortise itself.

  4. #4
    In general mortise and tenon work takes skill. However there is no problem making neat mortises in red oak. I recommend looking at Brian Holcombe's videos. Sellers looks like a beginner to me. It is helpful to have knife, square, mortise gauge. mortise chisel, and heavy mallet for this work. Using a bevel edged chisel is possible.

    I will concentrate on layout in my remarks. If you don't have a mortise gauge you can make one as follows:

    Take a piece of hardwood about 3/4 X ! and make a notch in it so that the last inch and a half is 3/4 x 1/2. This notch is called the fence and rides against the edge of the piece to be mortised. The put two small nails through the thin section so that one is say 5/16 away from the fence and the other nail is farther away from the fence by the width of your mortise chisel. I am sorry you can't see the nails in this picture. file the nail points so they match up well with your chisel width.
    nicholson gauge.jpeg

    lay out the length of the mortise with square and knife, and for a through mortise, extend these line around to the other side. Then use the gauge against the face side to mark the width of the mortise. mark from the same face side when you mark the mortise on the opposite edge.

    Use the knife and square to mark the tenon should all the way around, and use the gauge to mark the tenon on the end and the two edges, all from the face side so that the tenon will correspond to the mortise.

  5. #5
    Join Date
    May 2007
    Location
    Newburgh, Indiana
    Posts
    918
    If you are splitting the wood, clamp the piece while chopping.
    Life's too short to use old sandpaper.

  6. #6
    Join Date
    Sep 2007
    Location
    Longview WA
    Posts
    27,427
    Blog Entries
    1
    One piece of advise often heard when mortising near the end of a piece is to have some extra length to help avoid your workpiece blowing out.

    This leads to the question of why are you working with such a small piece?

    Can the mortises be cut before the piece is cut to shape?

    Mortises are usually cut with the chisel across the grain. Cutting with a chisel in the direction of the grain is almost certain to cause the wood to split.

    If for some reason the mortises have to be done with pieces already cut, then drilling first may be your best bet. Drill small holes at the corners so you can mark the back side. Through mortises are a lot less likely to cause problems when they are cut from both sides.

    jtk
    "A pessimist sees the difficulty in every opportunity; an optimist sees the opportunity in every difficulty."
    - Sir Winston Churchill (1874-1965)

  7. #7
    Join Date
    Oct 2010
    Location
    Australia
    Posts
    2,534
    If you strike the tangient grains 1st that should eliminate the potential of the wood splitting.

  8. #8
    Thanks all. I was trying to think why it split and it might have been when I was levering the chisel to help eject the waste, if my chisel was slightly twiseted and I had too much wood behind it, then when I went to break it I think that would have caused it to split.

    @warren that layout tool is neat. I'm not sure how well it will serve me here because the edges of my piece are rounded - which is the first problem, i really should have cut the mortises when the pieces were still square. Then I could just use my marking gauge and scribed the lines on both side.

    @Stewie, I didn't strike a line tangent to the grain. I'll try that on the next.

    @jim and @flamone I'll try those drilling tips.

    I have nine of these to do, so I'll try a few more and see if I can reduce the splitting.

  9. #9
    Quote Originally Posted by Stewie Simpson View Post
    If you strike the tangient grains 1st that should eliminate the potential of the wood splitting.
    Maybe I am misunderstanding your intention, Stewie, but I think you meant perpendicular to the grain?. Tangent is normally in the context of curves, but would mean parallel to (along) the grain in the case of a grain line.

Tags for this Thread

Posting Permissions

  • You may not post new threads
  • You may not post replies
  • You may not post attachments
  • You may not edit your posts
  •