Originally Posted by Julie Moriarty

So, are you finding and issue with the table itself or the settings?


 Contributor
So, are you finding and issue with the table itself or the settings?
 Contributor
Hugh, you cant hurt the cast iron table by doing this. I generally use a grey scotchbrite pad. Clean any heavy grease or wax from the tables, then flood the tables with a light oil or WD40. Use the sander just as you would on wood; not too long in one spot, even overlapping passes. You will feel when the grain gets knocked down. Once that is done, strip the tables with acetone or denatured alcohol and immediately apply the paste wax. If its cold in the shop, use a heat gun to get it fluid and work it in. This is especially important to do to the planer table on J/Ps. Hope this helps,
Erik
Member
Erik, thanks so much. I've wanted to do this for years and this is just the advice I needed to push me over the top. Thanks again, Hugh
[OP]
Member
Brian, your previous question kind of piqued my interest about what would the numbers look like if I used a precision instrument to measure them. In the following pictures the dial was set to 0 in the first one. After that all I did was move the setup from place to place. I never touched the dial through all these pictures.
Forward position
DIM_01.jpg
DIM_02.jpg
Center position
DIM_03.jpg
DIM_04.jpg
Back position
DIM_05.jpg
DIM_06.jpg
What they mean as to how the jointer will perform, I don't know.
Travel is fatal to prejudice, bigotry, and narrow-mindedness..." - Mark Twain
Contributor
Ok so those measurements dont tell the whole story, but they do indicate that something needs adjustment and possibly everything things adjustment.
Is the cutterhead set at the same height relative to the outfeed on both sides?
Contributor
A dial indicator is a drama queen. to me there are no useful measurements in what you have shown, both by how you have done it and changes you have made, no extension to full extension you simply cant trust any measures there. Ive only scanned a bit of all this but think I read you have adjustments on those machines for how flat your tables are, likely like a truss rod in a guitar neck which seems odd to me. Im used to heavier stuff with no adjustments for table flatness. and some things like one old SCM shaper I checked its very flat.
All of these machines need a starting point. On my old SCM saw that i had started on I finally bailed and went to manually flatten the top as it was making it harder to take other accurate measurements, adjusters are primitive or at least not easy to dial in fine changes.
I dont know those machines but I would want to know tables were flat from side to side and end to end until that is done I dont see much value in measuring, its only going to give you grey hair.
Id likely make sure the rear table is flat from side to side in length, then I would make it parrallel to the head then I would start on the front table and check that for flat side to side then in length. After that id check the relation of the two tables to each other. Through all of that I would not use a dial. I use a 72 Inch precision ground straight edge that was machined to be bang on accurate. Feeler gauges are simple and easy and at that point would tell you how the two tables are in relation to each other. I'd never had a need to check a jointer till I had that one issue and it was the material and not the machine. What it was out was minimal and it had never caused any issues in many years.
Last edited by Warren Lake; 09-23-2018 at 7:55 PM.
Member
DIM_04.jpg
I know you know this but the tables need to be clamped down when taking measurements. The clamp lever appears to be un latched but that may just be the way you have it oriented.
Marty
 Member
Man I feel like this discussion has gotten way off topic. I think a new thread should have been created here dealing with Julie and Gregs issues.
If at first you don't succeed, redefine success!
Member
unless they’ve changed something you push the handle in when they are at 12 o’clock and you rotate the handles towards each other as they bite the eccentric/cam pin.
The left handle should be about 3 o’clock and the right handle should be around 9 o’clock.
You could start both handles at 6 o’clock and rotate them away from each other leaving the right handle at 3 o’clock and the left handle at 9 o’clock. But you’re not in this situation adding any downward force to the table from your body. You’re actually somewhat lifting the tables and making the Cam work harder.
Last edited by Matt Mattingley; 09-23-2018 at 9:09 PM.
[OP]
Member
Both tables are clamped down tight. They can rotated 180, left or right, when clamping. At least on mine.
When I have a chance, I'll joint some boards as if I was preparing to do a glue up. Then I'll know if the tables need adjustment.
And now for something completely different - an old man with a new body won his first golf tournament in over 5 years. Never seen Tiger so close to tears before.
Travel is fatal to prejudice, bigotry, and narrow-mindedness..." - Mark Twain
Guest
Seen plenty of new cast iron parts warp after machining.
Just in time manufacturing can be thanked for that.
Contributor
I came to believe JIT means Junk In Time.
Sorry for the sidetrack Julie.
 Contributor
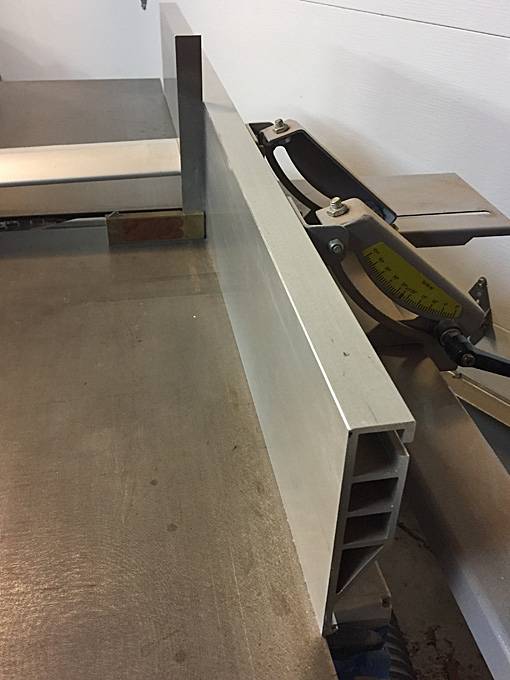
Pictures for Julie ...
Julie, this is the A3-31 J/P with the fence pulled across prior to converting the jointer to thicknesser-planer ...
Incidentally, this is the bed extension which can be used. I have rarely needed to use it, and it lives on the K3 slider ...
Now to business! Here is the fence pulled back very slightly over the edge of the table. I have not adjusted the setting. The last time I checked, about a month ago, it was square ...
Up close - you can see that it is now a few degrees off square (that's a Vesper square, which is essentially a machinist square - it is Accurate) ...
Now I set up the fence where it usually goes when jointing ...
This turns out to be 3mm inside the table ...
And the result is square .. square .. square ..
Set this way, here is the table available for jointing. That is a 300mm Starrett rule. Give or take a smidgeon, I'd say that there is 307mm in width ..
The position of the slide is in line with the edge of the table ..
.. and it hangs over the rail, but there is about 3" on the rail ...
I hope this helps.
Regards from Perth
Derek
Julie, join the Felder Owners Group on Yahoo. There are a number of resources there to assist with setting up your jointer, including a current thread discussing this issue in depth.
Mike
 Contributor
I’ve searched for this over and over and can’t find an active Felder owners group. Only a Felder users group with 111 members but no posts in months. Is there a link for this Felder owners group? It doesn’t seem to come up in my search on yahoo groups. Thx.
 Posting Permissions
 But really, I used a Veritas 24" straight edge, with 15" (not 18" as I said earlier) hanging over the infeed table. From there it was feeler gauges. I couldn't figure how to use the Betterly Uni-Gauge for this measurement. Using the eyeball method though, you can see the difference from one end to the other. I can see that possibly being a problem on glue ups.
 Reply With Quote