Results 1 to 9 of 9

Thread: 3 Large Bowls....

  1. #1
    Join Date
    Jan 2011
    Location
    Gresham, Oregon
    Posts
    406

    3 Large Bowls....

    I'm donating a salad bowl for a large reunion and auction I'm attending in Asheville, NC next month. Once I had chips flying, it was hard to stop and I had three! I'll pick only one and then have a spare to offer for another event.

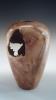
    #1 is a 15 1/2 inch claro walnut with a big leaf maple burl rim.

    IMG_0425.JPG
    #2 is a 16 inch spalted maple with alternating black walnut and maple inlays,
    IMG_0430.JPG
    #3 is another 16 inch spalted maple with a bit more color and has inlays of purple heart, red oak and Black walnut burl.
    IMG_0433.JPG

    C&C welcome.

  2. #2
    Join Date
    Mar 2016
    Location
    Florida
    Posts
    1,950
    All beautiful. Very nice.

    What finish did did you Apply?

  3. #3
    Very, very nice!! Love the inlays!

  4. #4
    Join Date
    Jan 2011
    Location
    Gresham, Oregon
    Posts
    406
    Gary - I generally use a coat of General Salad bowl finish and then sand back and apply Bees Oil (mixture of bees wax and mineral oil). The two spalted maple bowls here were a bit soft and I had to use minwax hardener to stiffen up the wood fibers in the final shaping. Then went to my normal finish procedure.
    Last edited by mike ash; 08-03-2018 at 11:05 AM.

  5. #5
    Join Date
    Jan 2015
    Location
    Lake Burton, Northeast Georgia
    Posts
    151
    The rim pieces appear to be segmented rings, correct?

    I'm interested in the sequence of steps. Here's what I assume it would have to be:

    1. Rough-turn the main piece of wood.
    2. Dry.
    3. Re-true the dried rough bowl, still leaving the walls somewhat thick (to allow for gluing the rim down atop the bowl).
    4. Flatten the rim of the rough bowl, for glueing the segmented part to it.
    5. Glue the segmented ring(s) onto the rim.
    6. Final-turn the bowl-and-rim glue-up, to desired wall thickness.

    Does that describe how these were done?

    Robert

  6. #6
    Join Date
    Jan 2011
    Location
    Gresham, Oregon
    Posts
    406
    Robert - you have the steps pretty well figured out! I have a few tricks I've developed in putting the segmented ring together so that it turns out well. Let's say I am doing an 8 piece segment.....I hand glue (press together and let sit) the 4 pieces of each half circle. Then when dry, I am concerned with a good joint fit of the two half circle, so with double sided tape, I put each half circle on a piece of 1/4" plywood and run it through the table saw with about a 1/16 of an inch overlapping the edge of the plywood as it passes the blade. I repeat this with the second half circle and "Presto" I now have beautiful joints to complete my inlay ring. Now I want to flatted the ring to match up well with the flattened bowl rim. I either run it through my drum sander, or I attach it with double sided tape to a flat disc mounted on a chuck and turn flat. I then butter up the bowl rim and press fit the inlay ring with the live center and put some pressure against it. My joints come out just perfect this way>

    Good luck, Mike

  7. #7
    Join Date
    May 2009
    Location
    Boston
    Posts
    1,740
    Thanks for the tutorial. I have some maple blanks I may try this on.
    Don

  8. #8
    Join Date
    Feb 2008
    Location
    E TN, near Knoxville
    Posts
    12,298
    Very nice designs. I especially like the look of the third one.

    JKJ

  9. #9
    Agree with all. But I can't choose a favorite. I'm guessing that some people will think they are all made of stone.

Posting Permissions

  • You may not post new threads
  • You may not post replies
  • You may not post attachments
  • You may not edit your posts
  •