Page 1 of 2 12 LastLast
Results 1 to 15 of 23

Thread: Workbench Build

  1. #1
    Join Date
    Dec 2017
    Location
    Plano, Tx
    Posts
    132

    Workbench Build

    About 20 days ago I went and purchased construction lumber for a Paul Sellers workbench I have been planning to build. As a teacher I enjoy having time off in the summer (which is why my workbench is "done" after 20 days) but spending a lot of money on hardwood for a bench was out of the question. It has been a fun process and I learned quite a bit about woodworking in the process:
    - how to dimension large pieces of lumber
    - how to use a scrub plane to really remove material
    - how to traverse across the grain to really flatten a board (something I had always avoided in the past)
    - how to sharpen more efficiently/quickly
    - through mortise and tenons
    - large housing joints (really using my router plane)
    - long grooves (hard to do with a router plane since I don't have a plow plane)

    I also purchased quite a bit to get the job done and have enjoyed using these new tools:
    - a 24" spear and jackson hand saw (the new kind - eventually I will refile it rip cut)
    - a type 11 stanley no. 6
    - a Veritas rip cut carcass saw (does a fine job with cross cuts but is a bit hard to start sometimes - I really want the crosscut now!)
    - Veritas dual marking gauge
    - more clamps!
    - a 9" quick release bench vise (Yost)
    - a 38" straight edge (very valuable for dimensioning lumber)

    Additionally, I feel like my sawing skills have taken a great leap forward! I've gotten to the point where I can scribe a line around a board (I do still go to the trouble of notching out a little recess on the waste side) and can saw to the line and have very little end grain to clean up to make the cut square.

    Here are some (many) photos from the process with descriptions:

    Bought all 12ft boards and got them gang cut at the store
    IMG_0184.jpg

    Stacked and ready to be surfaced
    IMG_0191.jpg

    Benchtop glued up from 11 2x4s (about 16oz of glue)
    IMG_0201.jpg

    Both sides flattened and at final dimensions (66" x 15" x 3.25")
    IMG_0207.jpgIMG_0208.jpg

    Aprons glued up from two 2x6s
    IMG_0215.jpg

    Legs and cross braces dimensioned and ready for mortise and tenons
    IMG_0231.jpg

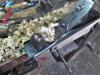
    Here is the No 6 I got on eBay - the rear tote was cracked and I purchased a new one in walnut from an online site I found. After cleaning it up and sharpening the blade it was very useful!
    IMG_0230.jpg

    I've hit my photo limit for this post so I'll continue in a reply


    1

  2. #2
    Join Date
    Dec 2017
    Location
    Plano, Tx
    Posts
    132
    As careful as I was about marking all of the mortises out several still ended up about 1/16th too long. I did find the dual marking gauge very handy though! For the first four I chopped them out with a chisel and hammer a la Paul Sellers and, while it was good to learn/practice that process, I decided to drill the rest out and pair down to the lines for a bit cleaner mortises.
    IMG_0236.jpgIMG_0242.jpgIMG_0256.jpg

    I didn't take any pictures of the tenons during the process but they mostly turned out ok. Sawed to about 1/32-1/16 away from the lines and cleaned up down to the lines with a router plane and chisels. The legs went together very square and felt extremely solid, especially once glued up.
    IMG_0268.jpgIMG_0279.jpg

    Had plenty of opportunities to practice sharpening/honing during this process. This is probably the thinnest shaving I've gotten yet from my No. 4. The surface of the scrap I tested on felt like glass after that shaving!
    IMG_0274.jpg

    Things really started moving at this point. Aprons were dimensioned, wedges for the leg housings were cut, and I made an extension for my router plane to accommodate the width of the housings.
    IMG_0286.jpgIMG_0287.jpg

    More to follow!


    1

  3. #3
    Join Date
    Jun 2010
    Location
    twomiles from the "peak of Ohio
    Posts
    12,170
    Looks good so far!

  4. #4
    Join Date
    Dec 2017
    Location
    Plano, Tx
    Posts
    132
    As much as I respect Paul Seller's traditional approach I was again not looking forward to a lot of chopping with a chisel. For the leg housings in the aprons (4 total joints) I drilled out a majority of the waste with a 1" forstner bit and again used my router to clean things up and get it to final depth (5/8"). It was neat to see the leg stay in the joint with just the wedge (of course I had to keep a hand on the apron so it wouldn't topple over since there was no support at the bottom of the leg)
    IMG_0295.jpgIMG_0293.jpgIMG_0291.jpg

    Even without the carriage bolts at the bottom of the aprons the frame was very solid and wouldn't rack at all. Once the frame was put together I checked the bench top one more time for flatness/twist, made a few small tweaks, and got it glued up.
    IMG_0301.jpgIMG_0309.jpg

    No photos of cutting the grooves for the wallboard but, considering I only had a router plane at my disposal I'm pretty pleased with it!
    IMG_0315.jpgIMG_0318.jpg


    One or two more posts


    1

  5. #5
    Join Date
    Dec 2017
    Location
    Plano, Tx
    Posts
    132
    The vice install went well too. I did use a jigsaw to make sure the cutout was as clean/accurate as possible. Once I got the wood for the vice jaws ready I installed them and planed them down to the height of the bench top. The outside vice jaw has some veg tanned leather similar to what Paul Sellers shows on his bench:
    IMG_0319.jpgIMG_0323.jpg

    Bench in its' final home with the first of several coats of Danish Oil. Annoyingly I did have to shim one of the legs because of where the bench is. At first I had a bit of a freak out when it started rocking but best I can tell, it is mostly the garage floor that isn't level/flat. The bench sits very flat and rock free on pretty much the entire other side of the garage...Anyone else have to shim their bench legs?
    IMG_0336.jpg

    After the second coat of Danish Oil dried (enough) I drilled a a few dog holes. I'm sure I will add some more as I learn how to best use the bench. For now I only have some Kreg bench dogs (which work well, btw!) but eventually I'd like to get some holdfasts. This morning I started on a removable shelf that will notch into the lower cross braces. I won't be able to store tall things underneath but I figure it will be a place where I can keep some things like bench hooks, my shooting board, and other jigs, etc.
    IMG_0343.jpgIMG_0345.jpg

    Part of this process included reorganizing my garage and moving from the corner my old bench was parked in to getting this whole half of the garage. So far, between the new bench and new space things already feel easier and I have more flexibility in my workspace which is very nice. I'll be working out of boxes until I figure out what kind of tool storage to utilize on the wall behind the bench but so far the tool well behind the work surface is holding what I need to make the removable shelf for the bench. Thanks for looking!1

  6. #6
    Join Date
    Mar 2017
    Location
    Forest Lake MN
    Posts
    340
    Looks very good. Glad you are aiming to get some hold fasts, they have become indispensable for me.

  7. #7
    Join Date
    Mar 2006
    Location
    Austin Texas
    Posts
    1,957
    Congratulations on completing the new bench Brian and a nice looking bench it is indeed. A bench is a nice step to accomplish along the way and I know you will look forward to building the underneath and wall storage next. Good stuff.
    David

  8. Bench looks great. My wife is a teacher and I tease her about having teacher disease. She go-go-goes all school year and then summer rolls around and she drives me crazy with the energy she has haha.

  9. #9
    Join Date
    May 2015
    Location
    NJ
    Posts
    1,392
    Nice looking bench. How long did she take you to build?
    "The reward of a thing well done is having done it." - Ralph Waldo Emerson

  10. #10
    Join Date
    Dec 2017
    Location
    Plano, Tx
    Posts
    132
    Quote Originally Posted by John Kananis View Post
    Nice looking bench. How long did she take you to build?
    Thanks! I started on June 9th. Didn’t keep track of hours but I put anywhere from 1-4 hours in most days.

  11. #11
    Join Date
    Sep 2009
    Location
    Putney, Vermont
    Posts
    1,044
    You made a fine looking bench Brian. I hope mine looks as nice, whenever I get it completed.
    I also have the Yost 9" vise for my bench. Looked like a good vise for the price. Enjoy.

  12. #12
    Join Date
    Nov 2008
    Location
    Lewisville, Tx
    Posts
    158
    Very nice.

    Congratulations on the bench and on getting it done at the start of the summer. And thanks for posting the pics. I always enjoy build pics and learn lots from fellow creekers.

    (nice sawbench too)

  13. #13
    Join Date
    Dec 2017
    Location
    Plano, Tx
    Posts
    132
    Thanks for the compliments, everyone! It is buried in a bunch of pictures so I will ask in this reply: how many of you have to shim your bench leg(s)? As best as I can measure the bench is square and twist free. In many areas of the garage as I moved it around in the build the frame sat evenly on the garage floor. However, where I have the bench positioned now (its’ permanent home), I had to place a 1/8” shim under one of the feet to get it not to rock. Seems like the wrong half of my garage is relatively flat but the side I have to be on is not!

  14. #14
    I had to shim mine slightly on my uneven basement floor. I taped a piece of non-slip drawer liner to the bottom of one leg.
    It's a modified version of Sellers' bench in his first youtube series. I put the 10" eclipse vise on and so far I have no complaints about any of it.

  15. #15
    Join Date
    Aug 2010
    Location
    USA
    Posts
    5,582
    Nice job on the bench. It looks solid and well constructed. I'm impressed with your glueup for the benchtop!

Posting Permissions

  • You may not post new threads
  • You may not post replies
  • You may not post attachments
  • You may not edit your posts
  •