Marked to show which part goes where.. IMG_4831 (640x480).jpg
Finally get one frame all ready for a glue up... IMG_4832 (640x480).jpg
With this sort of frame, I add a pair of nails into each joint.. IMG_4835 (640x480).jpg
Old piece of iron, so that IF these 3/4" long nails are too long, the iron will turn the point over, and back into the wood...
Set aside, and do the next.. IMG_4836 (640x480).jpg
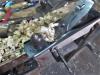
A few of those tenons needed shaved a bit, as they were too fat on one side....chin-powered chisel to remove.. IMG_4833 (640x480).jpg
Test for fit.. IMG_4834 (640x480).jpg
Noticed two of the first frames were twisting....decided to try and clamp them flat.....snap!
One tenon must have had a knot in it....tenon snapped right off.....NOT going to make a new part...got out a few other toys... IMG_4839 (640x480).jpg
Pilot hole, Countersink, and a Phillips screwdriver....jack plane to make sure all the sides matched each other... IMG_4837 (640x480).jpg
Went to all the corners, and added a 3" long #6 screw. Have to offset it a bit, as a 1/2" dovetail bit will be going along the edge....so it can slide into a sliding dovetail groove.
Bench is full of toys, I ran out of 3" screws....was getting a bit flustered......still have one more frame to build....Decided I had enough fun for today....
Once the fourth frame is done, I can gang all four together, and run the router around. Will need to dig out the edge guide for it. Then see about the matching grooves in the side panels...
I always enjoy your build posts.... When I build something, I think about the pictures very late in the game, so you miss the building of the project. You do a great job with it.
Picked up a box of 2-1/2" long screws ( no 3" ones were around..) after a couple Doctor office visits today.
Got frame #3 done. It is sitting clamped up to the first two. Screws are in place.
Got a start on frame #4....one long has both of it's mortises done. Then I just glued the ends in place. Clamped things right to the bench. Checked for square and lean.....one end was leaning a bit, added a caul to "un-lean" it. Waiting on the glue to dry a bit, before I sneak back to the shop.....Normally, the shop is closed on Mondays...with the deadline coming up....need to work through Mondays....18th July I have to be at the Heart center @ OSU.....
Might round up the parts for the router...and get it set up. Then I can route the sliding dovetails later this week...side panels need planed flat, first....may get out old No. 8 and see how it does.
Now have all four frames assembled..other than the kickers
Ganged the four up, evened all the sides up..mainly on the ends IMG_4848 (640x480).jpg
After I had went and bought a new box of screws....found the old box of 3" screws....in plain sight, of course
Clamped this stack to the side of the bench.. IMG_4845 (640x480).jpg
And set up that corded object.. IMG_4847 (640x480).jpg
Needed a dovetail bit installed, and the fence.. IMG_4849 (640x480).jpg
So it could run along the stack.. IMG_4850 (640x480).jpg
First setting.. IMG_4851 (640x480).jpg
Outside edges done...move the fence a bit.. IMG_4852 (640x480).jpg
Second cuts. Center the bit for the last cut.
. This end is done. Will flip things over, and do the other end..tomorrow.
Stay tuned..
Last edited by steven c newman; 07-02-2018 at 11:00 PM.
Have flipped the stack over...waiting for the sleepy-heads in the house to wake up...and the shop to cool down a bit.....and dry up a bit..Thunderstorm caused the Cellar Creek to go across the floor, again.
Hmmm..would that router guide fence be called a "Jig" , or a "Crosscut Sled"?
I have a few made jigs in the shop...one that holds parts for doing a mortise, needs rebuilt after 5 years of abuse. Another does all kinds of duties.....from guiding the circular saws, to guiding the routers across a panel, and has even been used on the bandsaw....just a wooden "speedsquare".. fence set up 2.jpg
Needs to be set according to how wide the router base is.. fence steup 1.jpg
To get the cut where it is needed, usually I will also check for square big square.jpg
Just three pieces of scrap wood. IMG_2669 (640x480).jpg
There is a cleat underneath.. speed square 2.jpg
Was originally designed as a replacement for a DeWalt Jobsite saw's rip fence.
No longer have the tablesaw....works good at guiding a circular saw.... trim an end.jpg
Will need to get out a sabresaw, and cut some feet profiles.... foot work.jpg
Maybe like these....used on the Pine Stepback Cupboard project? We'll see...
Trying to process 31 pictures,,into some sort of story...here goes...
Flipped the stack end for end....was in need of a little plane work.. IMG_4855 (640x480).jpgIMG_4856 (640x480).jpg
Looks a bit better? Decided to reverse the order I cut the dovetails... IMG_4857 (640x480).jpg
Since the fence was already out that far..center cut... IMG_4859 (640x480).jpg
Then these two. Reset again.. IMG_4863 (640x480).jpg
And do the outside cuts. Then set this mess aside, for now..
Got both panels out of their clamps... IMG_4864 (640x480).jpg
But, there was a problem.. IMG_4865 (640x480).jpg
Add-ons were a little thicker than the pre-made panel...we have ways.. IMG_4866 (640x480).jpg
Stanley No.8 Seems to do a decent enough job....more about this in the next episode
Ok...got this side done...flipped the panel over...was a tab worse...and that No. 8 was getting heavy.. IMG_4869 (640x480).jpg
Switched over to a No. 7c and a No.4....Was a lot of knot caused tearout on one corner....have an idea for that, too
Got two scraps out, to "stand-in" for a webframe and it's kicker... IMG_4871 (640x480).jpg
I marked this end "Top" and Inside....needed enough space above the frame to allow corner glue blocks...large square to mark the lay out lines... IMG_4872 (640x480).jpg
Needed to lay out for 4 webframes...with 5" at the bottom for feet. Went with a 7" spacing for the 1 x 8 drawers..got to the bottom.. IMG_4873 (640x480).jpg
Hmmm, just missed that bad tear-out....Varnish can was the "jig" to lay out the curves...
Got out a couple "Vintage saws" IMG_4878 (640x480).jpg
One is an older, all metal B&D, used it for the straight cuts... IMG_4881 (640x480).jpg
And the Green Plastic B&D for the curves. IMG_4882 (640x480).jpg
Fancy feet? Will fine-tune the one curve...can had a dent in it....hate when that happens..
Then got out the Speed Square..
More on that, in the next, exciting episode...
Stay tuned...
Ok, the Speed Square.....
To set it up, I needed to know how far "inland" the center of the dovetail bit was from the edge of the router's base... IMG_4884 (640x480).jpg
I also needed a mark, showing the center of the socket I was going to mill.. IMG_4886 (640x480).jpg
Slide the Speed Square over to the marks....checked with a larger square.. IMG_4887 (640x480).jpg
Once this was all set up, and a pair of clamps attached to the entire mess....jig, panel, and bench IMG_4888 (640x480).jpg
So nothing moves. Start up the router, and, pushing it against the jig..make the cut.. IMG_4889 (640x480).jpg
Pushed it through, then draw it back out, to clean the chips out....repeat for the next socket... IMG_4890 (640x480).jpg
I can then turn the panel end for end, and come back the other way. As long as I measure from the center of the socket to where the edge of the router base will be, I can go in from either the front or back edge of the panel....first two were on the front edge.
Was getting a bit worn out, soaked clear through....decided to sweep the mess up.. IMG_4875 (640x480).jpg
And call it a day....Maybe tomorrow, I can hide out in the shop...will be way too hot to stick me nose outside, anyway. Might see about getting things a little further along?
No deadline pressure for a pro like you Steven C. Water off a duck's back. Hotter than the 7th Gate of Hell here too. Sweatin like Moses Malone in my shop.
Waiting on BOTH eyeballs to wake up, this morning ( Happy Birthday, USA!) before I venture towards the shop....1st Breakfast (pills) has been done....will see about 2nd Breakfast in a bit.
A wee bit too early to run that router.....everyone else is sleeping in.
Design stage for the face frame.....I do not want it to intrude into the openings for the drawers....yet allow the cross-members to be a 3/4" thickness....Hmmmm
I can stand the stiles on edge....do a round-over "inside" and "outside"....and maybe a bead down the center? I leave the rails flat, where they attach to the webframes.....then where they meet the stile, maybe a dovetail? Face frame will be out of 1 x 2s.....except at the top and bottom.....fancy cuts on the bottom rail, leaves a 2" "foot".....will need a 1 x 3..or a 1 x 4 for the two. Three thicknesses of 1x2...will rip down the 1x4.....Should be able to use a 1 x 4 x48" to do both. Maybe a couple 1 x 2 x 6' for the rest.....and and extra one for the kickers...unless I have enough scraps for them.
Drawer fronts will use a through dovetail. And will be flush with the rails when closed. Round wooden knobs, 2 per drawer. Glue and screws to install the knobs.
May get a can of Golden Oak stain.....then a coat of Poly Gloss....still working on the top's design....Top panel is 3/4" x 16" x 48".....a bit too long....may cut it to size ( ~ 30"?) and used the left-over as stock for the kickers? Would save a few pennies, that way. Kickers need to be around 14-1/2" long....
Next PayDay is right before the "deadline"... may have to put this on hold for a few days.....depending on how I heal up....stay tuned...will update as things turn out.
Last edited by steven c newman; 07-04-2018 at 9:02 PM.
Ok...back to work...Got the last two sockets done on Side #1
Attachment 389077
I needed the light, camera hates it. Set this panel into the leg vise.. Attachment 389078
Set up the Ward's #78.. Attachment 389079
Used a piece of 1/4" plywood to set the depth...wanted the rebate to cover the sockets a hair... Attachment 389080
Once this fit...I can set this panel aside...and flatten side 2 Attachment 389081
#4 was for clean up...used a cambered jack in a couple spots, and the #7 and the #8....mainly the 7....Set side #1 onto the flattened #2 Attachment 389082
Have some trimming to do....marked this end for a circular saw cut.. Attachment 389083
Speed Square is also very good at guiding saws...
Moved the side around...had feet to mill.. Attachment 389084
I also marked where the sockets were...then milled those....then milled a rebate along the back edge to match side #1
Left both sides clamped together..until tomorrow. I can fit the top for length.....and resaw the cut-off from the top, to make kickers...then MAYBE a bit of assembly work?
Stay tuned....fighting crampy legs, right now....may have been a tad too warm?
Last edited by steven c newman; 07-05-2018 at 7:51 PM.
Had two frames that needed the dovetail pins trimmed a bit.....both were too fat....Measured for the length the top needs to be...27-1/2"
IF the floor will dry out, I can set the case on the floor, and work on over items....Have to get a 1/4" x 48 x 48 plywood panel....those 2'x 4' ones are a little too narrow for the back panel...once the back panel is cut to size....I can assemble the case....them work on a face frame. and three drawers....
Will try to get the case glued up...have a "stand-in" for the plywood back.....need that to make sure the case is clamped up square....May work on getting the top cut to size, and the kickers cut and installed....
Next PayDay will be right before the "deadline"....doubt if I can do a whole lot more on this..until after I am cleared to go back to "normal" activities....
Now have the parts needed to repair the bandsaw....the new-in-bag shaft arrived today....again..this will have to wait awhile....that 1/2hp motor weighs more than a Fat Man's Lunch..LOL..need a better pair of snapring pliers, and a new cord for the motor......will just have to wait...
Sooo, IF I can get a little more done..I will post as I go along....stay tuned..
OK...hauled a few things down to the shop today...clamps were rounded up.. IMG_4936 (640x480).jpg
1/2 of them.. IMG_4935 (640x480).jpg
More of them...Cut the panel for the top of the chest to length.. IMG_4934 (640x480).jpg
Set it aside, and cut the leftover into strips, on the bandsaw.. IMG_4939 (640x480).jpg
Then trimmed those to length (5 of the six, anyway).. IMG_4940 (640x480).jpg
used the Stanley #2246 mitre box for these...got out a couple drills.. IMG_4948 (640x480).jpg
Pilot hole drill, countersink drill, and the 1" screws I'll use to attach the strips to the undersides of the frames....with a dab of glue. These will be the kickers, that keep the drawer from tipping down, when you slide it out. Got a start on the corner blocks.. IMG_4956 (640x480).jpg
Starting to get warm down here... IMG_4947 (640x480).jpg
Sabresaw to cut the corners on the top. Cap from a paint can to mark the radius..
Figured out WHY it was getting too warm in the shop.....fan was still sitting upstairs.....closed the shop, swept up the sawdust, and headed for the room A/C unit...
Stay tuned. Could use a couple extra hands tomorrow...have the assembly to do.....15 clamps needed to be applied...at once....hard to do with just 2 hands..LOL..


 Reply With Quote