Page 1 of 2 12 LastLast
Results 1 to 15 of 20

Thread: Experiment from Derek's thread

  1. #1
    Join Date
    Aug 2012
    Location
    Missouri
    Posts
    2,152

    Experiment from Derek's thread

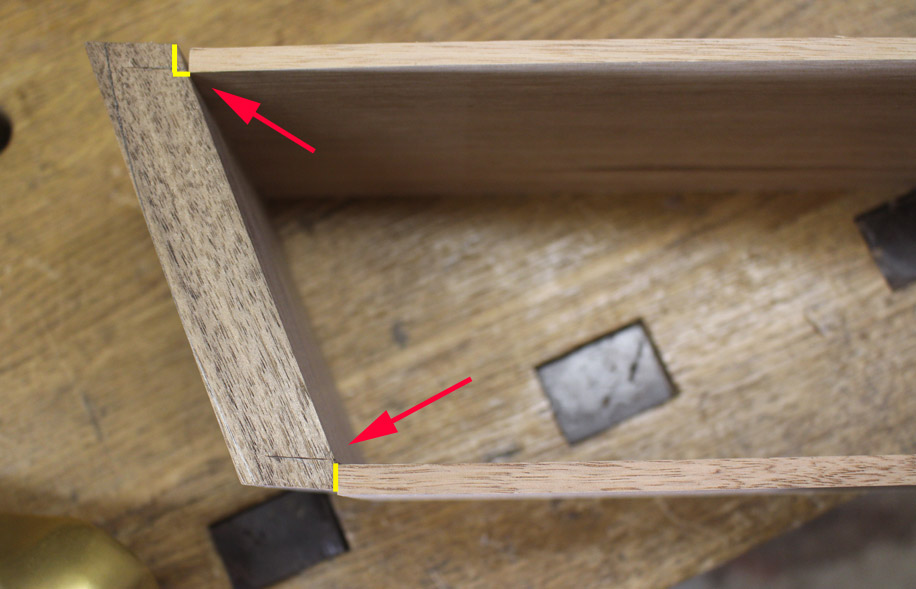
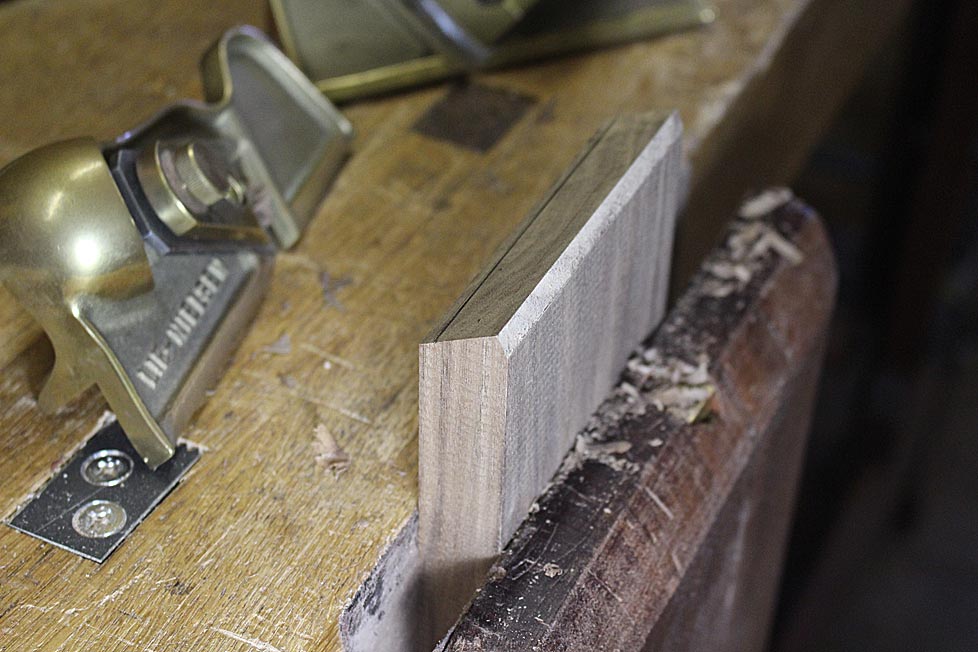
    I always like to try things. When I read Derek's thread about angled drawers and his approach I just had to try it by hand. I had a piece of walnut scrap and an oak scrap. I marked it out at 15* penciled it in hand cut the angle on the ends penciled in some dovetails and sawed it out. Chopped and pared out the waste. This is what it ended up. Not bad but not easy at all. Took an hour just for one corner. Without setting up some fixtures to aide in the work I would not want to do 48 drawers. Kudos to Derek and his methods. I just enjoy experiments.
    Jim
    Attached Images Attached Images

  2. #2
    Derek is not doing 48 drawers; he is just doing 24. He averaged an hour per corner the same as you, James. So all the "fixtures to aide in the work" netted him zero minutes. And by the time you made your 12th corner your average would probably be somewhat lower.

    Last week when Derek wanted feedback and asked "Can you do this another way?", I did a sample drawer and posted a picture because I thought I would have trouble describing it. I just did two dovetails in stead of three to save time. It took 14 minutes for the angled dovetailing. I think that the simpler the method the more potential for improving one's time.

  3. #3
    Join Date
    Feb 2004
    Location
    Perth, Australia
    Posts
    9,494
    Well done Jim!

    Was the drawer front (tail board) angled?

    Regards from Perth

    Derek

  4. #4
    Join Date
    Feb 2004
    Location
    Perth, Australia
    Posts
    9,494
    Quote Originally Posted by Warren Mickley View Post
    Derek is not doing 48 drawers; he is just doing 24. He averaged an hour per corner the same as you, James. So all the "fixtures to aide in the work" netted him zero minutes. And by the time you made your 12th corner your average would probably be somewhat lower.

    Last week when Derek wanted feedback and asked "Can you do this another way?", I did a sample drawer and posted a picture because I thought I would have trouble describing it. I just did two dovetails in stead of three to save time. It took 14 minutes for the angled dovetailing. I think that the simpler the method the more potential for improving one's time.
    No Warren, the reason you posted was not to offer another method in the spirit of endeavour. The reason you posted was to have a go at me. Your comments were insulting then, as they are now.

    Derek

  5. #5
    Join Date
    Aug 2012
    Location
    Missouri
    Posts
    2,152
    Quote Originally Posted by Derek Cohen View Post
    Well done Jim!

    Was the drawer front (tail board) angled?

    Regards from Perth

    Derek
    yes the drawer front was sawn at 15* as was the tail board. I was guessing that was somewhere in the neighborhood of yours. It worked OK, just took a while. If I had just a few to do I wouldn't hesitate to use my method. Of course I may do a little better than a pencil for the laying out and fixture the planing angles instead of planing to a line. You can see the angle in the second picture of the inside.
    Jim

  6. #6
    Join Date
    Feb 2004
    Location
    Perth, Australia
    Posts
    9,494
    Jim, I assume that you completed the lower side, as below ...


    Did you add a bevel? ...


    or angle the baseline? And, if so, how?

    Regards from Perth

    Derek

  7. #7
    Join Date
    Aug 2012
    Location
    Missouri
    Posts
    2,152
    Derek, I marked and sawed and planed the face. I then used the face to mark the tail board and sawed and planed that. I marked the blind depth on the face board and used that to mark the tail length on the tail board. I used the angle of the face board to mark across the edge of the tail board and used a square to mark across the tail board. I then marked and sawed the tails to the base lines. I sawed the half pins and left the center tail. I just hand held the tail board and marked the pins using the sawed half pins as a guide for square. I sawed the pins and pared them out by eye for the angle and used a bevel to check my progress. I used the face board as a gauge block to pare the center tail bevel. It was passable but like I said a better layout would have improved the process.
    Jim
    Attached Images Attached Images

  8. #8
    Quote Originally Posted by James Pallas View Post
    Derek, I marked and sawed and planed the face. I then used the face to mark the tail board and sawed and planed that. I marked the blind depth on the face board and used that to mark the tail length on the tail board. I used the angle of the face board to mark across the edge of the tail board and used a square to mark across the tail board. I then marked and sawed the tails to the base lines. I sawed the half pins and left the center tail. I just hand held the tail board and marked the pins using the sawed half pins as a guide for square. I sawed the pins and pared them out by eye for the angle and used a bevel to check my progress. I used the face board as a gauge block to pare the center tail bevel. It was passable but like I said a better layout would have improved the process.
    Jim
    This is about what I recommended last week.

  9. #9
    Join Date
    Feb 2004
    Location
    Perth, Australia
    Posts
    9,494
    Jim, from what I can make out, you have done the upper edge in my picture (above), and not the bottome edge. Is that right? My recent thread was about the lower edge. The sockets run at a different angle, and it was this angle that makes the marking transfer and excavation of waste more difficult than the other side.

    Still, I am suitably impressed with your work, which is really tidy, not to mention how enjoyable it is to have you join me in this. Fun?

    Warren, keep in mind that my hour also included fitting the drawer sides, marking out the drawer front dimensions (in the drawer blades, and then marking for the curved shape that would later be added). Since each drawer is slightly different, this adds 15-20 minutes to the build time.

    Regards from Perth

    Derek

  10. #10
    Join Date
    Aug 2012
    Location
    Missouri
    Posts
    2,152
    Quote Originally Posted by Warren Mickley View Post
    This is about what I recommended last week.
    Warren, I tried to make it clear that what I'm doing with this is an experiment. I was not trying to say that this way was better than Derek's method. I just wanted to see how difficult I found the process was by hand work. Given the facts that Derek has side rabbet planes and a trim router it would be difficult to beat the method by hand that many times without some difficulty, IMO. Excavation of the waste with the router and not having to pare an angle on the base of the socket is a definite advantage. That is why I started a new thread as to not make it appear that my method was better or faster just that it could be done with hand work.
    Jim

  11. #11
    Join Date
    Aug 2012
    Location
    Missouri
    Posts
    2,152
    Quote Originally Posted by Derek Cohen View Post
    Jim, from what I can make out, you have done the upper edge in my picture (above), and not the bottome edge. Is that right? My recent thread was about the lower edge. The sockets run at a different angle, and it was this angle that makes the marking transfer and excavation of waste more difficult than the other side.

    Still, I am suitably impressed with your work, which is really tidy, not to mention how enjoyable it is to have you join me in this. Fun?

    Warren, keep in mind that my hour also included fitting the drawer sides, marking out the drawer front dimensions (in the drawer blades, and then marking for the curved shape that would later be added). Since each drawer is slightly different, this adds 15-20 minutes to the build time.

    Regards from Perth

    Derek
    I already guessed that the question would come up Derek. So I have already started the other side. I'm going to cheat a little and use the same tails flipped over. We shall see how it works out. I don't see much difference one way or the other. I'm of the opinion that angles throw people into a swivet (my word, it means you anchor one foot and spin on it not knowing which direction to look for an answer). Alas we shall see. Maybe tomorrow. It's all fun anyway.
    Jim

  12. #12
    Join Date
    Feb 2004
    Location
    Perth, Australia
    Posts
    9,494
    I like "swivet", Jim .... I am frequently in a swivet

    By the way, the angle of the (end) pin board is 20 degrees.

    Looking forward to hearing about your experience.

    Regards from Perth

    Derek

  13. #13
    Join Date
    Aug 2012
    Location
    Missouri
    Posts
    2,152
    Well you'll have to settle for 15 because I already have the tails cut and the pin board sockets sawn
    Jim

  14. #14
    Jim,

    I think I posted to Derek's original post that it made my head hurt. Pretty much the same but it looks like a fun butt scratcher either way it is done.

    ken

  15. #15
    Join Date
    Feb 2004
    Location
    Perth, Australia
    Posts
    9,494
    I may be getting a little ahead of myself, but I have made a video of this - my first - and will demonstrate the corner. It was the second drawer I did this morning, and it took 39 minutes from beginning to end (including measuring up the drawer). My last drawer took 30 minutes, perhaps a little less. Later (have to learn how to upload to YouTube).

    Regards from Perth

    Derek

Posting Permissions

  • You may not post new threads
  • You may not post replies
  • You may not post attachments
  • You may not edit your posts
  •