Brian, I would love to see photos of the install.
I have the kit, but have not installed it yet.


 Member

Brian, I would love to see photos of the install.
I have the kit, but have not installed it yet.
Martin, Granbury, TX
Student of the Shaker style
 [OP]
Contributor
[OP]
Contributor
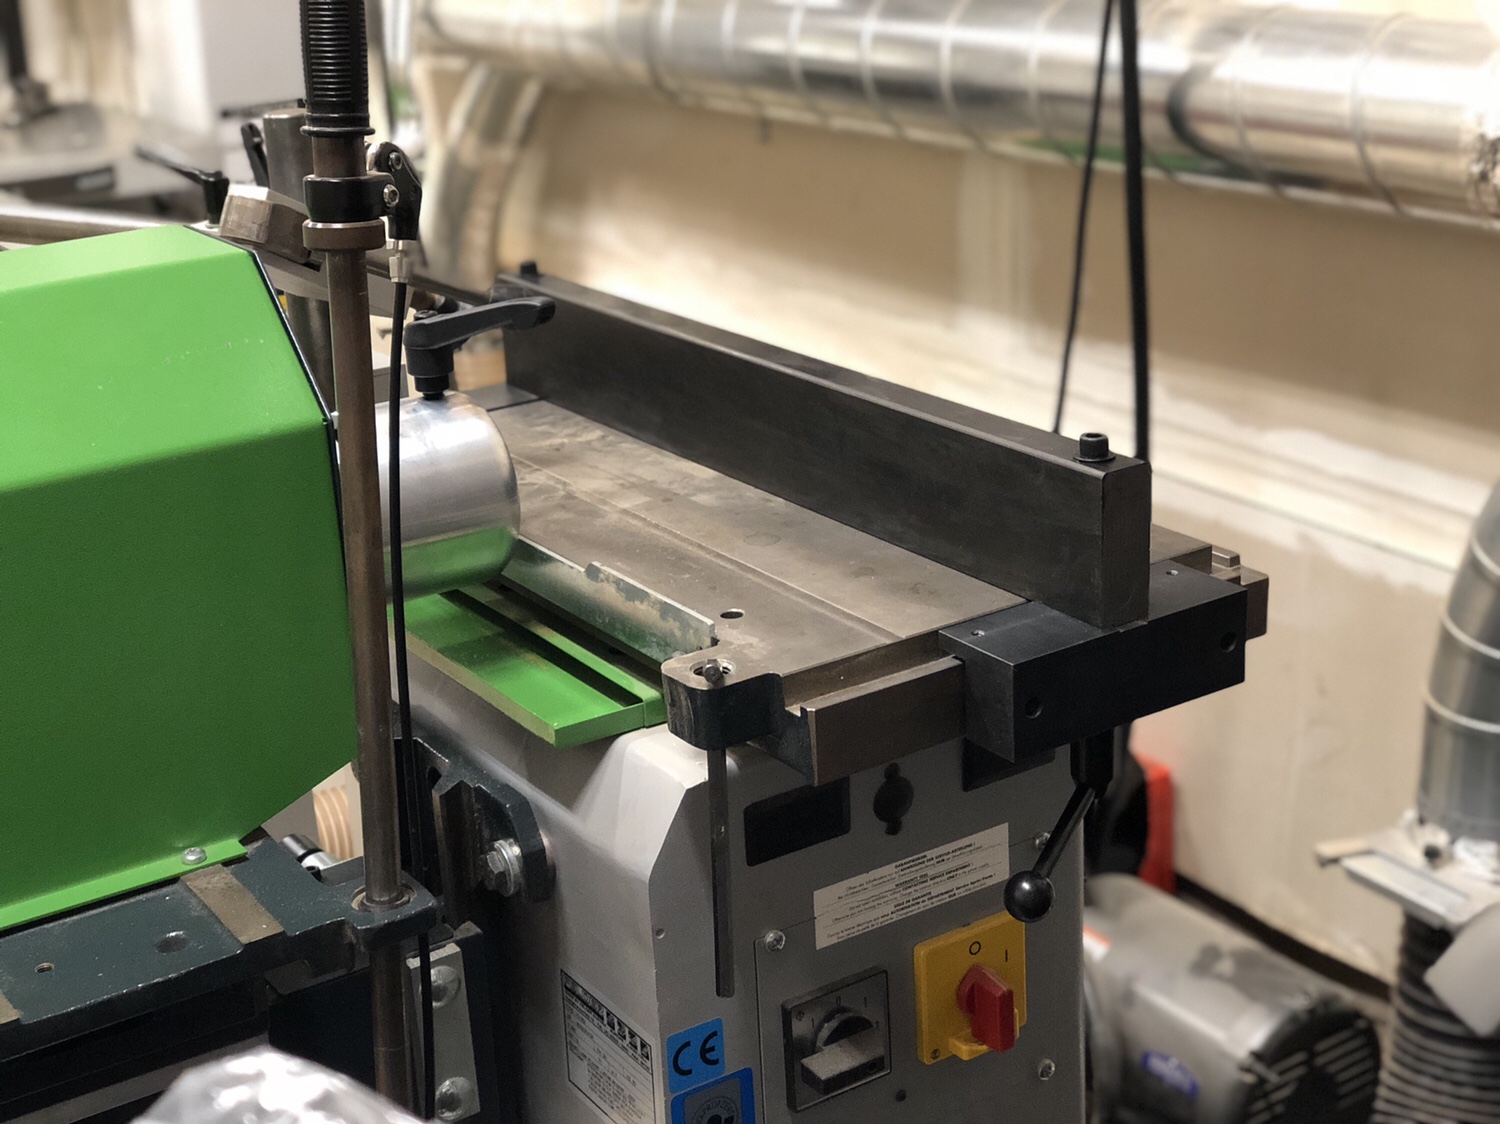
I found it pretty straightforward but Ill try to provide some detail on that aspect. The difficult part was also hard to photograph which was installing the gears onto the shaft inside the motor support (not sure the name for it). I took the handwheel off to gain visual access to the area, that was really easy. Just loosen the bolt and the hand wheel can slip off.
The shaft and pinion gears assemble. Theyre a tight fit but theyre not a press fit. Once theyre in position I drove the spring pins out partially to retain the gears in position.
I did all this with the racks already installed, the long end sticks out of the back of the machine. I needed to purchase the rear bolts separately because I also have the dowel boring jig installed. This required additional planning.
the brass blocks go on, the bolts installed but not tightened. I then adjusted the eccentric bolts to position the brass blocks. I position the gear to engage rack in a way which has the gear teeth meshing with full contact along their faces but clearance between the peak and valley. I then tightened the bolts and locked down the eccentrics in position. The trick with the eccentric bolts is to engage them into their threaded holes but make certain that the threads are one turn back from protruding, so as to provide a full turn of adjustment without interference.
Handle goes on the shaft and a bolt retains the shaft on the opposite side. The bolt hole is shallower than any bolt in the kit so I ordered a bolt and washed for that. It allows a minor bit of play in the assembly, which is necessary.
I oiled the shaft where it engages the blocks and dry lubed the gears.
The chisel holder bolts on, mine was super accurate to the motor, so I doubt I could adjust it at all.
Last edited by Brian Holcombe; 06-22-2018 at 8:12 AM.
Bumbling forward into the unknown.
[OP]
Contributor
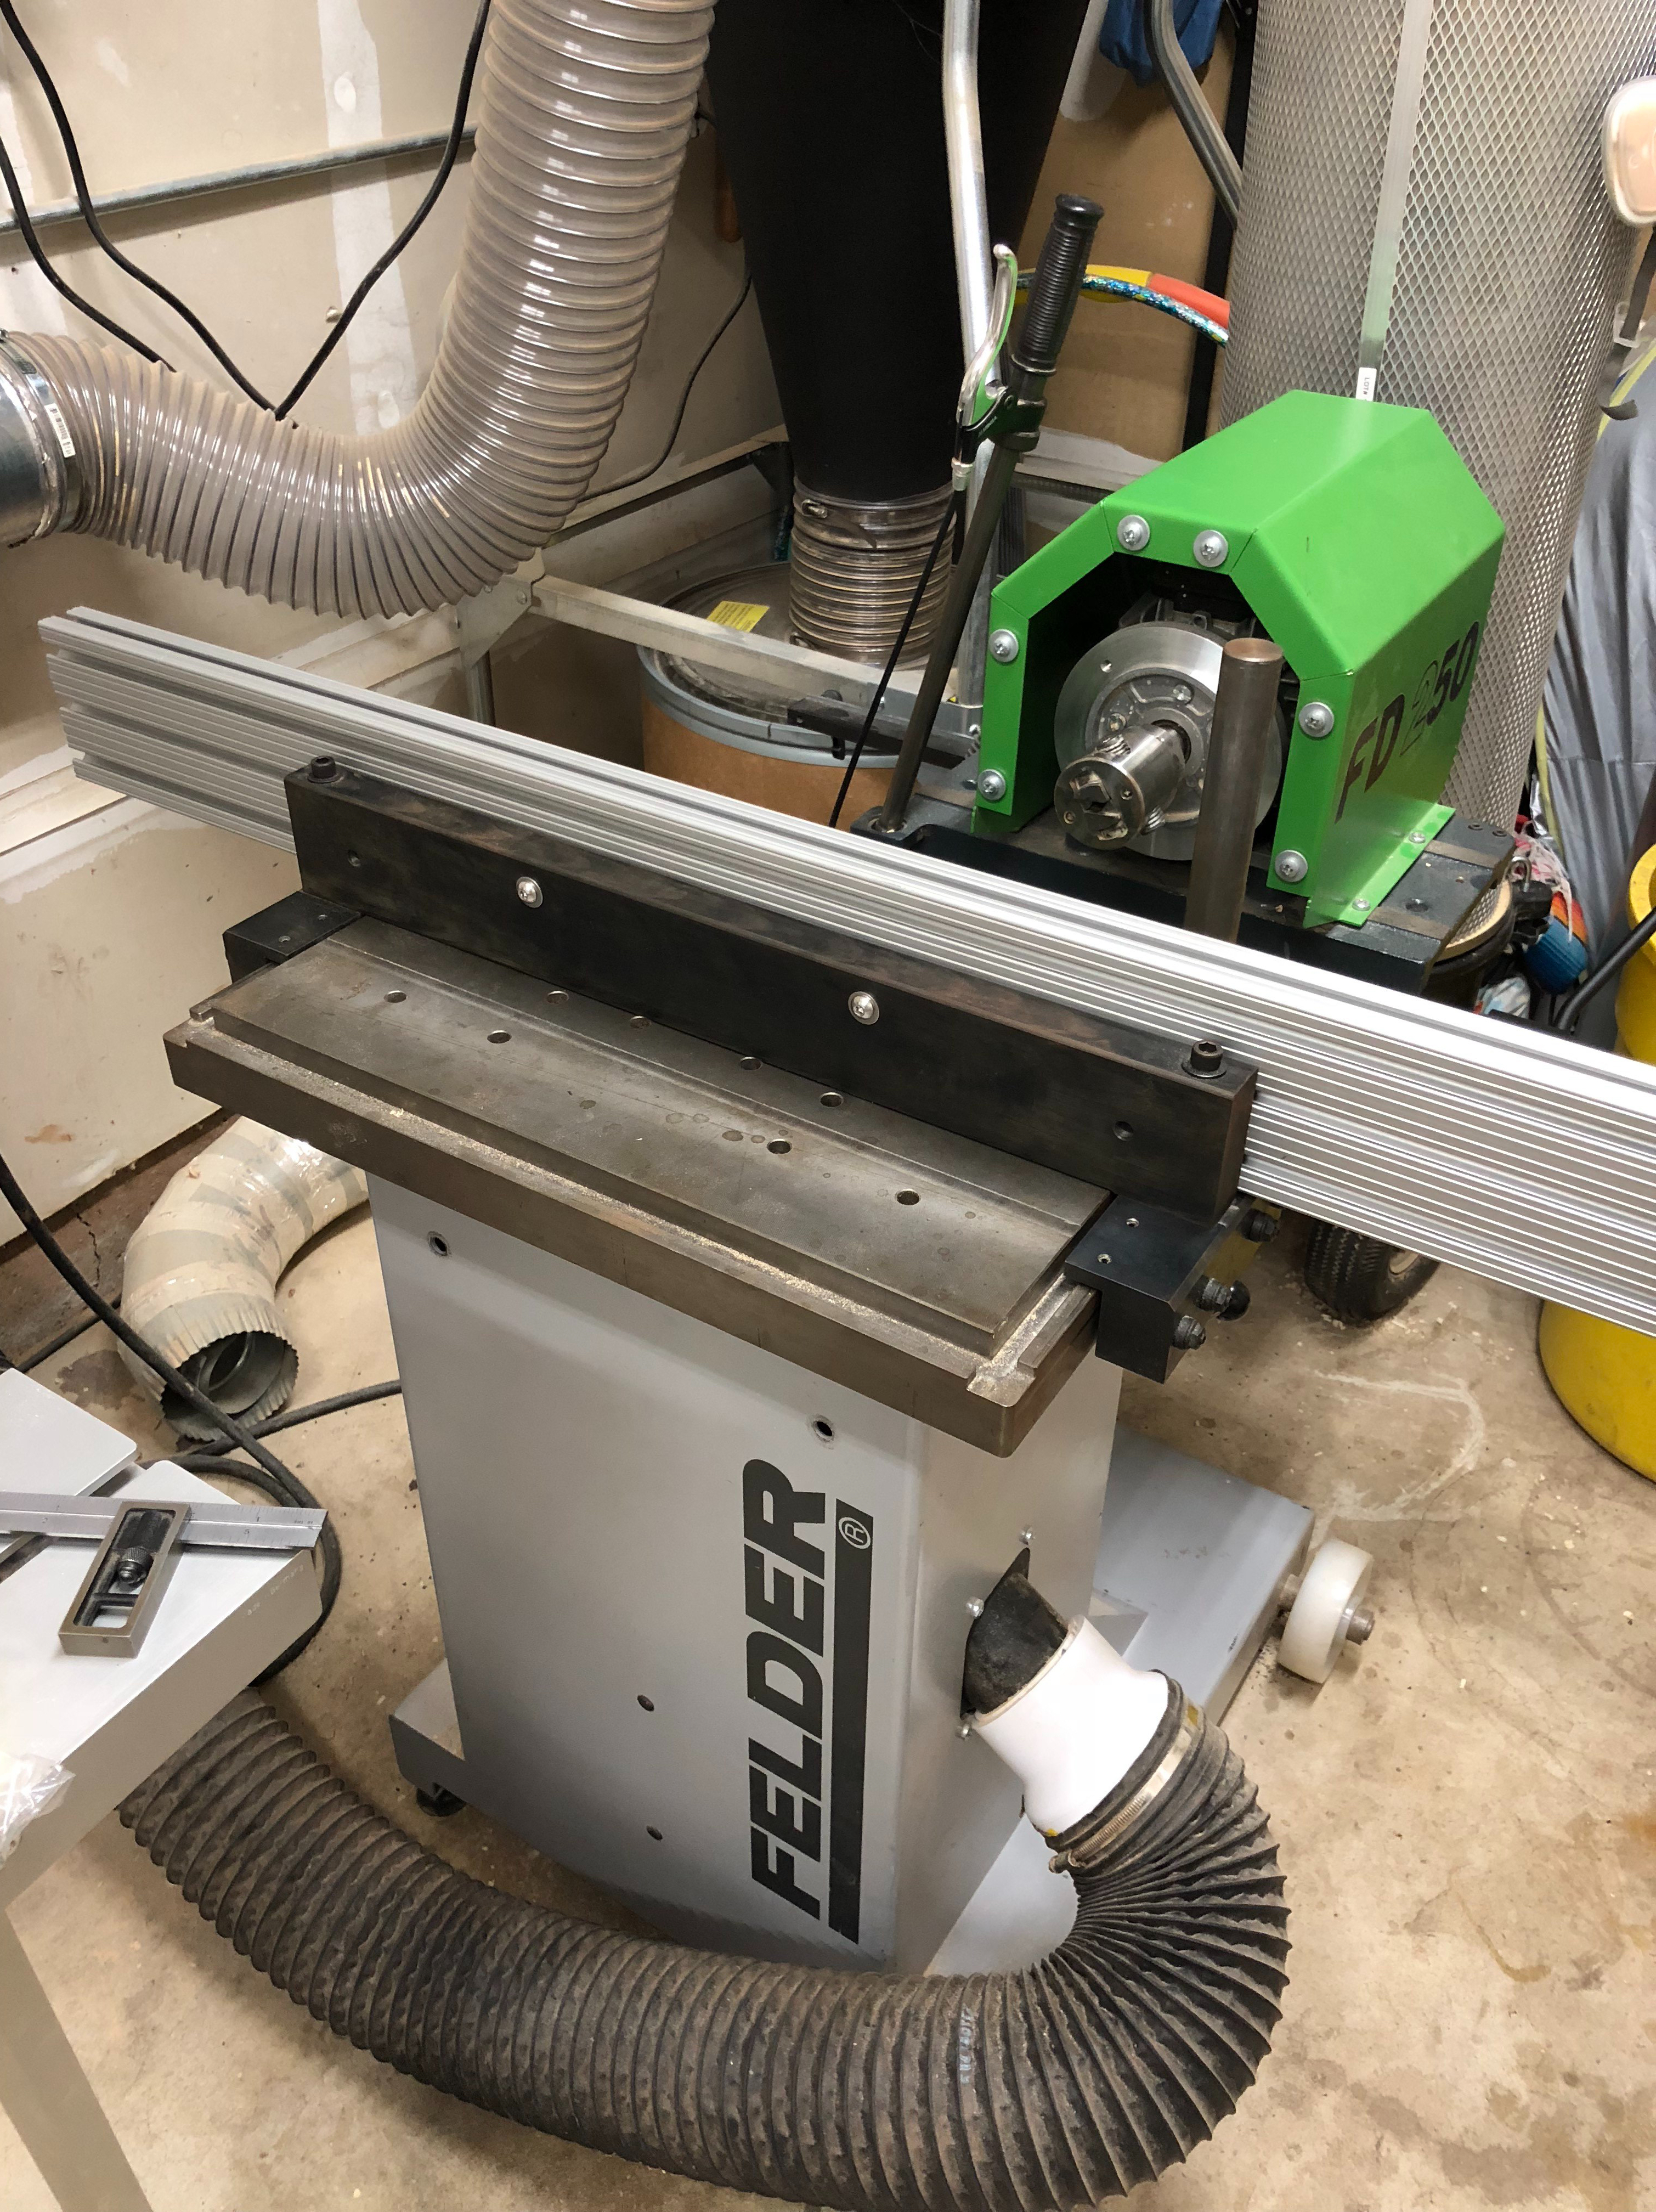
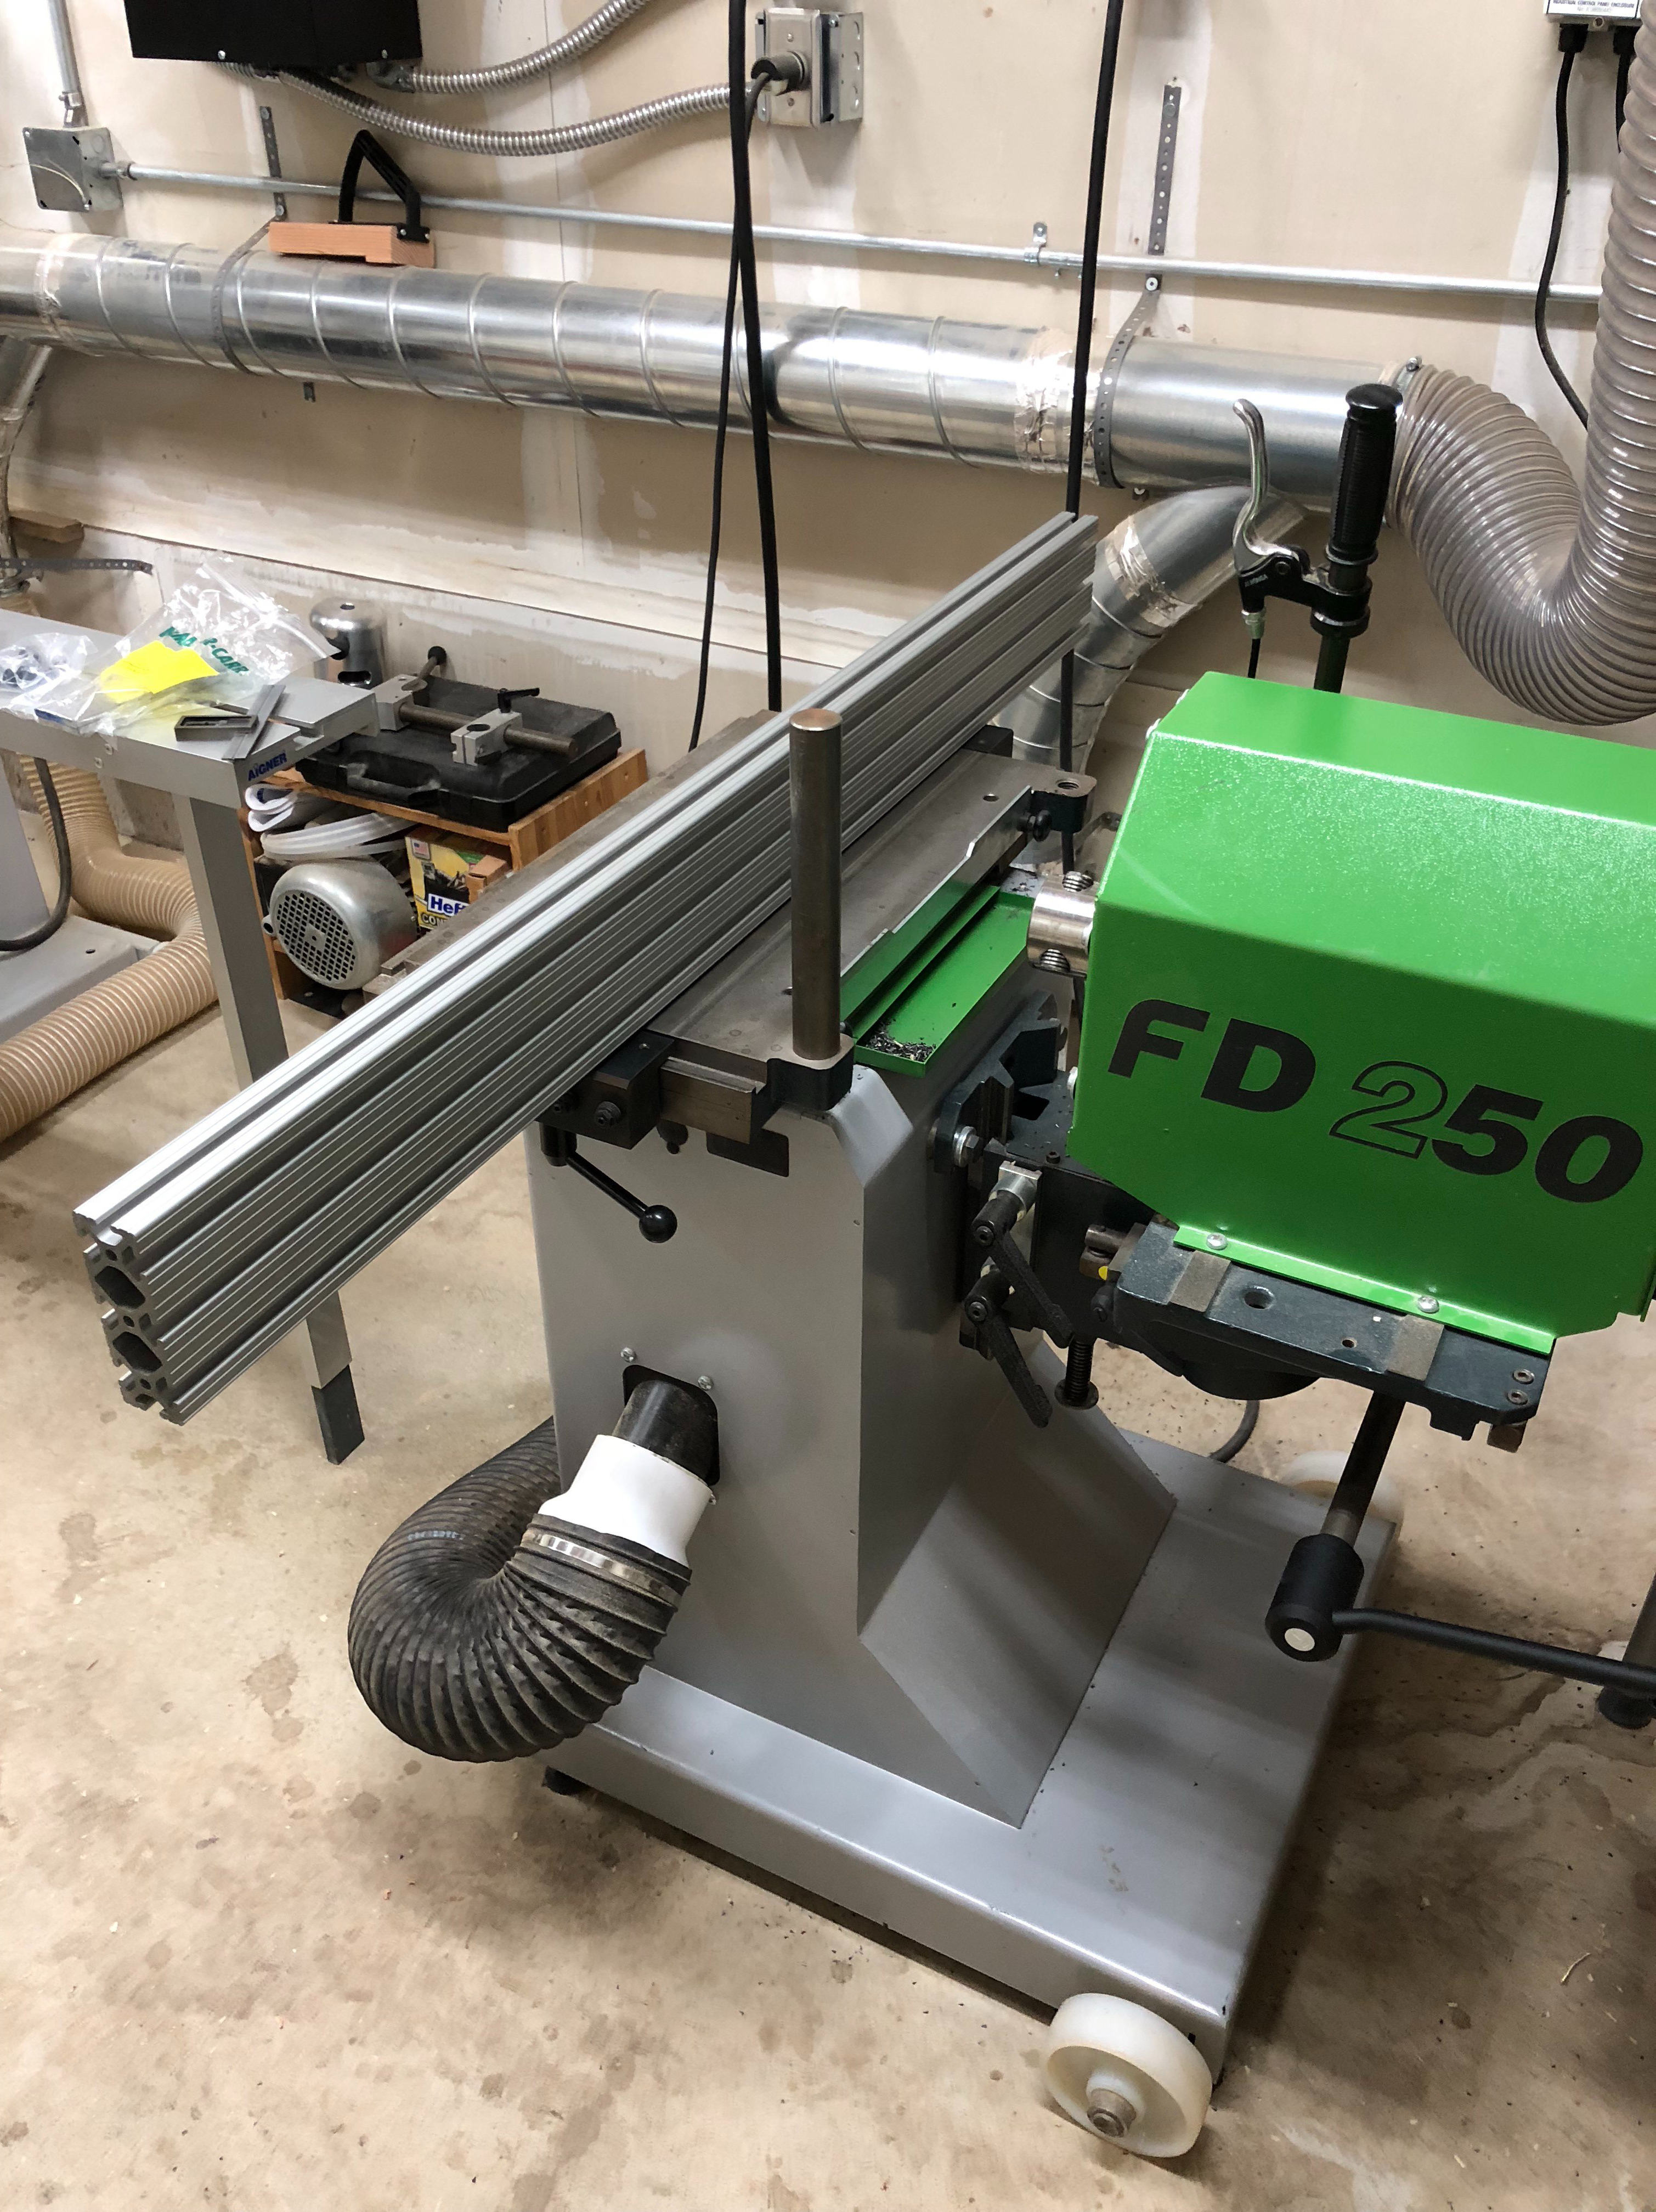
Got the fence together, less a few details.
I need to add more set screws along the side grips so that I can run the fence all the way up the front of the machine and off the back of the machine without issue. Need to machine a bit of clearance under the bottom of the main bar then put some holes for auxiliary fences. I also need to trim up the ends of the main bar and chamfer it, got a bit lazy there after some hours of the milling machine.
After that I'm starting to think of auxiliary fences, which can be just extruded aluminum sections with 90 degree supports on their undersides to help support long work. After which it will need to be able to hold a sacrificial wood section for through cuts and stops.
Maybe this will gain some interest.
Bumbling forward into the unknown.
Guest
Very nice!
[OP]
Contributor
Thanks Patrick! Looking forward to putting it to use.
Bumbling forward into the unknown.
[OP]
Contributor
Bumbling forward into the unknown.
[OP]
Contributor
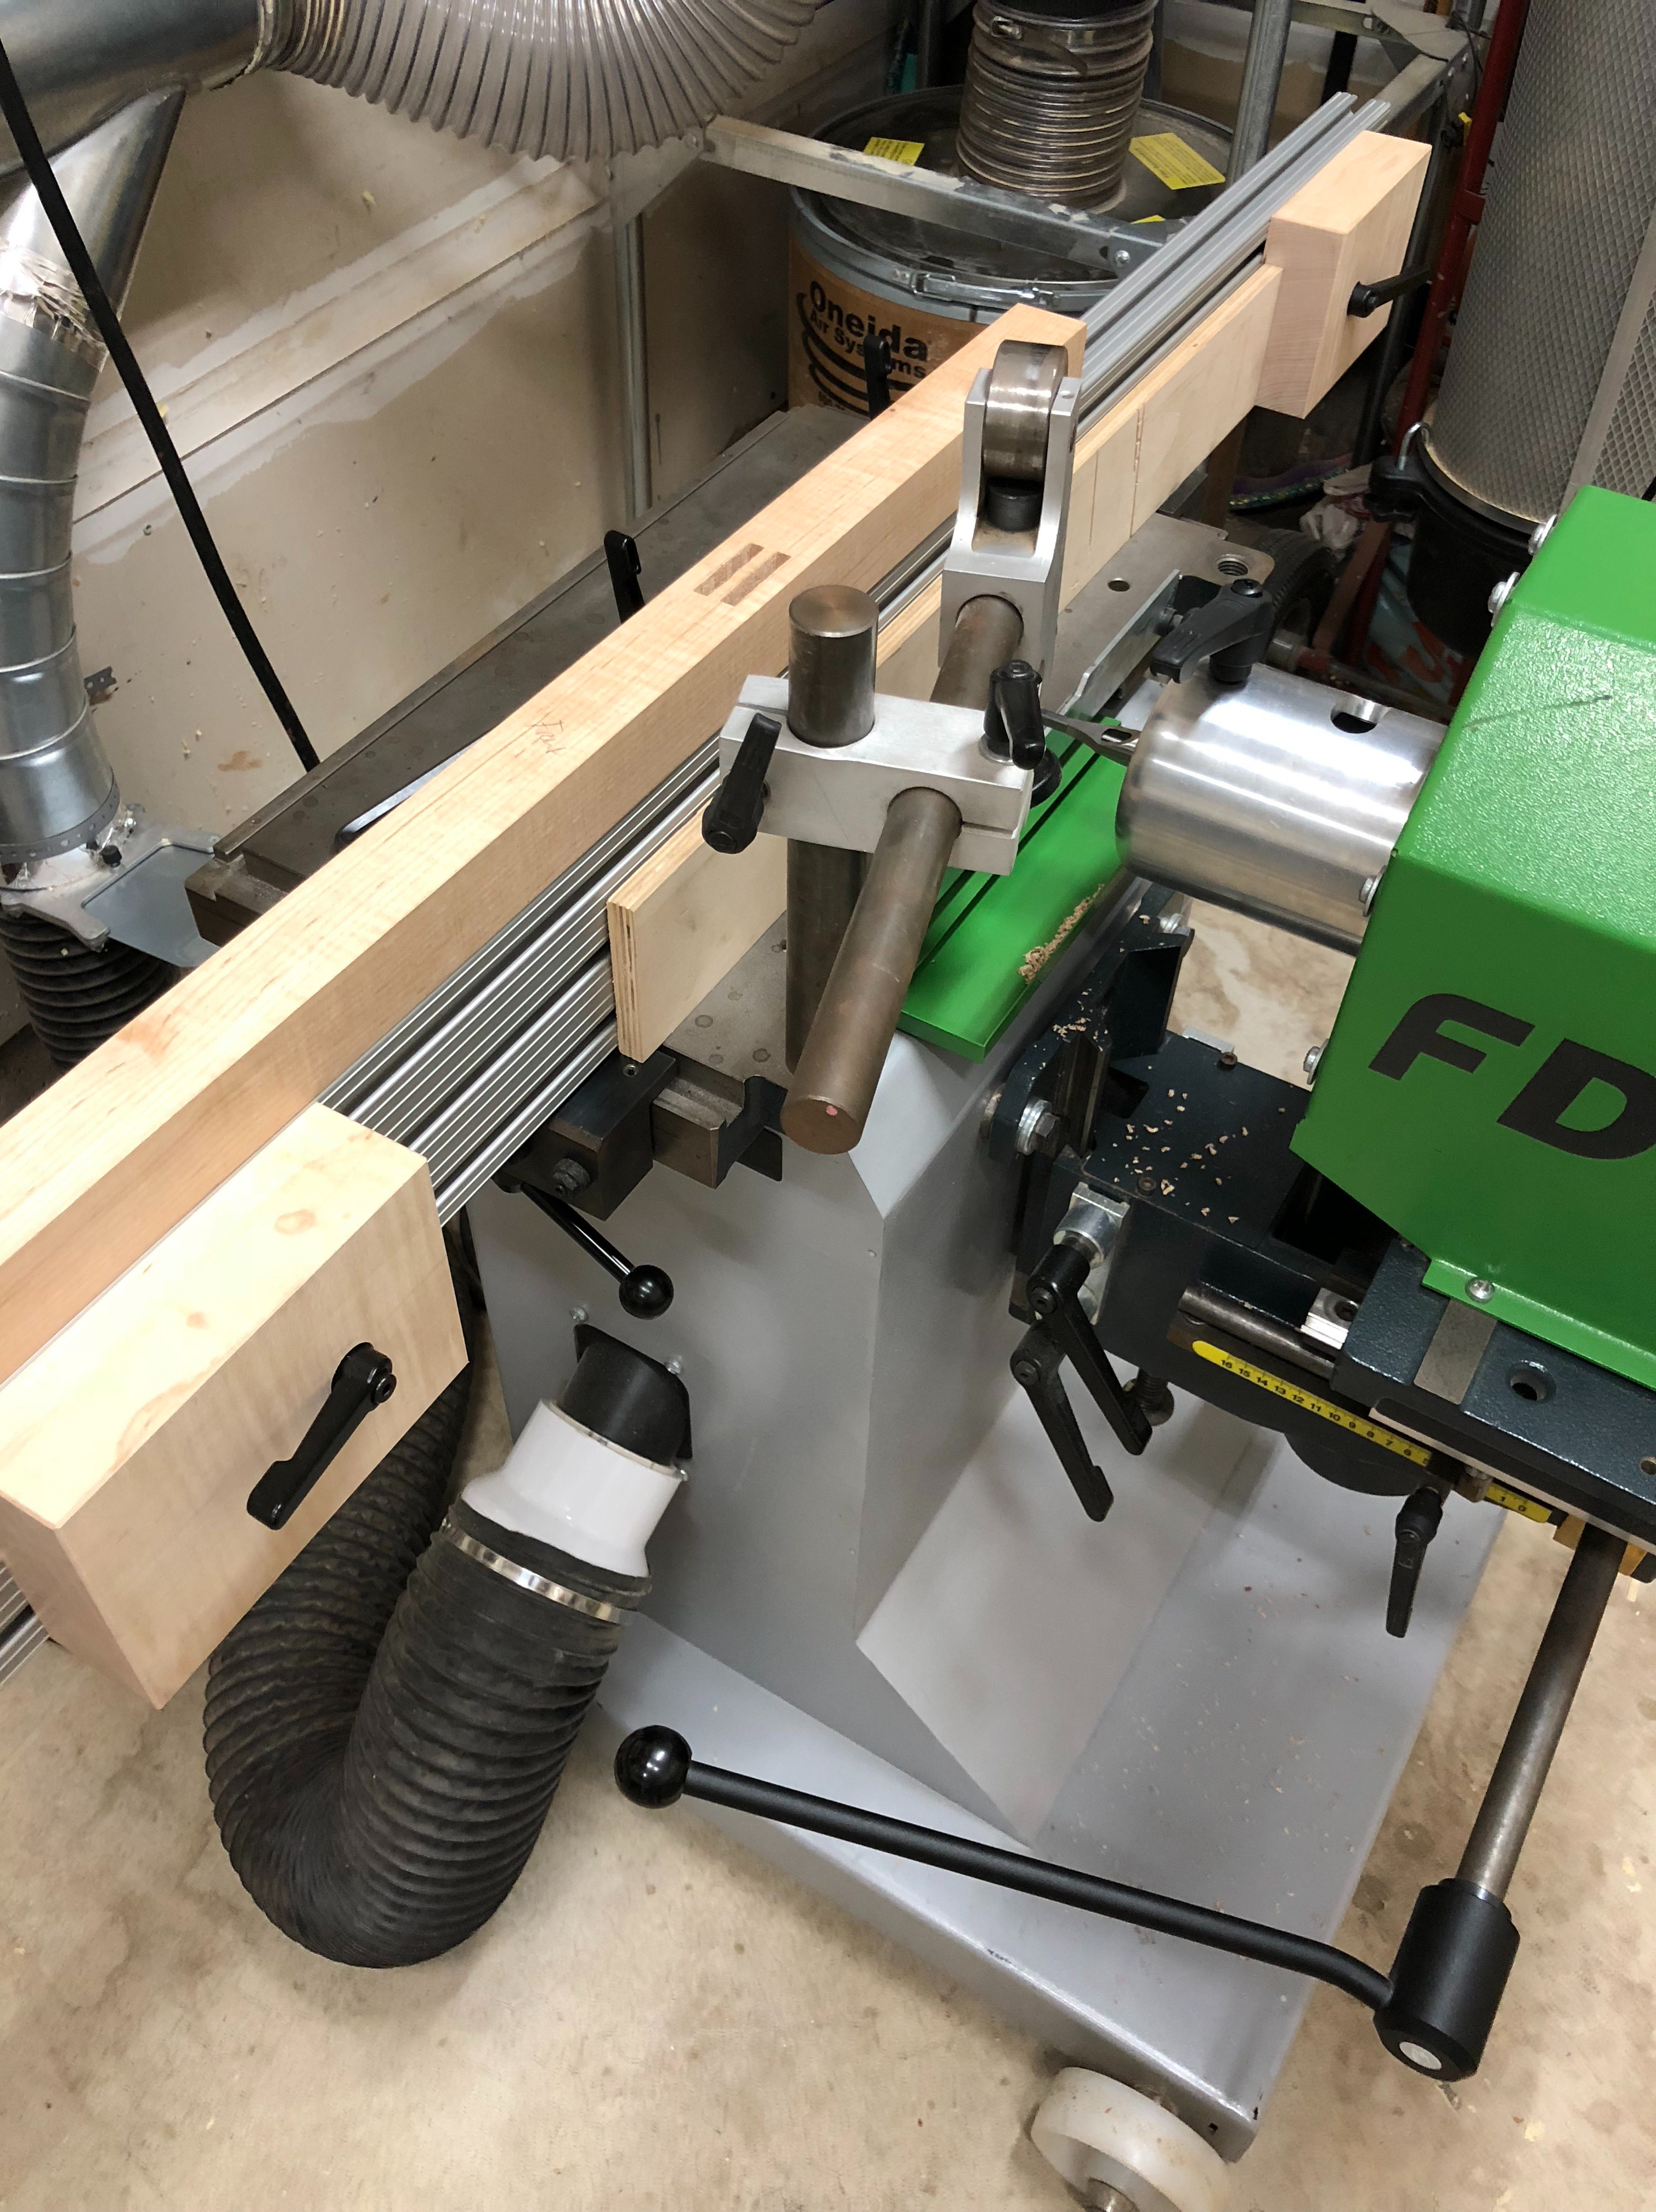
Extrusion arrived, this thing is heavy! Nice and straight. Next I'll be building some wooden stops and supports. I could have used this support a few weeks ago, but surely more long work will be coming up as I have an 8' section to cut mortises into. I made it so that the support could be slid over in either direction to offer extra support where needed. It's nice and sturdy, and lifted off the table by about 1/16" so that it does not drag.
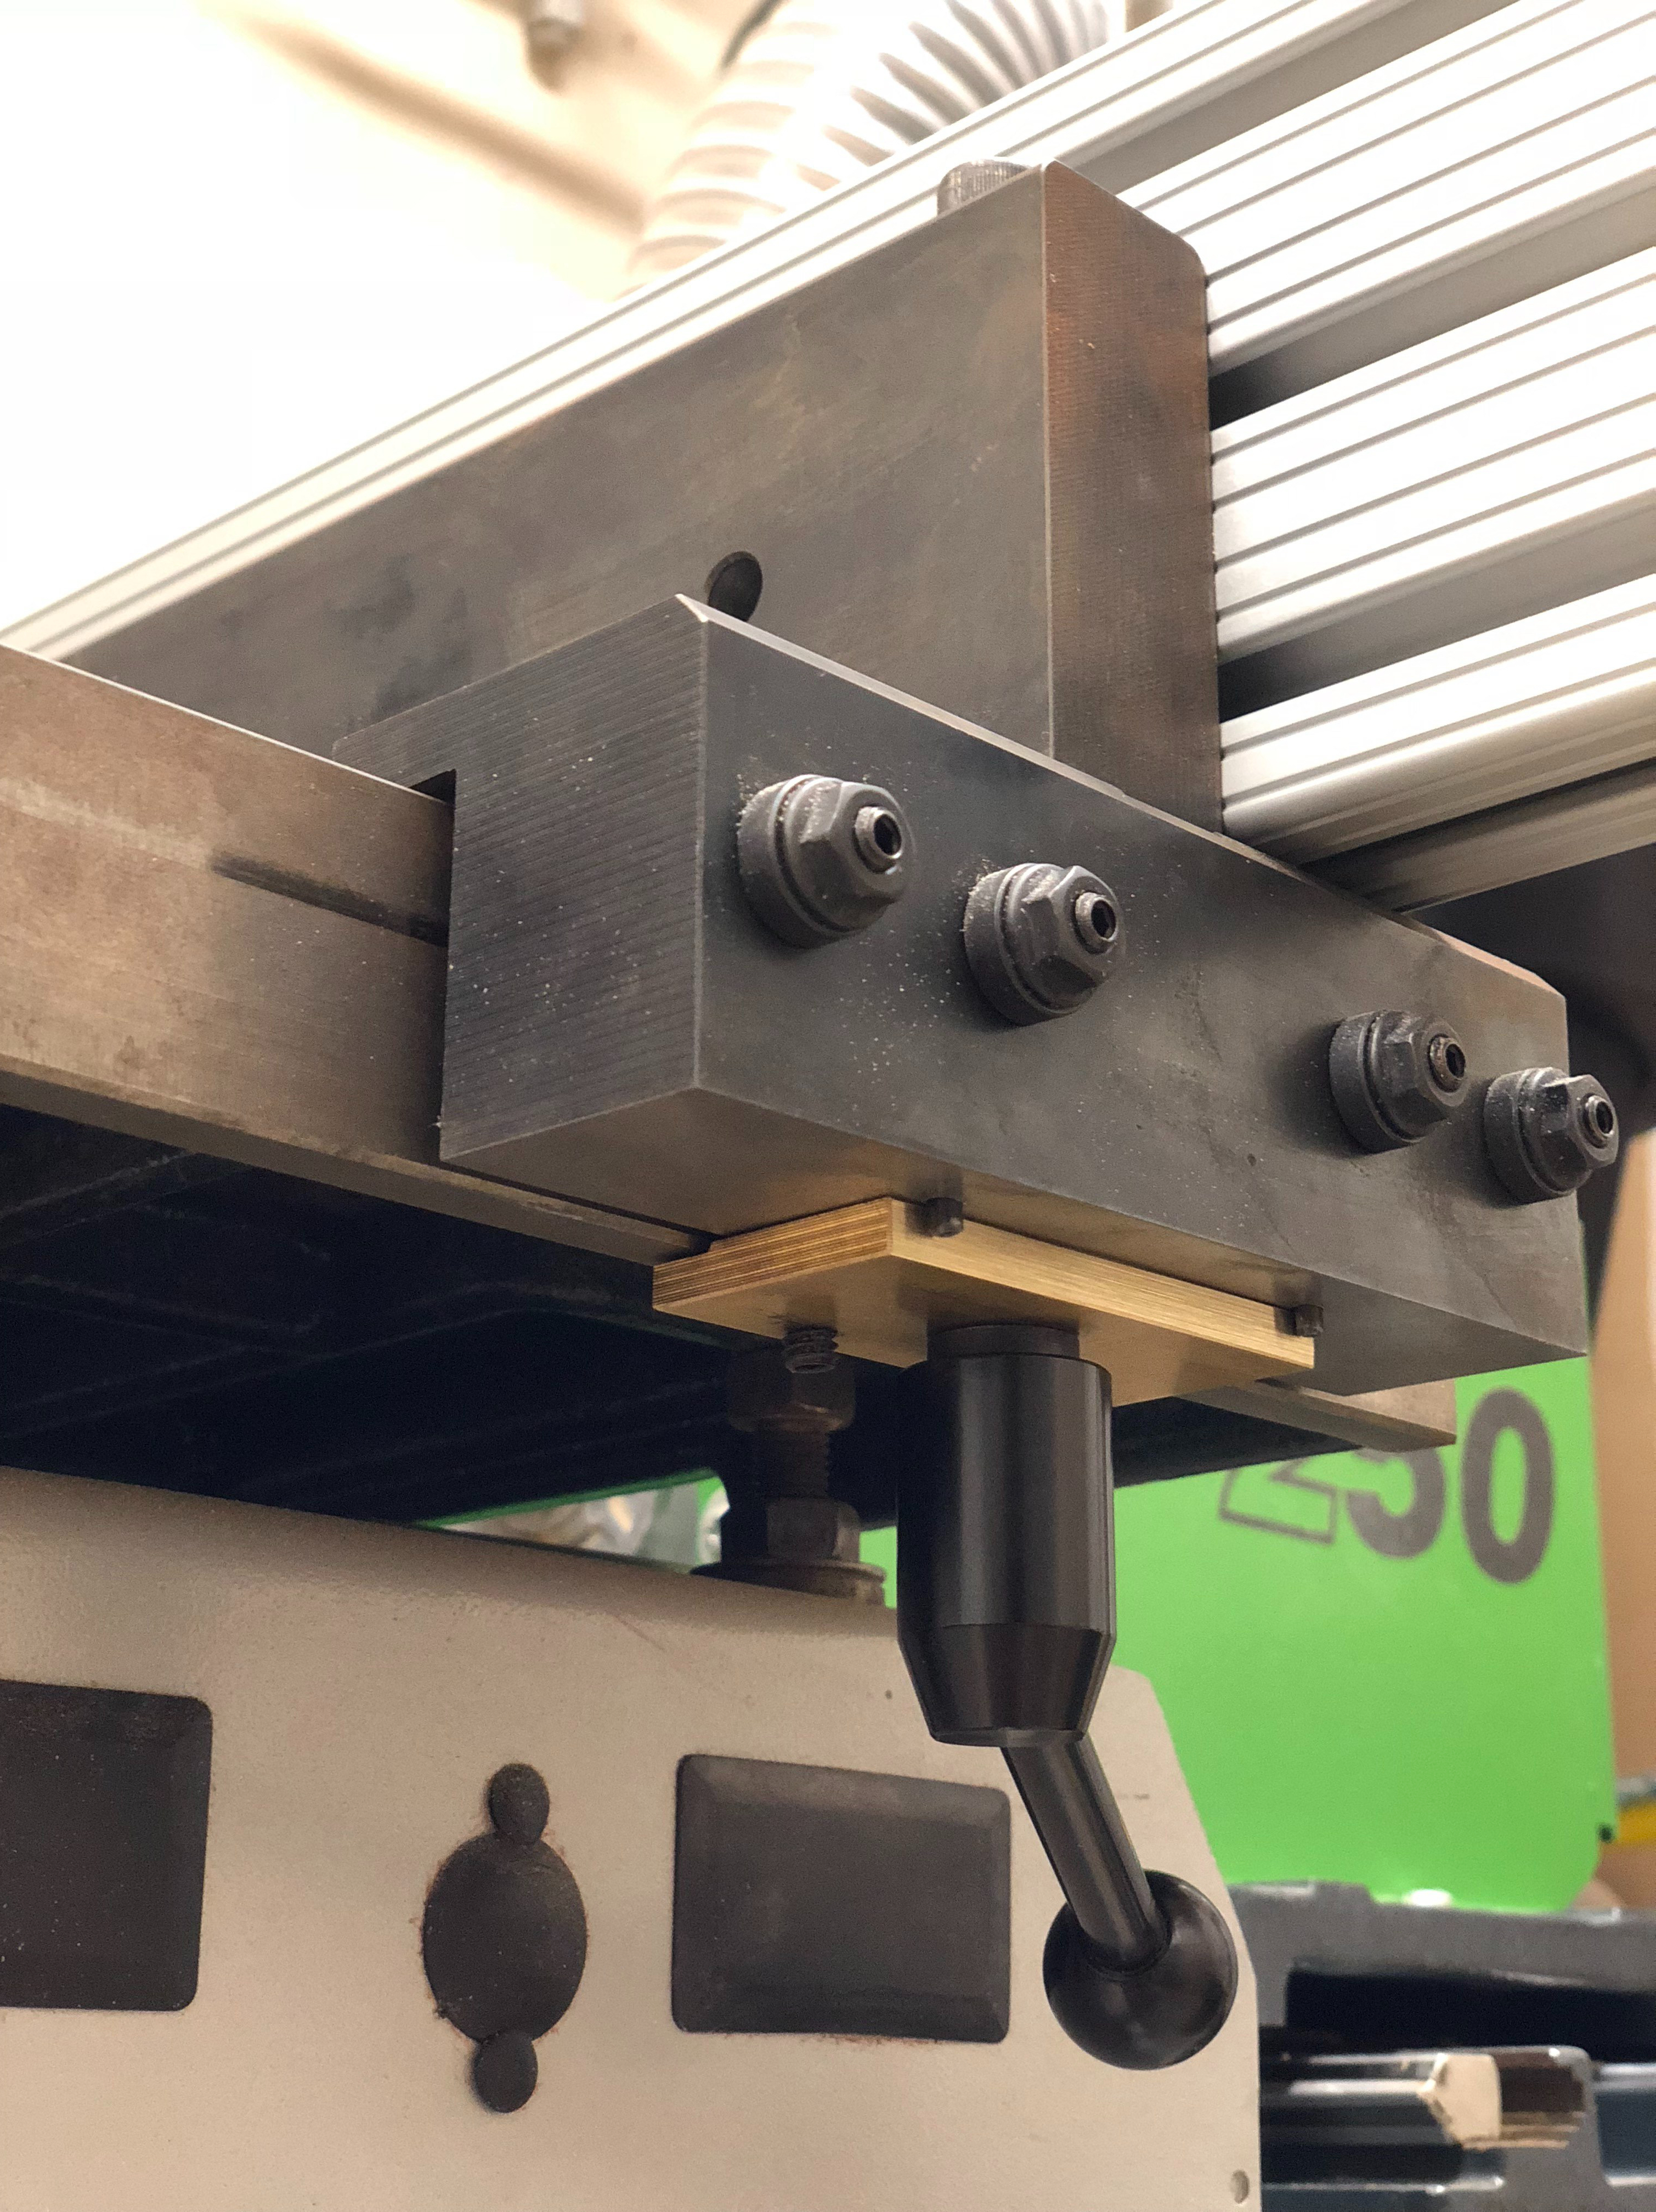
The washer setup wasn't holding firm enough so I made a new thing for clamping the side rails which seems to hold considerably firmer.
This fence now adds about 50lbs to this machine, right where it is needed most.
Bumbling forward into the unknown.
 Member
Brian, that is turning into a really nice setup, keep us updated.
Of all the laws Brandolini's may be the most universally true.
Deep thought for the day:
Your bandsaw weighs more when you leave the spring compressed instead of relieving the tension.
[OP]
Contributor
Thank you! Much appreciated. The stops are nearly complete, but it got to be too late in the evening to crosscut them to length.
I'm hoping that this fence lends itself well to adding on air clamps in the future. I'm thinking that some accessory can be made to hold the cylinder and cantilever it right off of the extrusion.
Here is the brass part I had mentioned:
There is no reason for it to be brass other than that I had some 1/4" naval brass that I am otherwise not going to use.
Bumbling forward into the unknown.
Contributor
Nice Fence Brian! The stops should be easier than a conventional HC as the fence is behind. Some pro and con the working horizontal vs the vertical setup.
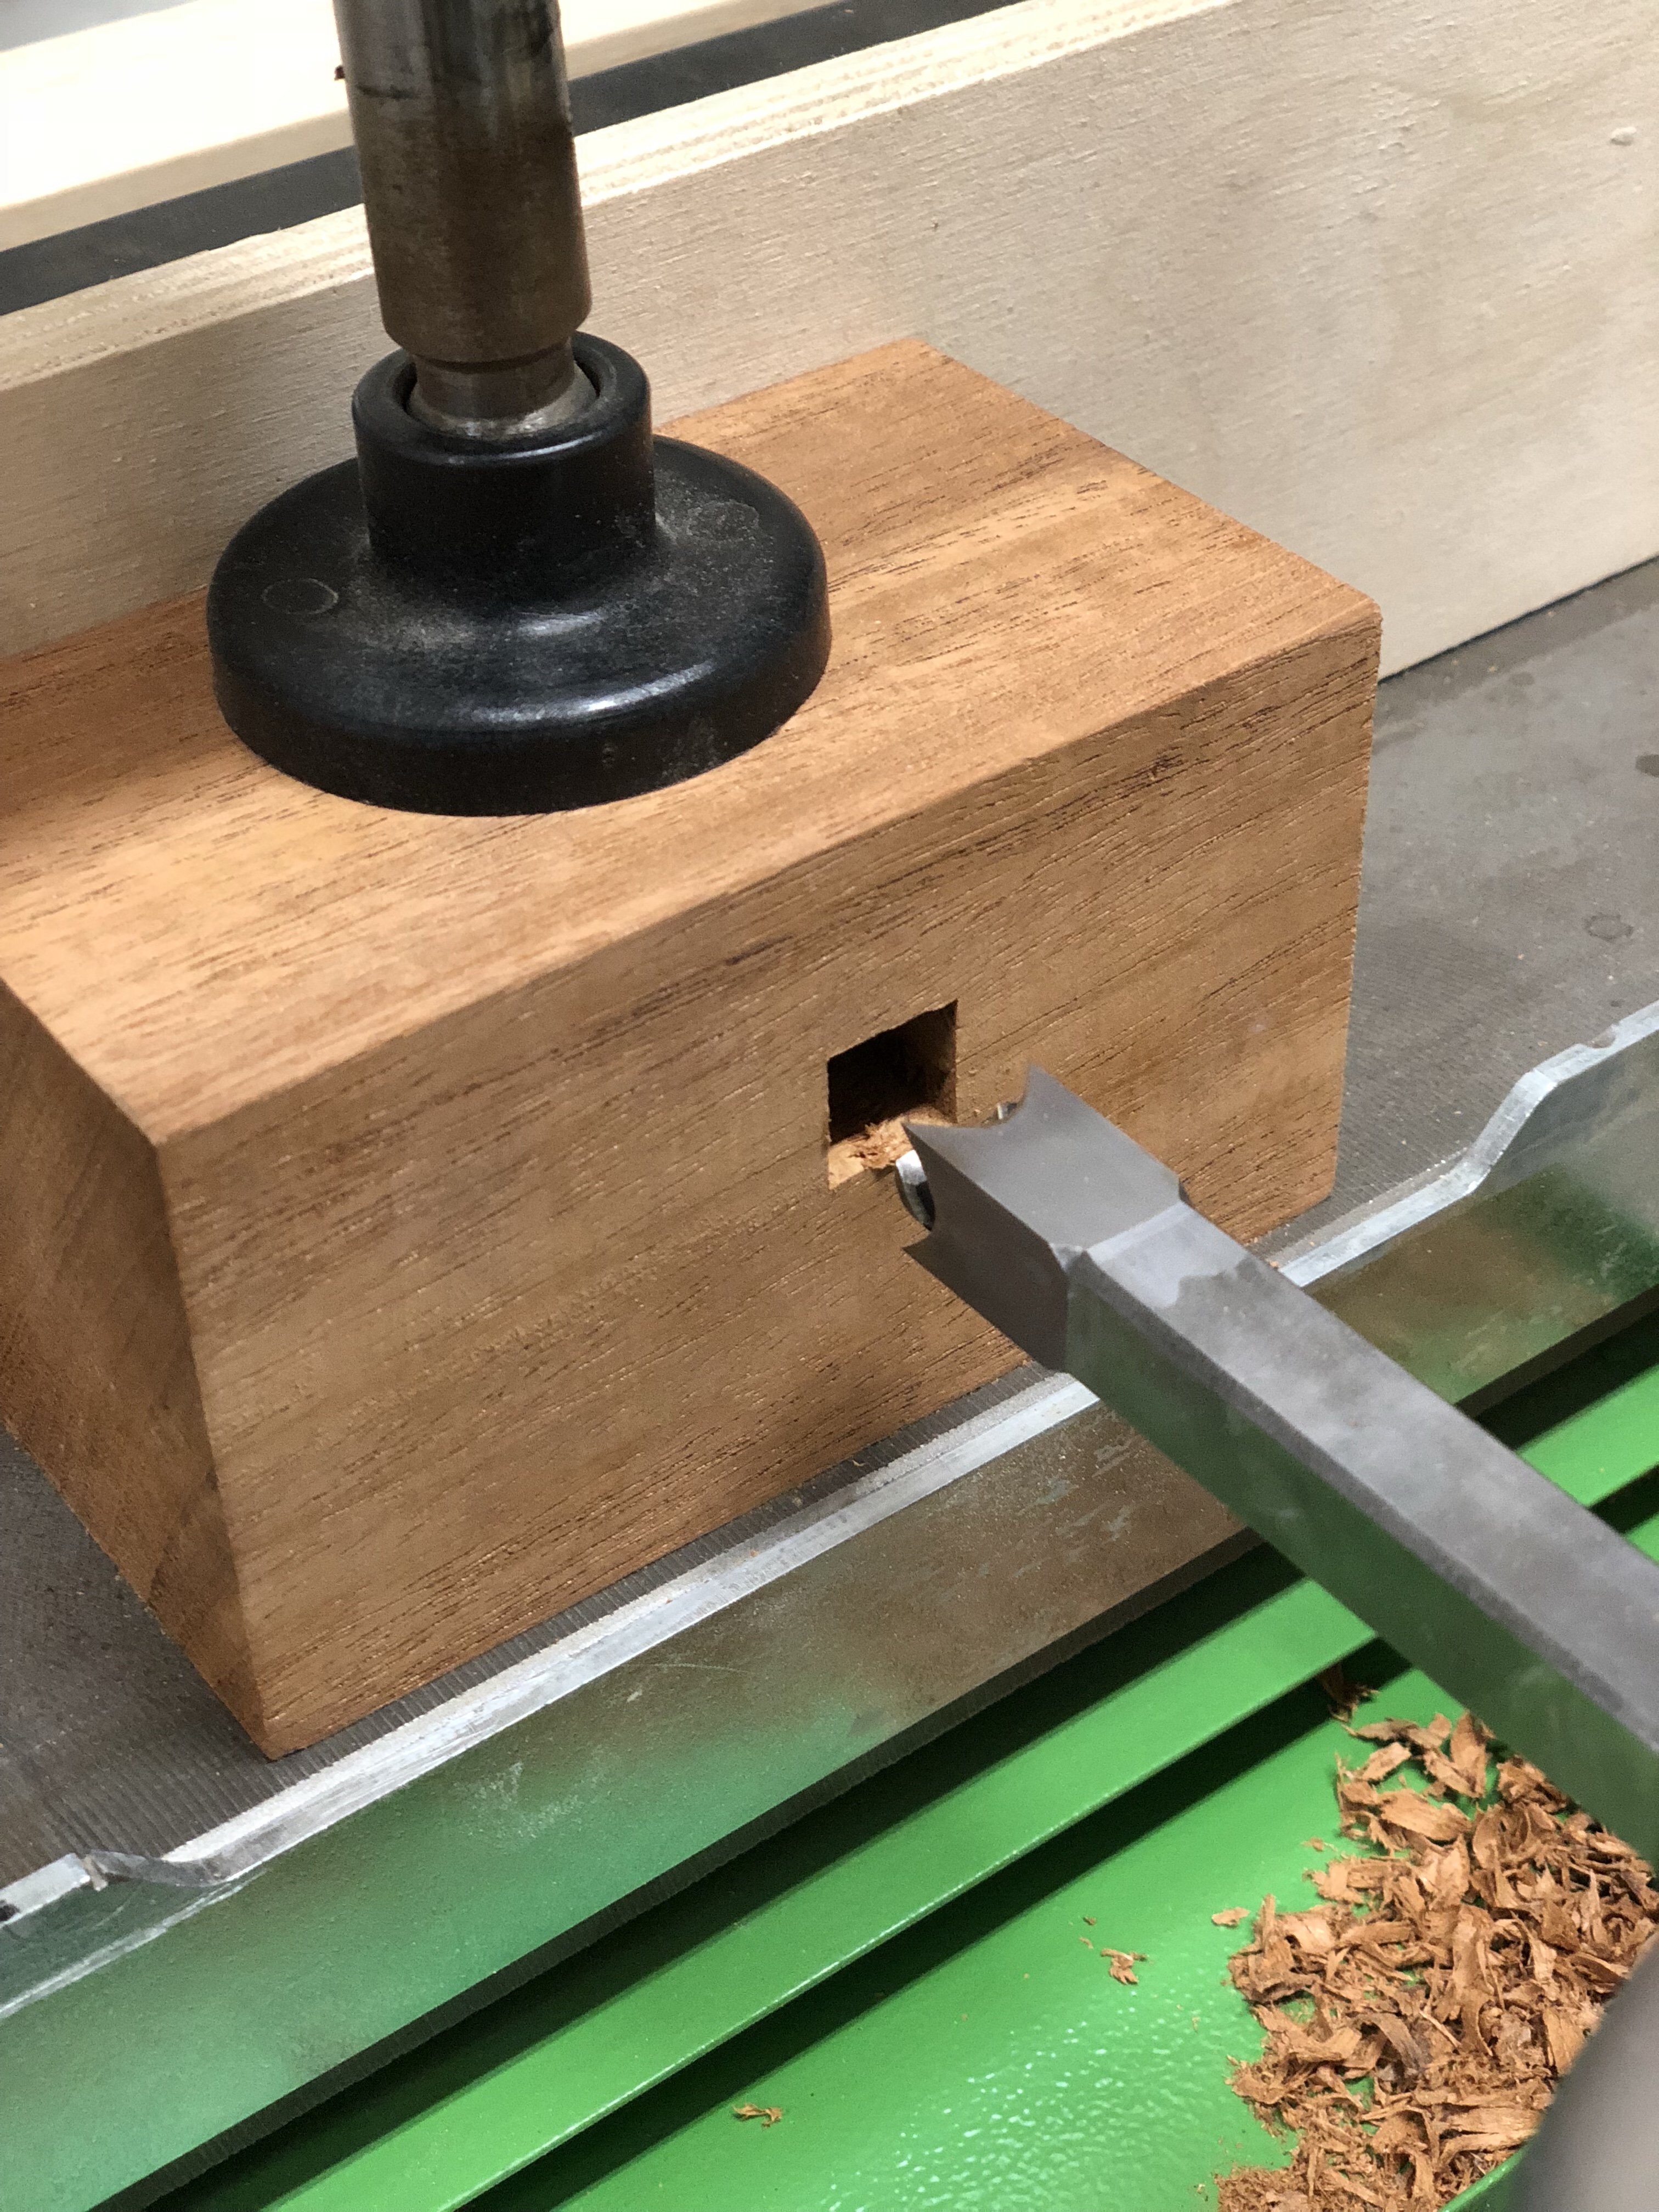
Is the auger held by the 2 jaw chuck and the chisel secured with the Kipp lever on the attachment? Hard to tell from the photos. That is my one gripe about the Wadkin HC, the bushings for the augers.
[OP]
Contributor
Thanks Joe! I do like these types of stops, I made up a set for my Festool tracks as well and they tend to be really easy to use.
Exactly, the two jaw chuck holds the auger and the kip lever setup holds the chisel. I’m going to be putting some serious hours on it shortly.
Bumbling forward into the unknown.
[OP]
Contributor
Last update on this
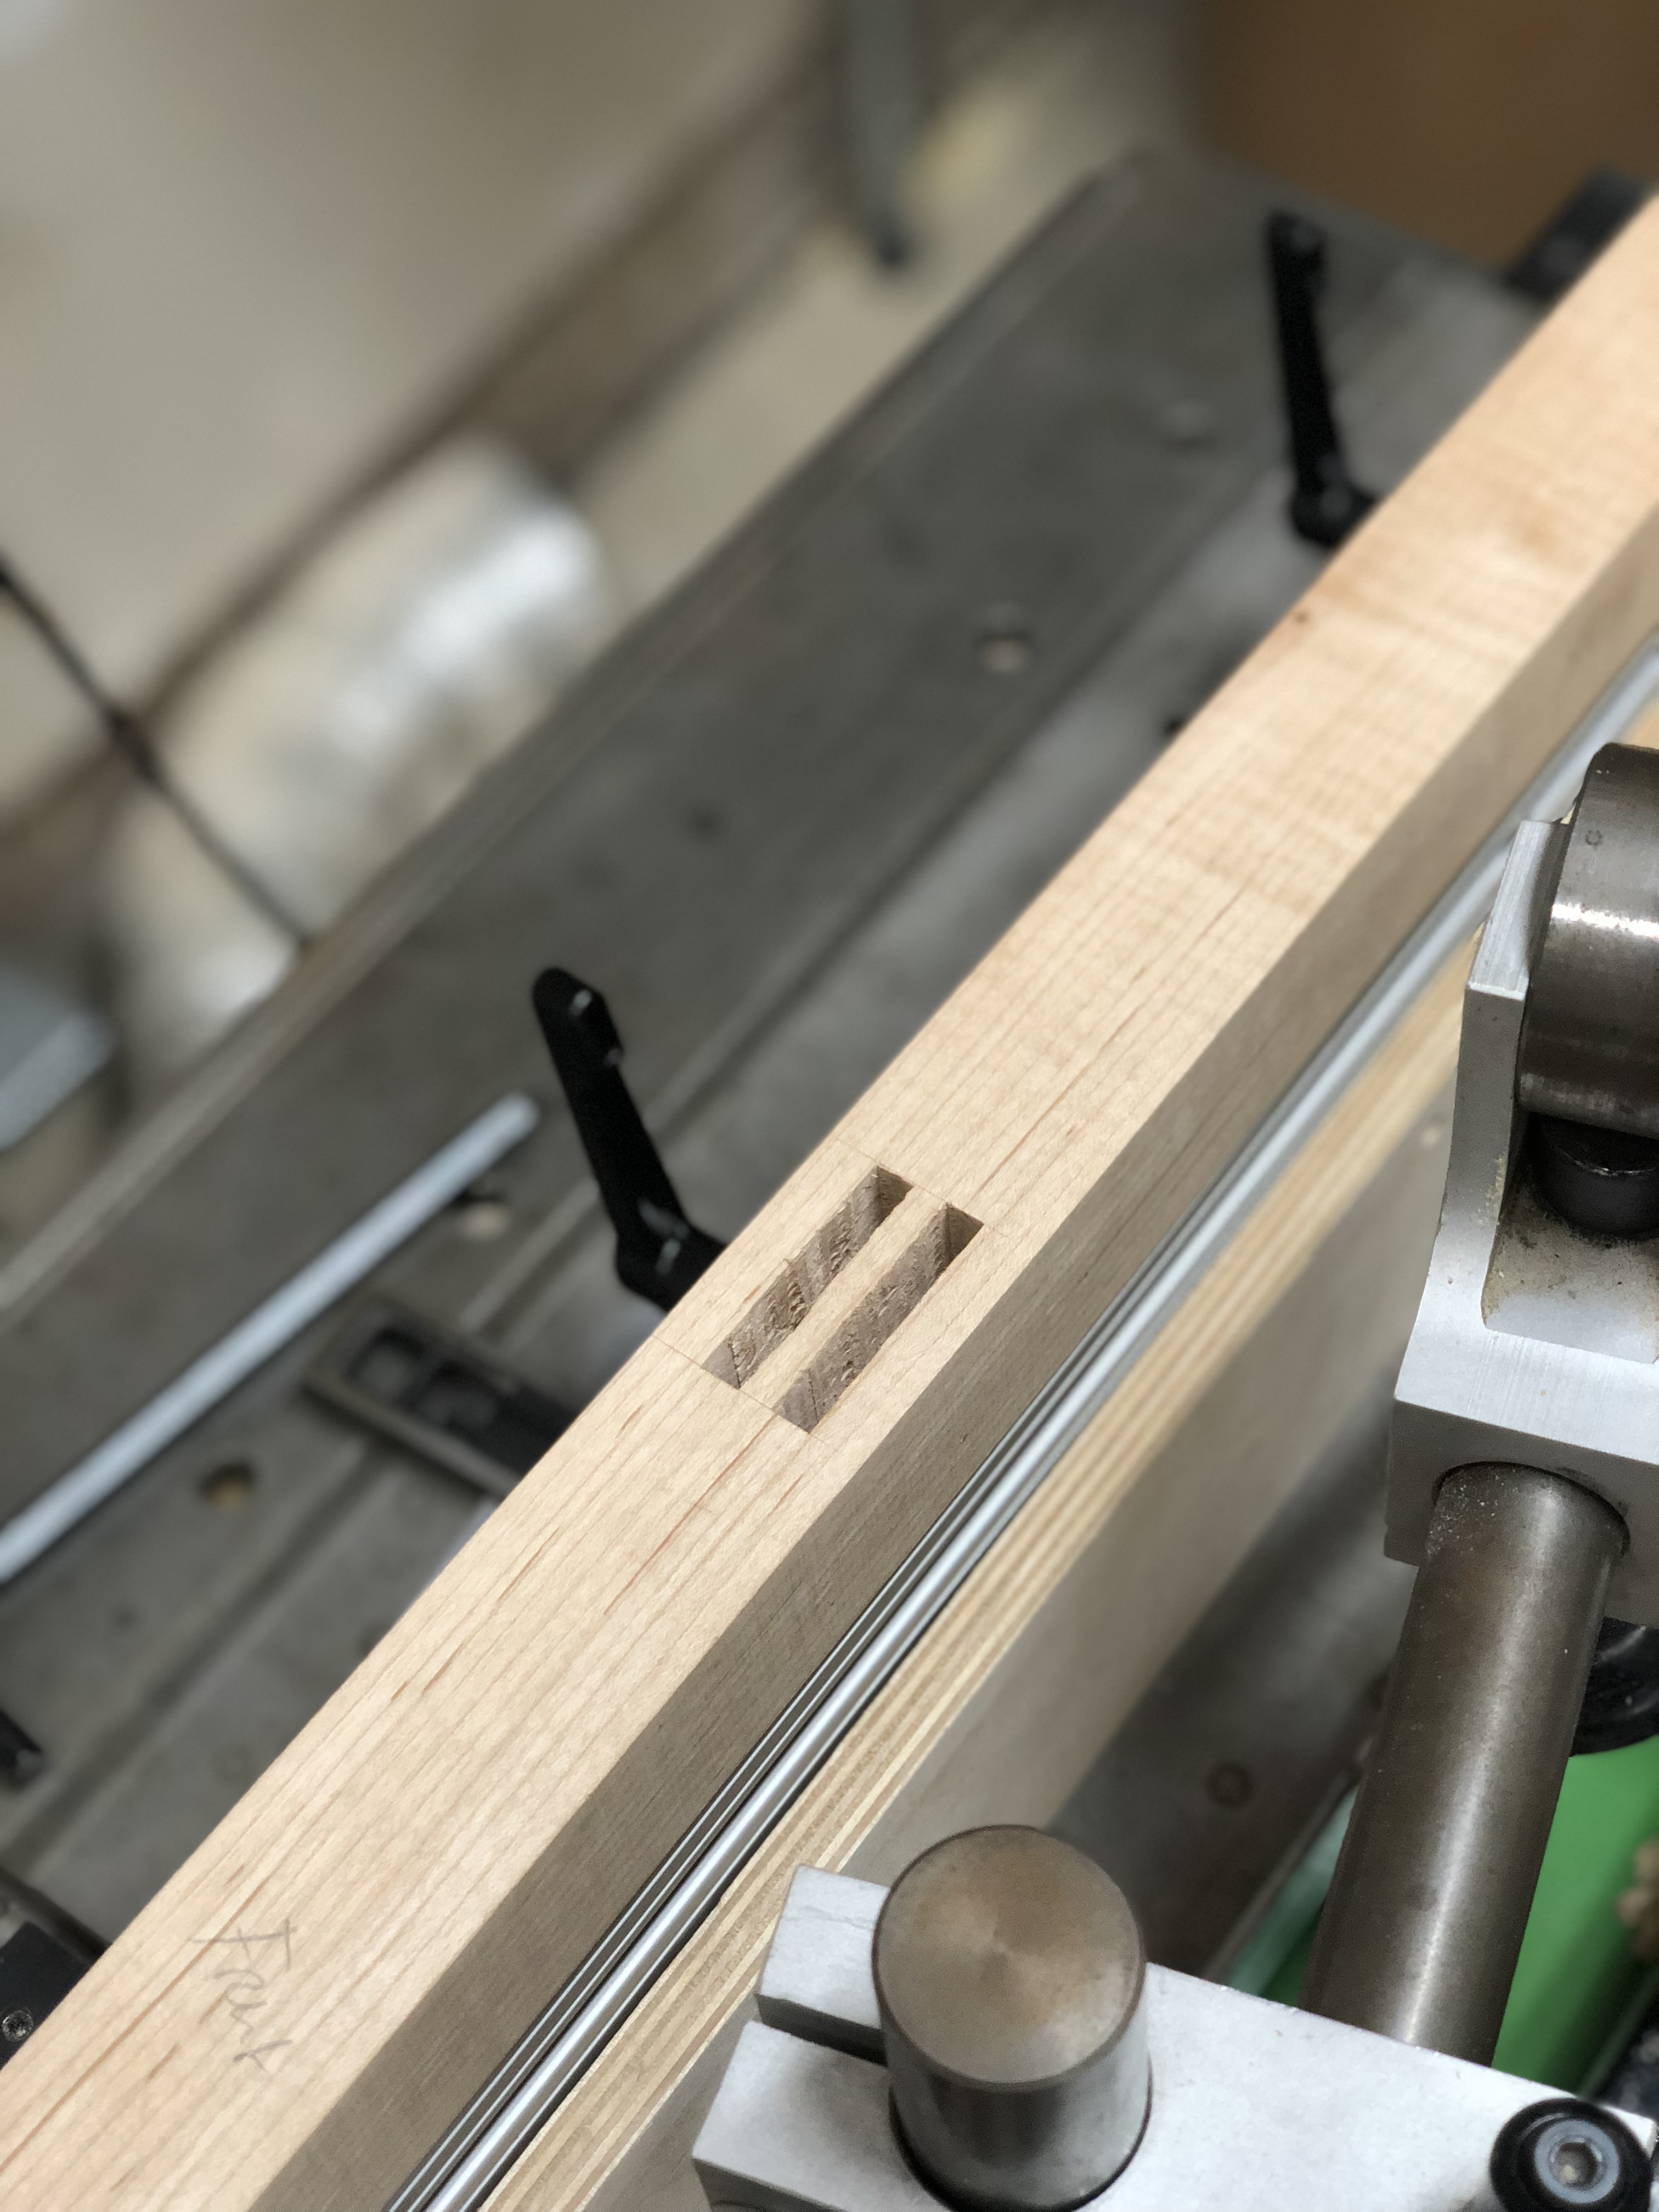
Finally cut some squares and rectangles with this machine. The stops and fence were well worth the effort. I cut a lot of double mortises, so long as my stock and markout are perfect I can set both stops then flip the stock over to make the second mortise without resetting the machine.
I put krupp handles on everything to make life easier. Few minor things to touch up, like putting a nylon button under each end of the extrusion and making simple supports.
I cut some 1/2" mortises in doug fir and mahogany just to see if I could, worked really easily.
Sharpening up the chisels seems a process, I worked the outsides nicely and I'm working out a device to attend to the inside with success. So far I turned some wood bits and used 2500 grit diamond compound, worked OK but it needs a better substrate.
Bumbling forward into the unknown.
 Posting Permissions

 Reply With Quote