Page 1 of 2 12 LastLast
Results 1 to 15 of 22

Thread: A start, while waiting

  1. #1
    Join Date
    Jun 2010
    Location
    twomiles from the "peak of Ohio
    Posts
    12,171

    A start, while waiting

    On other stuff to arrive. There is to be a Bedside Table built, to go with that bedframe.....needed to milled some legs, first. But, where to get the stock?
    block planed.jpg
    Well...IF you look off to the right, you will see acouple pieces of scrap, from the 2 x 10s....the long one is 29" long...
    Marked a few lines, got this machine to some how follow the lines..
    IMG_4416 (640x480).jpg
    No jigs, just eyeball the cut....was close enough. Had four blanks, and the rest of the chunk?
    IMG_4413 (640x480).jpg
    Should make good firepit starter...
    Marked the blanks for 25" in length...had a few knots to get rid of..right on the ends..
    IMG_4414 (640x480).jpg
    Used the mitersaw ( cordless?) to trim each to length..
    IMG_4415 (640x480).jpg
    The bandsawn edges needed a bit of work...wanted the blank to be straight and square..
    IMG_4417 (640x480).jpg
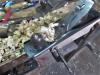
    Clamped all four together, and used the Heft & Hubris...aka Stanley No. 8..to flatten one side of the group..
    IMG_4418 (640x480).jpg
    Started to get decent shavings..must be about done..
    IMG_4419 (640x480).jpg
    Flip the mess over, and do the other side...hmmm...
    Stay tuned for Part 2..

  2. #2
    Join Date
    Jun 2010
    Location
    twomiles from the "peak of Ohio
    Posts
    12,171
    Anyway, flipped the mess over, and reclamped. Made sure the freshly plane sides were flat on the bench...and added a clamp..
    IMG_4420 (640x480).jpg
    Checking to make sure all the parts of the clamps were out of the way...planed until the square said I was done..
    IMG_4422 (640x480).jpg
    Not too hateful? Two sides are done...big mess on the floor..
    IMG_4421 (640x480).jpg
    Pushing that 10 pounder around is a workout....a bit more than I wanted to do. Will let these blanks sit overnight, and see what I can do tomorrow....been a busy day.

    Need to get the top processed....involves a glue up.....and start on some aprons..no drawer, this time. May taper the legs on two faces....no longer have a lathe. It may just be a simple Shaker table.
    Stay tuned....( just something to do, while waiting on parts for the bed...) and yes, I swept the floor..again.

  3. #3
    Join Date
    Jun 2010
    Location
    twomiles from the "peak of Ohio
    Posts
    12,171
    While I am waiting on this nasty looking finish to dry..
    IMG_4483 (640x480).jpg
    Let's just say I am not a fan. It IS what the Boss wanted...
    Went to the shop, while it dried..
    IMG_4474 (640x480).jpg
    And made some shavings and sawdust...sawdust from cutting a panel from 48" down to two @24" long...shavings by Stanley #8
    IMG_4475 (640x480).jpg
    1 x 10"s. edges needed jointed. got all four edges done, test fit for any gaps..
    IMG_4476 (640x480).jpg
    Set up according to the grain...then spread a bead along one edge. Slide the other half back and forth in the glue, until I feel it "stick"....then add a few clamps..
    IMG_4477 (640x480).jpg
    And a single caul..
    IMG_4481 (640x480).jpg
    Then set the apron stock up..
    IMG_4478 (640x480).jpg
    To see where the best cuts will be, to make four table aprons...
    IMG_4480 (640x480).jpg
    Will have to cut these out....
    And a few other knotty areas....May go back and taper the legs, on two edges, with a couple hand planes...once I figure out which edges will taper the best.

    Simple little table, not even a drawer...
    Stay tuned

    NO, it will NOT get that Rustoleum Junk for a finish...

  4. #4
    Join Date
    Jun 2010
    Location
    twomiles from the "peak of Ohio
    Posts
    12,171
    Tapered legs....splayed out, or straight?...Any bead details, or just leave it plain?

    Aprons.....beads or round overs, or?

    Top; corners will get a round profile......bevel the underside? Roundover, or a cove?

    And you thought this was a simple build...

    Once the bed project is out of the way, I can restart this little project....
    Stay tuned...

  5. #5
    Join Date
    Jun 2010
    Location
    twomiles from the "peak of Ohio
    Posts
    12,171
    Bed Frame Project is done. Assembled it today....and on my 3rd Lager to cool off...

    Took the clamps off the blank for the top of this little table build. maybe tomorrow, I can start work on it.

    Right now, I am too pooped to do too much more in the shop.....will even wait until tomorrow to put all the toys away...and there are a LOT of them upstairs....that need to go back to the shop...might need them later....

    Stay tuned...

  6. #6
    Join Date
    Jun 2010
    Location
    twomiles from the "peak of Ohio
    Posts
    12,171
    Errands to run today....and haul all the tools to the shop, and be put away.....

    Maybe later, I can set up a jig to taper the four legs with a plane or two...

    Width of the aprons..plus an inch or so...then the start of the taper....1-1/2" down to 3/4" on the two "inside" faces.....should be enough shavings from that, to fill up the burn barrel.....Marshmallows would be extra..

    Just a simple, little table...stay tuned..

  7. #7
    Join Date
    Jun 2010
    Location
    twomiles from the "peak of Ohio
    Posts
    12,171
    Maybe a three-parter, today..
    IMG_4509 (640x480).jpg
    Top is out of the clamps...all four edges have been planed straight and smooth..which leaves..
    IMG_4513 (640x480).jpg
    A bit of flattening..
    IMG_4514 (640x480).jpg
    And a little clean up. Set this aside...had to use a mitresaw..
    IMG_4510 (640x480).jpg
    To cut out the bad spots in the two 1 x 4 x 4' apron stock...wound up with these..
    IMG_4511 (640x480).jpg
    I also made sure the fan was "ON"
    IMG_4512 (640x480).jpg
    BEFORE I got going.
    Legs needed tapered..normally it would mean a jig, and a long time with a few planes...
    IMG_4515 (640x480).jpg
    Marked how far down the apron go reach..
    IMG_4516 (640x480).jpg
    And in theory, a mark where the taper would start..usually 1" down...in theory..
    We'll see how that went, in part 2...stay tuned..

  8. #8
    Join Date
    Jun 2010
    Location
    twomiles from the "peak of Ohio
    Posts
    12,171
    Ok, made a mark down at the "foot" end to leave 3/4" after the taper..
    IMG_4517 (640x480).jpg
    Straightedge to connect the two points....
    IMG_4518 (640x480).jpg
    Decided against a stiff back. Hogged the waste off with the bandsaw...THEN cleaned it up with the planes
    IMG_4520 (640x480).jpg
    Made the other tapered cut....needed a jig to hold this, while I planed away the saw marks...
    IMG_4521 (640x480).jpg
    Chopped a notch that fits the foot end...
    IMG_4523 (640x480).jpg
    Hmm, which jack plane to grab...
    IMG_4525 (640x480).jpg
    used this to clean up after the jack plane..
    IMG_4528 (640x480).jpg
    Repeat until the four legs have their two tapers done..
    IMG_4527 (640x480).jpg
    Then clean up a mess...almost finished filling the "Burn Barrel" today..
    Enjoying a COLD Lager right now....I also had to clean out the bandsaw, then readjust it's settings....Just to get the tapers done. Then plane each taper smooth, mark which side does get a Mortise..
    Maybe tomorrow, I can chop the mortises, and cut some tenons...? We'll see....

    Debate is whether to add a few bead details..or just leave things plain...also have to cut the corners of the top a bit...about a round shape?

    Stay tuned...

  9. #9
    Join Date
    Jun 2010
    Location
    twomiles from the "peak of Ohio
    Posts
    12,171
    Well, after supper...went back to the shop..
    Ripped the aprons down to 3" wide..
    IMG_4531 (640x480).jpg
    Then planed the edges until they matched each other..
    IMG_4533 (640x480).jpg
    Then decided to do a little bead work..
    IMG_4535 (640x480).jpg
    Then set the Langdon 75 up, to saw the shoulders for the tenons...3/4" long tenons, 1/4" thick...Bandsaw to make the cheek cuts....then trim the width of the tenons...
    IMG_4536 (640x480).jpg
    Time to call it a day.....clean the floor, again..
    IMG_4534 (640x480).jpg
    Tomorrow I can set up to chop a few mortises and maybe do a bit of bead work on the legs?
    Stay tuned..

  10. #10
    Join Date
    Jun 2010
    Location
    twomiles from the "peak of Ohio
    Posts
    12,171
    Late start, today. I suppose I should try the shop....85 degrees in the shade..outside.....

    Camera battery is all charged up...might see what I can get done today...

  11. #11
    Join Date
    Jun 2010
    Location
    twomiles from the "peak of Ohio
    Posts
    12,171
    Mentioned the top was profiled a bit..
    IMG_4539 (640x480).jpg
    Top is 3/4 x 18 x 24...seems to be a decent size..
    IMG_4541 (640x480).jpg
    Tenons were already done, was just a matter of chopping a few holes ( lookee there, a round mallet, in use)
    IMG_4542 (640x480).jpg
    Outside corner of each leg also gets a bead detail...
    IMG_4543 (640x480).jpg
    And just kept doing these...
    IMG_4545 (640x480).jpg
    Aprons are centered on the leg....had to bevel the ends of the tenons....
    IMG_4549 (640x480).jpg
    Finally got things to the point I could try a dry fit, to get the clamps set up.
    Couple of the tenons were wide enough, I could use an Aldi's 8mm chisel.....newer ones seem to like chopping, older ones are for paring...like the walls of the mortises...
    Kept double checking myself...to make sure each part was where it was supposed to be....found one leg with a mis-marked "T" for tenon....wrong face. I also labelled each joint as to what apron went into which mortise...

    Fan was on Medium today, spent half of the 3 hours sitting on the shop stool....
    Maybe after Supper, I can go back and spread some glue?

    Stay tuned..

  12. #12
    Join Date
    Jun 2010
    Location
    twomiles from the "peak of Ohio
    Posts
    12,171
    Ok...sitting here, picking dried glue off me fingers....

    glued up.jpg
    tried to glue and clamp on the bench...did not got too well...got this thing to the floor, in the only flat, open area in the shop....diagonal clamp to pull it into square at the top...
    leg adjusters.jpg
    Feet needed adjusted...Back right leg splayed out too much, clamp to pull it back in Back left leg needed to splat out a hair..c clamp to do that...front two were a bit wider than the other two...pipe clamp to get 12" between the feet, same as the back ones. Will let this sit overnight...and see what I can do tomorrow..
    Stay tuned...

  13. #13
    Join Date
    Jun 2010
    Location
    twomiles from the "peak of Ohio
    Posts
    12,171
    Maybe later this afternoon, I can wander to the shop, and remove that forest of clamps....

    Need to make "corner blocks"

    kicker.JPG
    Like these. Slat down the center was a kicker for a drawer...
    DSCF0016.JPG
    Glued, and screwed into place in each corner, then a slot is made to attach the top. Slot allows the top to move as the seasons change.
    May use the Langdon 75 to cut the 45 degree ends, again. Counter sunk hole for the screws to attach to the aprons..Might be the "project" for today's shop time?

    Stay tuned....oh..you do want the pictures from this sort of thing?

  14. #14
    Join Date
    Jun 2010
    Location
    twomiles from the "peak of Ohio
    Posts
    12,171
    Well, out of the clamps and ready to go..
    IMG_4554 (640x480).jpg
    Needed to cut the corner blocks..
    IMG_4557 (640x480).jpg
    Drill a few holes..
    IMG_4561 (640x480).jpg
    Installed into the corners..
    IMG_4562 (640x480).jpg
    with screws and glue....then cut some slots..
    IMG_4567 (640x480).jpg
    Just drill a hole, then rock the drill back and forth...Center the base onto the top..
    IMG_4558 (640x480).jpg
    And add screws into the center of the slots..
    IMG_4569 (640x480).jpg
    Turn the table over And smooth the top..
    IMG_4573 (640x480).jpg
    Molded edge was with a router..
    Stay tuned for Part 2

  15. #15
    Join Date
    Jun 2010
    Location
    twomiles from the "peak of Ohio
    Posts
    12,171
    Ok, Router?
    IMG_4571 (640x480).jpg
    Cove bit installed...
    IMG_4572 (640x480).jpg
    Sander to ease the edges a bit...
    IMG_4574 (640x480).jpg
    First coat of Golden Oak Stain applied to just the top...for now.
    IMG_4576 (640x480).jpg
    When the top is dry, then I can finish the rest of the table, while it is sitting on it's top.

    Then maybe a coat or two of gloss poly?
    Just a simple Bedside table..
    Stay tuned...

Posting Permissions

  • You may not post new threads
  • You may not post replies
  • You may not post attachments
  • You may not edit your posts
  •