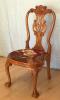
Results 1 to 12 of 12

Thread: Federal Style inspired end table

  1. #1
    Join Date
    Mar 2015
    Location
    SE Michigan
    Posts
    3,225

    Federal Style inspired end table

    My son requested an “antique looking end table” for his office, so I made my first attempt at a Federal Style (kind of) project. There was a whole lot of learning going on with this one. Mistakes covered up pretty well!

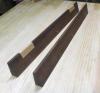
    Table is walnut. Top is walnut burl veneer with mahogany/maple banding and curly walnut veneer outside border. Legs have a quilted maple square outlined in maple/ebony stringing. Aprons have a maple stringing. This was a fun project. Looking forward to starting the one my daughter has now requested.

    E9C3D5B9-00F4-47B2-954B-7D9FC0DC372A.jpg 047A573C-994E-4B32-A95F-744F15DFB826.jpg

  2. #2
    Join Date
    Aug 2013
    Location
    Cumberland, Maryland
    Posts
    359
    Very nice indeed ! Excellent species selection and well executed.
    You only need 2 tools in life. If it's supposed to move and doesn't... use WD40. If it moves and shouldn't... use duct tape.

  3. #3
    There is a lot of originality in that version. I'm sure he will enjoy it, get ready for "people tell me they are usually used in
    pairs"

  4. #4
    Join Date
    Sep 2014
    Location
    Swampscott, MA
    Posts
    120
    Beautiful work!

  5. #5
    That's really something! Well done!
    Fred
    "All that is necessary for the triumph of evil is that good men do nothing."

    “If you want to know what a man's like, take a good look at how he treats his inferiors, not his equals.”

  6. #6
    Join Date
    Sep 2004
    Location
    Jacksonville, FL
    Posts
    859
    The only thing I see wrong with it is...it isn't mine.

    That's beautiful work I wish I had an end table like that. YOU did a great job on selecting and contrasting the woo. You should be proud and I'm sure your son will be.
    Marshall
    ---------------------------
    A Stickley fan boy.

  7. #7
    Join Date
    Mar 2003
    Location
    SE PA - Central Bucks County
    Posts
    65,836
    Darn nice work!!
    --

    The most expensive tool is the one you buy "cheaply" and often...

  8. #8
    Join Date
    Apr 2017
    Location
    Clarks Summit PA
    Posts
    1,744
    Very nice table with impressive inlay work Phil. Did you use the Lee Valley router with inlay attachments? I have a Stanley router which is about 20 years old. It has black plastic knobs and the the locking mechanism for blade depth shifts all the time. Are you happy with your Lee Valley router?

  9. #9
    Join Date
    Sep 2013
    Location
    Carrollton, Georgia
    Posts
    1,815
    Brilliant work, Phil. .. A very fine piece.
    Last edited by Yonak Hawkins; 05-14-2018 at 10:23 PM.

  10. #10
    Join Date
    Mar 2015
    Location
    SE Michigan
    Posts
    3,225
    Thank you all. Like I said, it was a fun, learning experience.

    Mark, I must admit in many of my projects I try to design in something where I get to use the LV router plane. I like using it that much. I do have the inlay accessories, guide, and cutters down to 1/16”. The apron stringing grooves were cut with the router plane. The squares on the legs were hogged out with a compact router and then cleaned up with the router plane. The top veneer and banding were assembled as one piece and pressed to the substrate...so no router used there.

    Here’s my initial impressions. The inlay spacers are very accurate. When combined as instructed, they are as close as ever needed. Like most things, I go with very light initial cuts to cut the surface fibers before going deeper. LV instructions say to go for the final depth on the first pass...indicating it is difficult to register to the same cut on multiple passes. I have not found that to be the case. Once the two sides of the groove have been cut with the inlay tool, I then choose to go with the router plane and appropriate cutter size to remove the waste. I do the final corner work with a chisel.

    Here’s a few things to keep in mind. The edge guide will need to be re-adjusted going from the inlay knives to the router cutter. The depth of cut will also need to be re-adjusted. I tend to strop the inlay knives before use just to hone them a bit. I do find I need to fiddle with the two knives just a bit to ensure they are at the same depth (aligned to each other)...but no big deal. I cut a practice groove in a piece of scrap to test the inlay knives depth, then test again when I move to the cutter.

  11. #11
    Join Date
    Feb 2003
    Location
    Leesville, SC
    Posts
    2,380
    Blog Entries
    1
    That looks Great.....

  12. #12
    Join Date
    Apr 2013
    Location
    Issaquah, Washington
    Posts
    1,320
    Beautiful piece Mr Mueller. Well done!

Posting Permissions

  • You may not post new threads
  • You may not post replies
  • You may not post attachments
  • You may not edit your posts
  •