Love the walnut and white oak contrast. It is my very favorite. Also, beautiful chamfers. I like how you did the corners first and then the sides.


 Member
Love the walnut and white oak contrast. It is my very favorite. Also, beautiful chamfers. I like how you did the corners first and then the sides.
 [OP]
Contributor
[OP]
Contributor
Thank you! Good eye!
Bumbling forward into the unknown.
 Contributor
Ok Brian, I can't figure it out. Why did you make the top half pins proud of the drawer sides? My only guess is "Just so someone would ask." It must be some kind of Brian speed secret.
Jim
[OP]
Contributor
I apply an inside chamfer, so that when the client reaches inside the drawer they do not rub their hand along a crisp inside edge but rather an edge that feels smooth because it's chamfered.Originally Posted by James Pallas

The chamfer is easier made through and through with the front of the drawer taller than the sides. The sides are also chamfered but the chamfers terminate. The rear of the drawer is also chamfered but can be made shorter than the sides and it too terminates.
Bumbling forward into the unknown.
Member
Brian, how do you cut your ultra-precise chamfers? I always enjoy doing that with a block plane and am fine with minor variations, but amazed by how "right" they look when just winging it. But yours are flawless. Method? Thanks for sharing. Great stuff.
Contributor
Brian speed secret. Never would've guessed it was just to shoot a chamfer thru. Just goes to show how we can over complicate the simple things in life.��
Jim
[OP]
Contributor
My pleasure! I use a chamfer plane, does the job beautifully.
Thanks Jim, absolutely and it also helps to set them apart a bit from production stuff. Nice production drawers will raise front and back and apply a bullnose round over to the whole drawer. It works but I’d rather stand out a bit from that.
Pat, the drawers are veneer over birch ply with heavy solid wood edging. More difficult than solid wood drawer fronts but worth it. 10” & 15” drawer fronts would move too much to maintain even gaps otherwise.[/QUOTE]
Brian, this kitchen is absolutely beautiful! I'm sure your clients are thrilled and you should be extremely proud of the achievement!
To me, your choice to use veneer over plywood with solid wood edging for the drawer fronts (versus solid wood) is insightful example of your true commitment to precision in your work. I applaud your high standards. Personally, I have much lower standards of precision and my aversion to plywood would have driven me towards solid wood drawer fronts and larger gaps – which is probably a good reason why I'm not a professional.
I incredibly impressed and reassured by the fact you made the kitchen cabinets by hand– thank you. Your achievement gives me faith this is in fact possible and someday I might be able to do something similar (albeit with much lower standards for design and execution).
Thanks for demonstrating that hand tool woodworking is still possible (if only by someone with your skills) for large-scale, practical applications like kitchen cabinets- Bravo!
Cheers, Mike
[OP]
Contributor
Thanks Mike! Certainly it feels good to have this under my belt, it was a long process and well worth it in terms of experience.
Absolutely, I think you can handle a similar job, you turn out a lot of high quality furniture so it should be no problem.
My pleasure!
Bumbling forward into the unknown.
 Contributor
Brian,
Fantastic job. Red Oak, hard to make it look anything more than utilitarian, in my opinion, but you managed to make it actually warm and inviting.
I too have an aversion to plywood most of the time. In cases like this though its not just the size of the seasonal gaps, its the fact that they will inevitably be uneven depending on the season. And uneven gaps just look terrible.
In cases like that I do something similar to what Brian does for that exact reason. Large door panels, drawer fronts, enclosed side panels, etc. Sometimes I'll make my own plywood for larger jobs as well. Gives me a little more freedom and a much thicker face veneer to work with right from the start. (not to mention that I can size the plywood however I like and not have to rely on weird metric equivalents and lots of waste from the standard 4x8 sheet)
Making furniture teaches us new ways to remove splinters.
[OP]
Contributor
Thanks Matt! Its definetly nice to make your own plywood.
Bumbling forward into the unknown.
Member
Hey Bill,
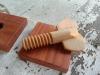
There's actually a Japanese hand plane for that--search for Mentori Kanna.
It's a unitasker...but a really good one. I waited 2 years before getting one, and wouldn't be without one.
 Posting Permissions

 Reply With Quote