Results 1 to 8 of 8

Thread: Restoring knotty pine T&G walls

  1. #1
    Join Date
    May 2005
    Location
    Seattle
    Posts
    13

    Restoring knotty pine T&G walls

    Was hoping I might get a little advice on restoring some 50+ year-old knotty pine walls. They are the "real" tongue-and-groove kind (not paneling), and I presume the finish was the traditional amber shellac and I have no idea if any previous owners added anything to the mix along the way. I don't have the time (or the stomach truth be told) for a full refinish sanding down to bare wood and I'm hoping I can leave the boards on the wall during the process.

    Here's a pic of one wall:
    IMAG2099-20180414-113156721.jpg

    Scratches and scuffs:
    IMAG2100-20180414-113157344.jpg

    Another showing areas of low sheen where I presume all the finish has worn off:
    IMAG2101-20180414-11315840.jpg

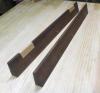
    And another showing old nail holes in areas:
    IMAG2102-20180414-113155981.jpg

    There are also places where it looks like sap has leached out of the walls and dried into a white bumpy and crusty mess.

    I've heard that going over the walls with denatured alcohol can help remove any residual shellac. Another source said mix up a 50-50 solution of denatured alcohol and lacquer thinner and use one of the fine grit green pads to go over the walls.

    For holes, I was probably going to use Famowood wood filler in the closest tint I can find...though I did see a video where a guy was using a wax stick to fill in holes and buffing the residue in with the rest of the wall that seemed to work pretty good. Though I don't know how well a big slug of wax would hold up to whatever the finish product will be.

    For finish, I was hoping to use something like an amber tinted Danish oil like a Watco for ease of touchups in the future, or just going the traditional route of amber shellac.

    Any tips on surface prep and finish are most appreciated. Thanks!

  2. #2
    That stuff darkens over time. Many find it too dark and remove or paint it. Do not consider your work on it a desirable upgrade to anyone but you, then do what you like.

  3. #3
    Join Date
    Nov 2013
    Location
    Waterford, PA
    Posts
    1,239
    My old home had miles of the real knotty pine board walls like you're showing. Chances are, the places that have holes are from 1 of 2 things. 1) Somebody hung something (photo, mirror...) or 2) a few boards were removed to access the wall and then put back. I never refinished whole rooms, but did touch up areas over the years. The first step is to determine what the existing finish is. If it is shellac, I'd give it a good scrubbing with TSP and then re-coat. If the finish is something else, it will probably be harder to avoid complete removal of the old finish. I'd consider filling the nail holes after you re-coat.

  4. #4
    Join Date
    Nov 2006
    Location
    NE Ohio
    Posts
    7,029
    Try orange shellac - cut down 50/50 with denatured alcohol.
    Zinsser changed the name of the orange shellac to amber.

    It's the traditional finish from the 1950's and 1960's, used in probably 90+ % of the construction of that era.

    I had some scratched spots on some window frames & trim that I touched up.

    I've heard that going over the walls with denatured alcohol can help remove any residual shellac
    Sort of...
    Going over the walls with denatured alcohol will - - eventually - - remove the shellac,,,,operative word being - eventually.
    Alcohol isn't the solvent for shellac (the solvent for shellac is ammonia), it's the reducer/thinner. Since shellac can be drawn out to infinity, going over a shellac surface with alcohol will just leave a thinner coat of shellac on the surface.

    Once upon a time,,,a co worker got mixed up and told a customer to seal all their wood trim with shellac prior to staining it.
    What he should have told them - - cut down 3# cut shellac 1 part shellac to 7 parts alcohol.
    When they went to stain the wood, the stain just ran off....

    Yours truly got the task of sanding/wiping down a whole house full of trim with 220 grit paper and gallons (and gallons and gallons and gallons and gallons,,,probably close to 24) of alcohol.
    It was Summer and hot and humid and miserable & it lasted a week.....

    But anyhow - yes wiping it down (with alcohol) will freshen up the surface & you can give it another coat if you want - or just give it a coat of paste wax.

    I'm hoping I can leave the boards on the wall during the process.
    Honestly?
    I wouldn't.
    You really should tear out the footers & replace them with treated.
    Sooner or later enough moisture will wick through the concrete to rot that white wood.
    Then it will stink & the smell will get into the floor up above.
    "Life is what happens to you while you're busy making other plans." - John Lennon

  5. #5
    Join Date
    May 2005
    Location
    Seattle
    Posts
    13
    Thanks for the tips. Rich - yes the most thorough route would be to pull all the boards down and work on them, but I just don't have the bandwidth for it. Further, the boards look like they have been futzed with over the years with some attached correctly by finish nailing through the tongues...others have been face nailed with both finish nails and standard-head nails at random locations, and I'm just not going to deal with that right now. Rot/moisture isn't an issue - these are on an elevated first floor with no concrete in sight. I will be removing the baseboards, crown, and trim.

    I think what I'll do is just do some experimentation with a few scrap boards that I've removed from other sections. I'll use 4 boards and on each board a different cleaner/stripper (TSP; ammonia, denatured alcohol, and a 50-50 mix of denatured alcohol and lacquer thinner). Once clean, I'll try 4-5 different finishes on sections of each board (amber shellac, a couple different tints of Watco; maybe a pure Tung oil; maybe Daly's BenMatte; and maybe a paste wax) and see which section looks the most reasonable. I'll follow up here with results later. I'm game for any other tips/combos as well. Thanks!

  6. #6
    Join Date
    Nov 2006
    Location
    NE Ohio
    Posts
    7,029
    Rot/moisture isn't an issue - these are on an elevated first floor with no concrete in sight
    Cool! The first picture made me think for some reason this was a basement rec room.
    "Life is what happens to you while you're busy making other plans." - John Lennon

  7. #7
    Join Date
    Jan 2018
    Location
    Madison WI area
    Posts
    149
    I have a similar project. Do you have access to a planer or sander? I found some beautiful white pine under the old finish.

    20180416_201755109_iOS.jpg20180416_201819465_iOS.jpg
    Last edited by David Ruhland; 04-17-2018 at 8:34 AM. Reason: pics upload failed first time

  8. #8
    Join Date
    Mar 2015
    Location
    SE Michigan
    Posts
    3,225
    I love Watco, but my concern would be the smell that will last for quite some time. Yes, it will go away eventually, but I’d probaby stick with the shellac. By the way, every room in our cabin is covered in the same knotty pine...walls and ceilings. The condition is similar to yours. Please keep us posted on what you end up doing.

Posting Permissions

  • You may not post new threads
  • You may not post replies
  • You may not post attachments
  • You may not edit your posts
  •