I wouldn't obsess over it too much. Clean up the worst of it and put it back to work. It isn't an heirloom instrument or piece of furniture - don't forget, as soon as you are done, somebody is going to go after it with a knife.


 Member
I wouldn't obsess over it too much. Clean up the worst of it and put it back to work. It isn't an heirloom instrument or piece of furniture - don't forget, as soon as you are done, somebody is going to go after it with a knife.
Moderator
To the OP: given that the use of scrapers and planes is raising some hackles, perhaps you should use a random orbit sander.
To the rest: To both of our chagrin, I'll edit all snark out of any posts here.
 Contributor
Why? Because it would be better. It should have been done that way to begin with. Nothing is worse than planing surfaces where the grain goes different directions on adjacent boards.Originally Posted by Patrick Chase

 Contributor
Finding a mass produced cutting board assembled with all the grain orientation running in the same direction would be close to a miraculous coincidence.
A full counter top cutting board salvaged from a 1928 built home by a friend an me doesn't even have many pieces side by side running in the same direction. Most of these were assembled and then run through a large sander. There was no reason to put in the extra cost of aligning all the pieces in the same direction. The interesting part about this old cutting board is it is assembled with hide glue so it has seams opening from years of being wiped down with hot water.
jtk
"A pessimist sees the difficulty in every opportunity; an optimist sees the opportunity in every difficulty."
- Sir Winston Churchill (1874-1965)
Member
Generally when you pick board directions you're trading off (at least) three things against each other:
- Grain direction. If you have trouble planing against the grain then you would want all of the boards with grain going the same way.
- Figure. You want the boards to look "good" when glued up, which to most people means that you want continuously flowing grain with no obvious discontinuities or sharp turns at board boundaries. There are all sorts of ways to achieve this, and some of them involve intentionally reversing the grain direction from one board to the next.
- Dimensional stability. If all of the boards in the glue-up have identical orientation (pith-up/down, grain) then the glued up board will be as prone to cupping as a single piece of the same width. For wide glue ups that can be a serious problem. You can avoid that by reversing every other board such that they alternate cup directions, but doing so sacrifices grain direction and potentially figure.
IMO being able to plane well against the grain is a key skill for good glue-ups precisely because it allows you to ignore (1) and focus entirely on the appearance and dimensional stability of the piece. That's a lot easier than having to worry about all 3 at once in my experience.
 Contributor
Planing against the grain is important for most scenarios since grain reversals in wood are extremely common. However I always align boards in a glue up to plane the same direction and usually go through a bit of hell to ensure that. I dont want the rug effect happening on a panel, so I slip match them in odd numbers, of pairs if theyre perfectly VG.
Id recommend planing this, will be an excellent training program and if it goes poorly then chop it with a cleaver until it looks untouched.
Member
Yeah, good point. I probably overstated the regularity with which I mix grain directions in glue ups (though I think it is something that we must be able to do when there's no other way out of a tricky grain-matching problem).
Contributor
That is one of the big differences between something handmade by an experienced craftsman or artist and something made in a factory and machines.
jtk
"A pessimist sees the difficulty in every opportunity; an optimist sees the opportunity in every difficulty."
- Sir Winston Churchill (1874-1965)
Contributor
Thanks Jim!
 [OP]
Member
[OP]
Member
WOW! Thanks to everyone for the discussion.
As someone pointed out, it's just a cutting board and not a fine piece of furniture so I'm not too stressed over it. I am, however, trying to improve my planing skills to be able to work on fine furniture.
So, I started planing with very thin shavings in a random direction. After a couple tries I think I figured out the planning direction to use on the three boards (indicated by the arrows in the pictures).
Board A still gave me tearout along the long part that I circled, and since it's such a large area I'm not 100% sure about the grain direction for that one, but I'm guessing it is more of my technique.
What I'd like to know is if I could have saved myself the trial and error from being able to read the face grain and end grain, or if you really just have to guess and test.
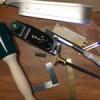
Someone also mentioned the cap iron setting so I've attached a picture of how the plane is set up. Maybe that is why I still had tearout?
I've also purchased a card scrapper and burnisher and once I get it sharpened I will try that for the final smoothing.
Photo Feb 17, 6 01 20 PM.jpgPhoto Feb 17, 6 02 31 PM.jpgPhoto Feb 17, 6 02 36 PM.jpgPhoto Feb 17, 6 02 41 PM.jpgPhoto Feb 17, 6 18 56 PM.jpgPhoto Feb 17, 6 19 44 PM.jpg
Member
The setback of your cap iron is in the right ballpark. I think the problem is that the leading edge angle is too low to effectively break the shaving and suppress tearout. Based on the way it's finished I suspect that that's a cap iron from a Quangsheng-made plane (most likely sold as WoodRiver here in the US). Those ship with a 25 degree bevel, and you realistically need 50+ degrees at the very tip to prevent tearout.
Search for "David Weaver cap iron" and you'll find an informative article on the topic. I can't link it because it's on a "rival forum".
Last edited by Patrick Chase; 02-18-2018 at 12:04 AM.
[OP]
Member
Yup. A woodriver.
Just to be clear, you are saying to sharpen the cap iron to sharper angle like B in the (exaggerated) picture?
Photo Feb 17, 8 02 09 PM.jpg
And thanks for the other article, studying it now.
[OP]
Member
Just focusing on one board so I can gain a better understanding of grain, I would love to know how you came to that conclusion.
[OP]
Member
nm. i think from the article what it is saying is that I need is picture A, or in reality, just put a bevel on the tip of the cap iron.
I'm pretty sure this is the key advantage as it says in the article:
I'll just read that 100 more times until I understand it...instead of allowing the iron to lever a shaving such that it breaks below the level of the cut, the cap iron exerts forward pressure on the shaving, preventing it from levering wood before the cutting edge is able to reach it.
Member
At a minimum you need a high-angle "microbevel" at the tip, about 1/64" tall. Ideally you should gradually blend that back into the cap iron's primary bevel, as doing so helps shaving ejection.
From experience the rough finish on that QS/WR cap iron will tend to trap shavings when used with a close-set cap iron. You're going to want to smooth that.

 Reply With Quote
