Trying to find time to turn (ha, for the past three years). Problem is once I get out in the shop couple hours pass in what feels like minutes.
My oldest son got married last May and he and his new wife went to Hawaii for their honeymoon. My gift from them was a hunk of koa about 2x4x15. I wanted to make something for them with it and decided to make a 4-piece cheese set.
I havent turned for several months due to other projects and I injured my wrist! Thought this would be a good project to do before second turning some bowls that have dried out. Thought Id post this to see if I put into practice the things I have learned hear and at the local woodturning club. Looking for comments and criticism to help improve my skills and techniques.
The cheese set takes a ¼-20 threaded insert in the handle that the stud on the tool screws into. They wanted $20 for a special mandrel but thought I have a lathe I can just make one. Making the mandrel is a story by itself took three tries!
- I chucked up a 4 cube of ash, took it to round at the tail end, drilled & tapped it to fit my 1-1/4-8 spindle, and cut the mortises so it would sit flat on the spindle shoulder. I even super glued the threads and re-tapped them. Reversed the piece using my cut threads on the mandrel then drilled a hole for a thread insert (my plan was install a threaded insert into the mandrel and then glue a stud into it so I could hold the handle). After I threaded in the insert and installed the stud I was saddened to find out the hole must have walked off center. Before my second attempt, did some reading here and found there are short/stiff drill bits called centering bits so went to my local HF and picked up a set.
- For the second mandrel used the same process but this time used the centering bit. Yes, total runout in the stud was less than 0.005. Cut the diameter of the mandrel at the threaded insert end to match the diameter of the shoulder on the cheese tools. I tried to blend this ¾ diameter too well with the rest of the mandrel and created whatever one calls a lamp shade for bowls on spindle turning (I cut into the hole bored for the 1-1/4-10 tap).
- Third time was a charm. IMG_3417.jpg IMG_3418.jpg
Fun part handle making steps I used:
- Chuck the handle block.
- Use the centering bit to start the threaded insert hole drill to depth/size with twist drill. IMG_3412.jpg IMG_3413.jpg
- Make a mandrel to drive threaded inserts into the blank. IMG_3414.jpg
- Use a drill chuck in the tail stock I turned the headstock by hand while advancing the tail stock. I used this method on flat work and a drill press to assure the inserts go in straight. (Use a hex wrench to drive the insert in a little deeper.) IMG_3415.jpg
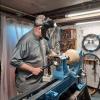
- Remove the chuck, screw the custom mandrel on the spindle, and tighten the reversed handle blank on the mandrel. Attachment 377324 IMG_3420.jpg
- Turn the handle. (I used the tail stock to support the turning as much as I could.) --> practice piece IMG_3421.jpg
Will update once I create the real handles.
Mike

 Reply With Quote