I would like to know bhow to "rivet" the blade to the 2 piece handle? I have seen where a brass rod is used and peened but then how to you avoid the "rough" edges?
Thanks!


 [OP]
Member
[OP]
Member
I would like to know bhow to "rivet" the blade to the 2 piece handle? I have seen where a brass rod is used and peened but then how to you avoid the "rough" edges?
Thanks!
 Contributor
Most guys like to slightly countersink the wooden scales and then make the rivet about 1/8" longer than the finished sandwich. Peen carefully, flipping sides every so often. When complete, draw file the result and you are done. You might practice on some scrap to adjust your technique. Alternatively, marking knife scales are not under a lot of stress, a little 5 minute epoxy would work just fine. Drawfile the edges to remove the squeeze out and you are done.
[OP]
Member
Pete, thanks for the reply. After peening if I file don't I "lose" the peen?
Member
No. That's the purpose of the slight countersink. Peening the brass causes it to expand out to fill that countersink, forming wider head that locks the scale to the tang.
I'm a belt-and-suspenders guy with this, so I always do epoxied scales and brass rod.
[OP]
Member
Thanks Sean now I get it!!
 Contributor
Hi Tom,
Here are some marking knives made from stuff around the shop:
Shop Made Knives.jpg
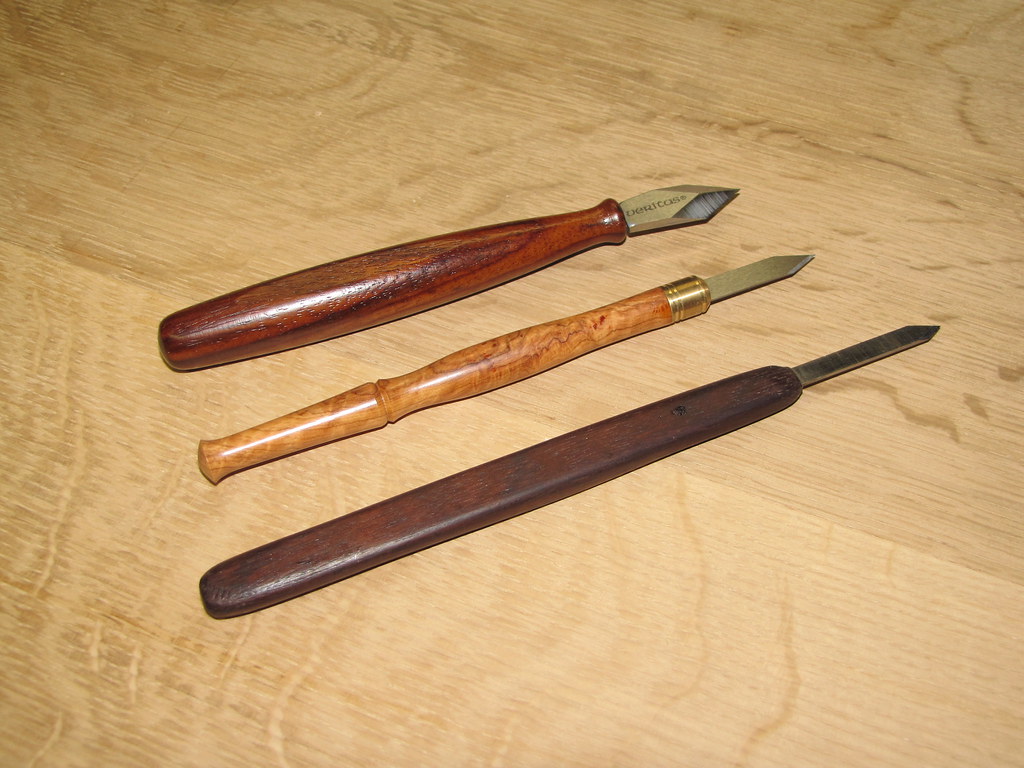
From top to bottom they are in the order made. The first and last are made from an old plane blade. The one in the middle is made from a piece of saw blade. The top one was made using brass rod for rivets to hold the scales in place. This was my first attempt without testing the rod for how much extra or how big of a divot to peen it into.
This is my build post on the ebony handled knife:
http://www.sawmillcreek.org/showthre...s-Just-Dove-In
If my fancy ever again turns to making a knife it will likely be a spear point made from a plane blade.
jtk
"A pessimist sees the difficulty in every opportunity; an optimist sees the opportunity in every difficulty."
- Sir Winston Churchill (1874-1965)
Member
Search for "knife handle bolts". You will find all sorts of sizes and materials. Brass, stainless, titanium, aluminum. they are easy to use. Brass rod also works well. If you want a lanyard hole use brass or copper tube.
clint
 Contributor
The bottom knife is a homebrew. The blade was crafted from a scroll saw blade and the handle scales are rosewood. The blade is embedded in a groove that was cut in both sides. I drilled a hole through the handle scales that aligned with the hole in the blade. When I epoxied the scales to the blade the hole filled with epoxy. The blade is going nowhere. The dark epoxy blends with the rosewood and you can hardly see it at the seams or where the hole comes through.
Sharp solves all manner of problems.
Contributor
I learned the hard way to drill a bit of countersink space for the peened ends to expand into. Ruined a great scale that way. A slow setting epoxy helps give you time to peen before the epoxy sets. I would recommend taking a piece of your brass rod and peening the ends just to get a feel for the process and the resulting shape. An inch or so held with pliers or pocked through a thin scrape should do the trick.Originally Posted by sean contenti

 Posting Permissions

 Reply With Quote