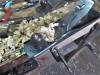
I'm a novice at using handplane. I was trying out a new lee valley #4 smoother on the face of a piece of maple 2" wide. The plane skips at the beginning of the push stroke and cause ripples at the start of the piece. The shaving are either dusty or form tiny rolls. I backed the blade up as much as I could but the plane still skips. It's most likely I'm the culprit but I'm not sure what need to change. Thanks!

 Reply With Quote