Ah found it thanks!Originally Posted by Andy Giddings

-Rob


 Member
Ah found it thanks!
-Rob
 Moderator
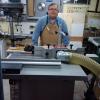
I completed my own Fritz 'n Franz jig today and look forward to using it! This is on a MiniMax S315WS slider.

--
The most expensive tool is the one you buy "cheaply" and often...
Member
Looks good Jim. I have been thinking about the way the jig is made and one problem is that the end nearest the blade which I use as a zero reference gets chewed away by the blade or if the blade is changed is no longer zero to the blade. I am thinking that it would be a good idea to make the end nearest the blade have replaceable faces so changes can be made without making a whole new jig out of either a very hard timber or maybe aluminium or HDPE.
I have made two different types, one is plain Jane with no tracks, rules, stops etc and the other has tracks and stops. I find I use the plain one way more than the fancy one using the end of the jig as a zero reference and placing the measured mark I want to cut to against that edge and that is very fast and accurate. I am thinking of making one for 45 degree angle cuts as well to make them easier to do without having to set the saw each time.
Chris
Everything I like is either illegal, immoral or fattening
Moderator
Chris, I can absolutely see the value of using this "technique" to construct dedicated jigs for angles and shapes that one might produce frequently with the type of work they do. The kicker about this is that the workpiece is "captive", both between the two sides of the jig and to the slider wagon. And it can be used to make very small parts safely and without one's hands being anywhere near the spinning blade. Win-win, IMHO.
On the faces, I agree that there is potential for wear. Replaceable is a nice way to deal with that; the challenge is a secure way to keep the replaceable face in-place while being removable without having any metal exposed to the blade. Countersunk screws may work for that.
--
The most expensive tool is the one you buy "cheaply" and often...
 [OP]
Member
[OP]
Member
Jim, sounds like you realized the same thing as I did.... SAFE way of cutting small pieces. "Win-Win"
I made my jigs to receive replacement edges (zero clearance) via tongue and groove using UHMW strips and a dab of silicon to help keep them in place.
IMG_7626.jpg
Cheers
 Contributor
Wow, fancy, mine's the plain Jane version.
Cutting small pieces.jpg
regards, Rod.
Member
Rod,
That might be plain Jane but it looks comfortable to use.....and I really like the material deflector on the right side of the blade. Don't think I've seen one of those before.
Really nice jigs guys!
Member
That deflector appears in the latest Hammer/Felder video https://www.youtube.com/watch?v=xb1N5oxekyo
Chris
Everything I like is either illegal, immoral or fattening
Member
That is the Aigner deflector. https://www.werkzeuge-fuchs.de/en/mi...ort-workpieces
You can download Aigner catalogue to see the detailed description of the deflector, it should be easy to DIY make one.
https://www.werkzeuge-fuchs.de/en/Downloads
James
Member
Deflector is easy to make. About $.50 in scrap, and $1.00 in 3/8" dia x 3/8" long rare earth magnets, and 5 minutes of time and you are done.
When not using it, it sticks to overarm guard, or side of the machine.
Contributor
Thanks, here's my drawing for it.
Visio-Tablesaw deflector wedge drawing.pdf
Regards, Rod.
Member
I'm pretty new to using a sliding table. I purchased a 2000 model C3-41. To ask maybe a dumb question when do you use the deflector usually?
Dan
Moderator
I just saw the "deflector" in the video that Keith posted in the Woodworking Projects forum...and one immediately was put on my "to-do" list. I can think of many times I would have liked to have had that on the saw...
--
The most expensive tool is the one you buy "cheaply" and often...
Moderator
It's primary use is often when trimming off small pieces so that they don't roll back into the blade and go shooting across the room, knocking the shop cat off the shelf and causing general mayhem.It's positioned at the riving knife (or where a small piece will clear the cut fully) so that it doesn't try move the piece until it is actually an off-cut.
{edit for clarity}
I meant to say that it gets positioned such that the cutoff just completely clears the cut. That could be back as far as the riving knife or it could be close to the arbor center of the blade, depending on what you are cutting, blade height, etc. The idea is to deflect the small cut-off piece away from the blade so it doesn't ride forward and vibrate to where the teeth might throw it across the room...
Last edited by Jim Becker; 09-08-2017 at 8:57 PM.
--
The most expensive tool is the one you buy "cheaply" and often...
 Contributor
Hmm, I have a deflector and I always rested it against the flat of the blade just in front of the arbor. Maybe I'm doing it wrong. I'll try it on the riving knife. Main problem to to remember to install and remove it.
 Posting Permissions

 Reply With Quote