Page 1 of 3 123 LastLast
Results 1 to 15 of 33

Thread: Moving Fillister Plane build.

  1. #1
    Join Date
    Oct 2010
    Location
    Australia
    Posts
    2,534

    Moving Fillister Plane build.

    In the early stages of building a traditional Moving Fillister Plane. The depth stop assembly, single iron, and ancillaries were purchased from the U.K close to 5yrs ago, so its been a project that's been well overdue in getting started. Some existing slop within the mechanical movement of the depth stop had to be addressed before it was later installed. The build itself will take some time to complete as this is my 1st time attempt at this type of wooden plane design. Each stage needs to be followed up by a detailed account of the measurements taken for future reference.

    A rebate needed to be formed to allow the later gluing in of a partial sole of higher janka timber. The main stock species is Tasmanian Tiger Myrtle.


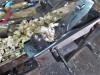
    Depth stop adjuster after being installed. A dovetailed keyway was formed to house the adjuster side wall plate.


    Stewie;
    Last edited by Stewie Simpson; 07-04-2017 at 1:06 AM.

  2. #2
    Looks nice. I can't wait to see the rest.

  3. #3
    Join Date
    Jun 2013
    Location
    Neither here nor there
    Posts
    3,841
    Blog Entries
    6
    I love your builds. I also love the patina on your bench. Looks like many years of love.

  4. #4
    Interesting hardware. Would you share the identity and source? Pretty please?

    Nice looking start. Looking forward to more.
    Fair winds and following seas,
    Jim Waldron

  5. #5
    Join Date
    Oct 2010
    Location
    Australia
    Posts
    2,534
    James; the easiest option is to find an old moving fillister plane that's wooden body is in poor condition and recycle the metal parts.
    Last edited by Stewie Simpson; 07-04-2017 at 6:40 PM.

  6. #6
    Join Date
    May 2015
    Location
    NJ
    Posts
    1,407
    I'm sure this is going to be a beauty of a plane.
    "The reward of a thing well done is having done it." - Ralph Waldo Emerson

  7. #7
    Join Date
    Oct 2010
    Location
    Australia
    Posts
    2,534
    The thread plates to secure the moving fence were keyed in before being epoxied into position.


    The partial sole of higher janka Aust. Jarrah was glued in before being dressed back to final dimension.


    Stewie;

  8. #8
    Join Date
    Oct 2010
    Location
    Australia
    Posts
    2,534
    The moving fillister plane build has been moved to different forum site.

    Stewie;
    Last edited by Stewie Simpson; 07-07-2017 at 3:02 AM.

  9. #9
    Join Date
    Jun 2010
    Location
    twomiles from the "peak of Ohio
    Posts
    12,182
    Why?

    Reasons?

  10. #10
    Join Date
    Jul 2015
    Location
    Broadview Heights, OH
    Posts
    714
    I think he means it's on another board, not SMC. As to why, who cares?

  11. #11
    Join Date
    Oct 2010
    Location
    Australia
    Posts
    2,534
    Nicely worded Pete. I knew you would understand.

    regards Stewie;
    Last edited by Stewie Simpson; 07-09-2017 at 9:34 AM.

  12. #12
    Quote Originally Posted by Stewie Simpson View Post
    Nicely worded Pete. I knew you would understand.

    regards Stewie;
    Do you have a link to it, Stewie? I would like to see the build, you do good work.

  13. #13
    Quote Originally Posted by Allen Jordan View Post
    Do you have a link to it, Stewie? I would like to see the build, you do good work.
    Might be over on Wood Central. Stewie sometimes hangs out there.

  14. #14
    Join Date
    Oct 2010
    Location
    Australia
    Posts
    2,534
    Allen; the post has been moved to the Aussie forum site. The mods will likely not appreciate me posting a direct link.

    Stewie;

  15. #15
    Join Date
    Oct 2010
    Location
    Australia
    Posts
    2,534
    Re-threaded the securing bolts for the moving fence to SAE 1/4 NC20.


    The moving fence installed. The 2 brass slides and slitter are next.


    The brass slides epoxied into position. The inboard side of the moving fence was also trimmed back to obtain the targeted 3/4 inch set.


    After shaping the slitting iron, the cutting end was heated to a cherry red before quenching in oil. The cutting tip was then hollow ground and honed to a sharp edge.


    Slitting iron keyed into the inboard side of the fillister plane.


Posting Permissions

  • You may not post new threads
  • You may not post replies
  • You may not post attachments
  • You may not edit your posts
  •