Page 1 of 2 12 LastLast
Results 1 to 15 of 16

Thread: "Oh No" What Happened to my Goblet!

  1. #1
    Join Date
    Jan 2006
    Location
    Chicagoland
    Posts
    2,801

    "Oh No" What Happened to my Goblet!

    (Think I already know)

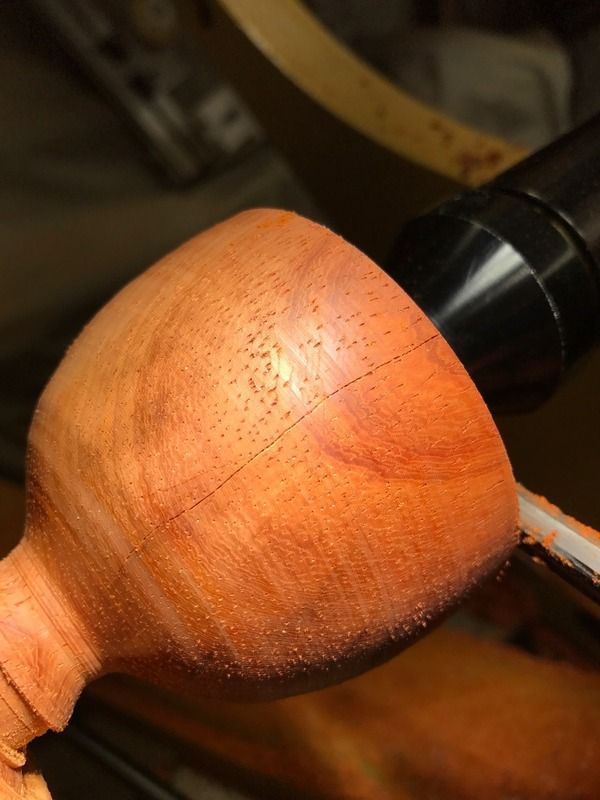
    Went out this morning to hollow out my goblet and cut the captured rings and I found this:


    I rough cut the outside of the cup yesterday. Maybe I should have hollowed it yesterday too? The wood is padauk that I got from Woodcraft. I'm guessing it wasn't totally dry and the crack developed over night?

    What do you think caused this?


    Thanks,

    Mike

  2. #2
    I think ALL of the exotics one buys at Woodcraft and other such sources should be dealt with as wet. They are usually waxed all sides and heavy. It would takes years to dry in that situation. Always wrap the piece with a plastic grocery bag if you leave for any length of time. You may also want to use a piece of grocery bag in your chuck so your jaws don't rust if wrapped in a bag with the piece.

    Left click my name for homepage link.

  3. #3
    Join Date
    Feb 2008
    Location
    E TN, near Knoxville
    Posts
    12,298
    Yes, if I can finish one the same day I like to hollow fairly close to the final thickness. BTW, following Raffan's advice on making lidded boxes from even very dry wood, I also turn the outside and inside of the box to close to the final size and let it sit overnight. If there are any stresses in the wood, this gives them a chance to equalize and increase the likelihood of a good fit on the lid.

    At one time I bought some big blocks of various exotic woods from the late Jim King in Peru and they came dipped in paraffin, like you will often see exotic blanks from Woodcraft and elsewhere. To prevent disintegration, Jim recommended boiling these blocks for half a day as soon as possible. He said for his bowl export business, they boil every roughed bowl in 55 gallon drums over a wood fire. I use a propane-fired turkey fryer.

    JKJ

  4. #4
    Join Date
    Sep 2015
    Location
    San Diego, Ca
    Posts
    1,647
    When you left it overnight the outside started to lose moisture and started to shrink. The inside was still wet and expanded. As John said, it is best to stick a plastic bag over it if you need to stop for a while.

    A friend of mine had a similar situation with a piece of red cedar but came up with a solution. He mixed up some Tite bond glue (PVA) and thinned it something like 3 or 4 parts water to 1 part glue and he soaked the piece for a day or two. It re-hydrated and the crack closed up. When he dried it, the crack didn't re-open. At this point you don't have much to lose.

  5. #5
    Any board stock over about 8/4 or 2 inches thick, never seems to reach a stable moisture level because of the thickness. Add the wax coating and it gets worse. Looks like a tiny crack just to the left of the bigger one, which means there could have been hair line cracks in it that were not visible. So, finish turn in one time slot when ever possible. If not, plastic bag it... Been there, done that, more than once...

    robo hippy

  6. #6
    Join Date
    Jun 2011
    Location
    Colby, Washington. Just across the Puget Sound from Seattle, near Blake Island.
    Posts
    936
    If I'm reading your description correctly, you turned the outside, then returned to do the inside? In my experience -- I've turned a ton of goblets -- your failure rate will be much lower if you turn the inside of the goblet first, then slowly work your way down the outside, forming (and finish sanding) the bowl, stem base, then stem. If you can stabilize the bowl end with your tailstock center, do it.

    Now that you've got this split, try slathering everything with CA, perhaps clamping it to close the crack. CA is sandable, and makes a good, polishable goblet finish.

    Anyway, that's my two cents.

    Russell Neyman
    .


    Writer - Woodworker - Historian
    Instructor: The Woodturning Experience
    Puget Sound, Washington State


    "Outside of a dog, there's nothing better than a good book; inside of a dog it's too dark to read."

  7. #7
    Join Date
    Feb 2010
    Location
    Hanover, Ontario
    Posts
    405
    Mike, that is sad to see! As we talked about, always just rough the outside and not too far down, you need the thickness to finesse the inside and complete the outside. Now put your selected finish on the cup, all of it completely, you will not be coming back up here. Now work your way down the stem with big cone support in the live centre. Put protection inside the cup to protect the finish.
    As you go down the stem, also finish each thin section as you go.
    I would put the CA on as suggested and complete this one. Nice wood and a great learning experience.
    Peter F.

    Oops, don't know why this rotated. But it is in Spindle turning orientation!!!
    Attached Images Attached Images

  8. #8
    Join Date
    Jan 2006
    Location
    Chicagoland
    Posts
    2,801

    Lightbulb

    Quote Originally Posted by Peter Fabricius View Post
    Mike, that is sad to see! As we talked about, always just rough the outside and not too far down, you need the thickness to finesse the inside and complete the outside. Now put your selected finish on the cup, all of it completely, you will not be coming back up here. Now work your way down the stem with big cone support in the live centre. Put protection inside the cup to protect the finish.
    As you go down the stem, also finish each thin section as you go.
    I would put the CA on as suggested and complete this one. Nice wood and a great learning experience.
    Peter F.

    Oops, don't know why this rotated. But it is in Spindle turning orientation!!!
    Thanks to all for the advice.

    The crack seemed to close up quite a bit. Thought I could save it but then I saw the crack almost through the base so it went into the learning pile. I did learned a lot on this piece. I have been concentrating on bowls and ends up this spindle turning has many challenges. I made a captured ring goblet several months ago and this time around seemed more challenging - even without considering the crack.


    • I somehow forgot how to hollow the cup out. I'm able to hollow it out but not the same way I see others do.
      • I couldn't core it like a bowl (probably end grain problem)
      • I see some core from the middle then pull the cut outward to the left - I tried this and first few cuts went well then got a good catch.
      • Saw Raffan do a wierd circular motion where he actually starts in the middle and ends up on the right side of the cup. Tried this and couldn't make a single chip.
      • I ended up using my hollowing jig and made a perfect bowl - but I want to do it with conventional tools.
      • Several of my tools have been modified for bowl turning so I'm sure the shapes ate not optimal for spindle turning.


    • Captured ring shaping. I used my D-Way 3/8" beading tool to shape the outside of the ring.
      • OMG - when I got close to a complete bead I got a small catch. I chucked up another piece to practice on and they were catchy too. I called up Dave and he said I was the first to have issues with his beading too (why do I always seem to be the first & only).
      • Dave suggested I turn my Robust tool rest around. I did this and it helped but I think I also was not letting the tool do the work - I was.

    • Beading tool - like a hook tool to make the beads. (Sorby tool with replaceable cutters)
      • I had this for my first captured ring goblet and my issue is it either doesn't cut or cuts too aggressively. That's why I purchased Dave's beading tool.
      • Had the same issues this time. Now I can't again be the only one to have problems with this tool. I can't even get it to jut cut the back side of the bead!


    I'm stubborn (and I need a second goblet in two weeks) so I grabbed a piece of dry ash that I made the first one from. Still a bit of a challenge but going much smoother than the one with the crack.

    Mike


    Added:

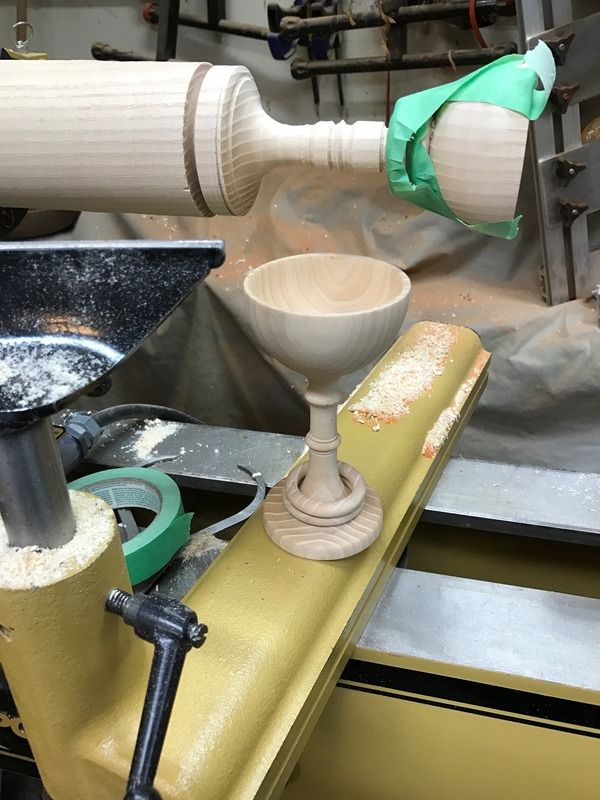
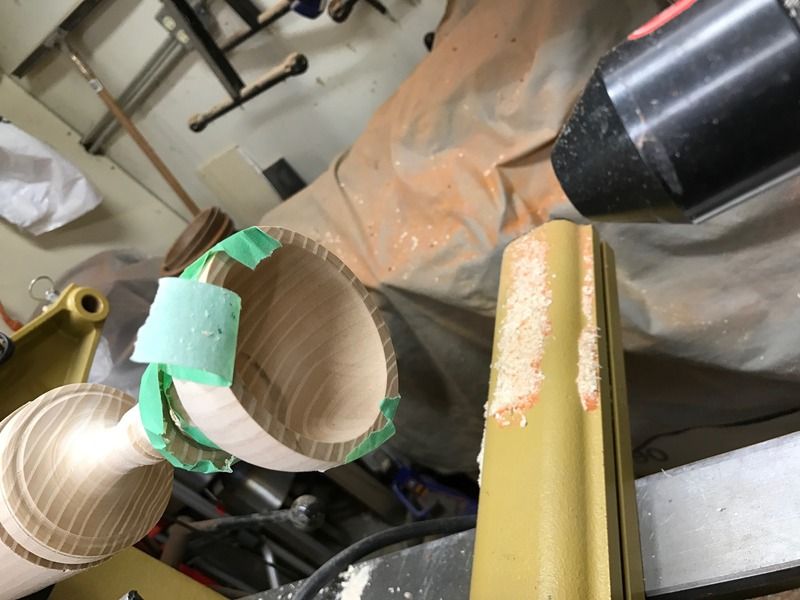
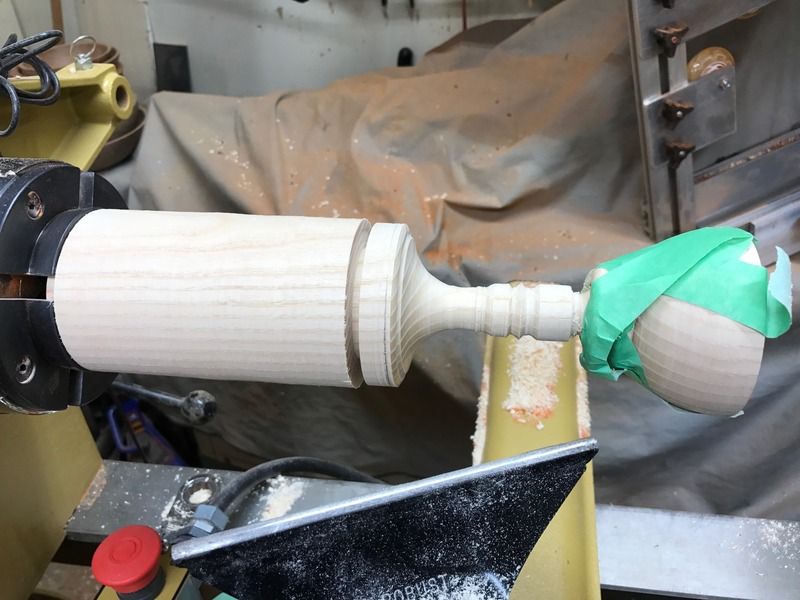
    Should have shown these:

    #1 shows brother/sister goblets.

    #2 is inside second goblet (oops - the ball left a ring).

    #3 side profile - close to being finished although the sanding of the inside of the rings is somewhat dreaded.


    Last edited by Mike Goetzke; 04-24-2017 at 8:48 PM.

  9. #9
    Join Date
    Feb 2010
    Location
    Hanover, Ontario
    Posts
    405
    Mike,
    You are getting it! Your Brother and Sister goblets look nice. The ball ring should sand out easily, you still have some heft in the stem. Try your big Aluminum cone with a little padding for the cup edge. Or make a wooden cone for your live centre. The side view might show why you are getting catches and probably vibration.... You are a long way out from the Chuck, try using wood that is only one inch longer than your desired finished goblet. I wish I could be there to help, keep watching the end grain hollowing videos and ask a Mentor at your club to watch over you for a few cuts. Keep at it.

  10. #10
    Join Date
    Jan 2006
    Location
    Chicagoland
    Posts
    2,801
    Thanks Peter. I have been using a spindle steady - I took it off for the picture. Once I took the picture I noticed the same thing - the blank is quite long. I'm thinking I can still shorten it and re-chuck it. Yeah, the one in the lathe is still being worked on. I was shaping the base then planned to sand the ID of the rings and finish the stem. I found docgreenwoodturner online and it went into the mechanics of cutting spindles. May chuck up a practice piece (or two) to see if I can become more comfortable with spindle turning.


    Mike

  11. #11
    Join Date
    Feb 2008
    Location
    E TN, near Knoxville
    Posts
    12,298
    Quote Originally Posted by Mike Goetzke View Post
    ...I found docgreenwoodturner online and it went into the mechanics of cutting spindles. May chuck up a practice piece (or two) to see if I can become more comfortable with spindle turning.
    Mike,

    If you don't have it, Doc's book is a great resource. Available on Amazon: https://www.amazon.com/Fixtures-Chuc.../dp/1565235193

    I highly recommend becoming an expert at spindle turning! I've turned at least a little of most things and I enjoy spindle turning the most. Also, some of the best turners in the world say spindle turning will teach you the fine tool control that will let you turn anything. When I teach beginners the first tool in their hands is the skew chisel. It doesn't take long before they are making clean planing cuts.

    BTY, goblets are some of my favorite things to turn. Maybe try a profile goblet some day! I made these for my son and his wife.

    profile_PC244147es.jpg profile_comp.jpg

    Or a little bitty goblet. (these all fit on a penny)

    tiny_things.jpg

    Our good friend John Lucas once got into a contest with another turner to see who could make the smallest goblet. At the end they were turning under a microscope with sewing needles sharpened into turning tools. You need a magnifier to see the smallest. John said at that scale a single pore in the wood would cause the stem to break.

    JKJ

  12. #12
    Join Date
    Jan 2006
    Location
    Chicagoland
    Posts
    2,801
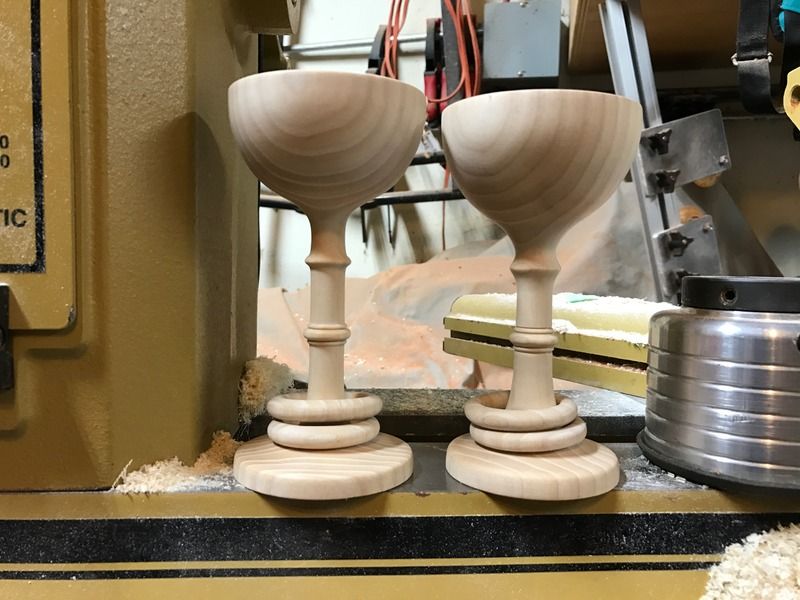
    Had some time to play some more on the lathe:


    Thanks for all the help and encouragement.

    Taller for the groom and shorter for the bride.

    I did some practicing for with coves and still haven't mastered it yet but I'm getting better. I have the rest height set so the tip of the 3/8" spindle gouge is on center. I seem to have the best luck of not getting a run back if my handle is parallel to the floor, flute closed. But, this seems to give the cut a start that is too vertical. Also, seems like once I start the cut I need to lower the handle quickly and open the flute progressively to get a good shape. Sometimes the cut is chattering but if I go over it a second time it's smooth.


    Mike

  13. #13
    Join Date
    May 2010
    Location
    Ambridge, PA
    Posts
    968
    Pretty sweet looking pieces Mike.
    Member Turners Anonymous Pittsburgh, PA

  14. #14
    Quote Originally Posted by Mike Goetzke View Post
    Had some time to play some more on the lathe:


    Thanks for all the help and encouragement.

    Taller for the groom and shorter for the bride.

    I did some practicing for with coves and still haven't mastered it yet but I'm getting better. I have the rest height set so the tip of the 3/8" spindle gouge is on center. I seem to have the best luck of not getting a run back if my handle is parallel to the floor, flute closed. But, this seems to give the cut a start that is too vertical. Also, seems like once I start the cut I need to lower the handle quickly and open the flute progressively to get a good shape. Sometimes the cut is chattering but if I go over it a second time it's smooth.


    Mike
    Those are VERY nice Mike!

  15. #15
    Join Date
    Feb 2008
    Location
    E TN, near Knoxville
    Posts
    12,298

    Notes on spindle turning

    Quote Originally Posted by Mike Goetzke View Post
    I have the rest height set so the tip of the 3/8" spindle gouge is on center. I seem to have the best luck of not getting a run back if my handle is parallel to the floor, flute closed. But, this seems to give the cut a start that is too vertical. Also, seems like once I start the cut I need to lower the handle quickly and open the flute progressively to get a good shape. Sometimes the cut is chattering but if I go over it a second time it's smooth.
    Nice pieces.

    Your tool rest height sounds good. It is important to enter the wood with the flute closed to prevent a skating/skidding catch. If the start of the cut with the flute closed seems too steep (too much towards perpendicular to the spindle axis if I understand what you mean), you may not have the handle swung far enough to one side or the other. The bevel of the gouge should be aligned exactly with the actual or desired profile at the start of the cove. Depending on several things including the shape of the cove and the tool grind, you may need to swing the handle a few degrees further to the right when starting the right half of the cove.

    I do a lot of spindle turning, much of it on thin spindles. It is hard to think of the exact motions needed to cut perfect coves, let alone describe them in writing. After you do a thousand they are second nature - you just cut them and never, ever think about the motions. However, after reading your post I made myself stop and think about it. I actually had to get up from the chair and walk down to the shop and cut some coves to watch what I did.

    I think there are four coordinated movements needed to cut a cove, what I call might swing, twist, tilt, and thrust. For example, consider cutting the right half of a cove, right to left, from the right edge to the center:

    START THE CUT entering the wood at the very right of the cove with flute closed (positioned to the left, 9-o'clock) depending on the shape of the cove. The handle should be approximately horizontal with the ground (if your tool rest is positioned as you said) so the bevel is exactly lined up with the desired beginning of the cove for the first cut OR with the existing cove profile if it is a subsequent refinement cut. If making the cove wider the tip actually enters the wood a tiny bit to the right of the existing cove but with the bevel still lined up parallel to the cove profile. If the width is ok but your are making the cove deeper, the bevel should start riding on the existing cove then almost immediately start slicing deeper. (Note that if refining an existing cove and not entering the wood at the cylinder surface, the flute might not need to be at 9 o-clock but can be twisted a bit.)

    END THE CUT always with the flute open (up, 12 o'clock) - the twist. Regardless of where it started out, the handle should now be perpendicular to the spindle axis - the swing. The handle is dropped - tilt. The handle is pushed forward so the bevel is riding the bottom of the cove and quits cutting in the exact center - the thrust. Some people think of "lowering the handle" to get the tilt or raising the tip of the tool - same thing. But I think of neither - I just ride the bevel and adjust the tilt and forward tool position as needed to keep the tool cutting the way I want it.

    In between the START and the END of the one side of the cove all four movements need to be coordinated - swing, twist, tilt, and thrust.

    The important thing is all the movements need to be smoothly coordinated. Twist, thrust, and tilt without a smooth swing gives you a a poorly shaped cove (maybe too deep) and possibly a catch. Swing, tilt, and twist without thrust and the gouge quits cutting. Too much thrust and tilt too fast and you push the tip out the wood and it quits cutting. Not enough or too slow with the tilt and you end up scraping and tearing the wood instead of cutting. Forget to twist and it's a disaster.

    After the first cut on the right side, move to the left side and repeat the exact steps with mirrored motions. The tip of the gouge should quit cutting exactly in the center and the bottom of the cove, ideally with the two halves symmetrical. Repeat.

    The motion is sort of a "scooping" action, maybe a bit like scooping out a curved curl of ice cream with a spoon. I have people practice it over and over starting with small, shallow coves.

    The ending position of the flute should always be straight up in the center of the cove, at the 12 o'clock position.

    The starting position of the flute depends on whether this is the first cut on the cove. If you are refining a cove it depends somewhat on the shape of the cove. The first cut when entering the wood should have the flute exactly at 9 o-clock or the tip may catch and skate down the cylinder. (unless you have very good control) When refining or deepening an existing cove you might started with the flute at the 9:30 or 10 or 11 o-clock position. Just imagine the existing or desired shape and adjust as needed. (Easy to say!)

    One thing about the swing: at the start of the cut the bevel needs to be aligned with the existing beginning cove or the imagined/projected cove shape. If the cove is shallow AND the gouge is ground with a small (sharper) angle, the handle may need to start further to the right (for the right half of the cove). If the cove is deep, say if refining and deepening an shallow curve OR if the gouge is ground with a larger angle, the handle may need to start less far to the right, in fact it may need to start

    Some notes:

    - You always cut, of course, "downhill" relative to the grain. This means each half of a cove (or a bead) USUALLY needs to be cut independently - make a cut on one side, then a cut on the other, etc.

    - There is a lot of variability in the required tool presentation and motion. Much depends on the shape of the grind and possibly the flute and the tool size. Much depends on the shape and size of the cove, some on the diameter of the work.

    - It is always helpful to draw some lines on the cylinder before starting the cove: the desired left, right, and maybe the center of the cove.

    - As with other turning, don't try to stand still and move the tool with your arms. The handle or at least your arm should generally be anchored against your side and the body should move left or right. Even when I turn thin spindles one-handed using the other hand as a steady rest, I grip the tool with my hand, press the end of the handle into my forearm, and hold my arm against my side.)

    - Relax. A death grip on the tool prevents smooth, flowing curves and results in lumps, tool marks, and catches.

    - Use good lighting. It is difficult to judge a surface with compound curves with insufficiently bright lighting or lighting that is too diffuse, such as indirect or long, high fluorescents. I prefer several small diameter lights on swing arms so I can position them as needed. Smaller "point source" lights also make it easier to see tool marks and scratches.

    - I prefer spindle tools with medium to small handle length and with not much tool extending from the front of the handle. My wooden spindle-turning handles are generally 6" to 12" in length. Longer handles just get in the way. I sometimes use spindle gouges and small roughing gouges with no handle. I usually like the tool extended about 4" or so from the end of the handle - I make adapters for my wooden handles so I can position the tool shaft as needed and hold it in place with set screws.

    - As always, try not to stare at the point of the tool where it is cutting. Watch the profile at the top of the spindle. I know this is difficult, especially at first.

    - Don't try to use a too-small spindle gouge. You can cut beautiful coves with a small roughing gouge and even a skew. I often use a 5/8" StLeger (Thompson) roughing gouge to smooth and shape even small spindles, then switch to a 3/8" spindle or detail gouge for details. It is difficult to cut a large, sweeping cove with a 1/4" spindle gouge.

    - Sharp, sharp, sharp tools. I like to hone/strop/polish the cutting edges. I also round and polish the heel of the bevel so it doesn't leave burnished lines on the sides of the cove.

    - Several spindle gouges sharpened exactly the same are useful. When one gets dull grab a sharp one. If they are not sharpened to the same grind you may have to get used to the feel of the second one so it is better if they are identical.

    - For practice, a soft, fine-grained wood like cherry or holly is great. For improving technique, pine/fir from a 2x4 is better. If you can get perfect, smooth cuts without tearout on pine that has rings with alternating hard and soft wood, you are getting pretty good!

    - I sometimes use deep, aggressive cuts when "roughing out" a cove. After that, I treat every cut as a finish cut. After a several "finish" cuts to refine the shape, the tool motion is well practiced.

    - Two other things: speed and speed. Speed of the lathe: the faster the better. I usually turn spindles wide open, over 3000 rpm on my PM. Speed of the tool movement: the slower the better. A slow cut gives more revs per distance down the work so the surface can be much smoother than with fast movement. Moving slowly when practicing makes the motions easier to coordinate too.

    A well-cut cove will need almost no sandling, perhaps starting 400 grit or finer depending on the wood.

    BTW, cutting a bead (or actually, refining a bead) is almost the opposite of a cove: start in the center of the bead with the flute at 12 o-clock and the tool perpendicular to the axis, twist, swing, adjust the handle tilt and position as needed to follow the bevel and keep the tool cutting all the way to the side of the bead. The flute at this point should be at (or approaching) 3 o'clock and the handle tilted towards horizontal depending on the bead shape. The closer the point of the tool gets to the rotational axis, the closer it needs to point to the axis. The handle will be swung to the right for the right half of the bead UNLESS the bead is quite shallow and/or the gouge grind angle is small, then it might need to swing left or even not swing at all. Again, I ride the bevel to follow the profile (or the desired profile) of the bead and move the handle as needed. An ogee combines both a bead and a cove, with the flute starting on the bead at 12 o-clock and ending in the center of the cove at 12 o'clock, with the swing, tilt, and thrust gyrating as needed. Good fun!

    Oops, that is far more than I intended to write...

    JKJ

Posting Permissions

  • You may not post new threads
  • You may not post replies
  • You may not post attachments
  • You may not edit your posts
  •