Results 1 to 6 of 6

Thread: Stanley Transitional Jointer Mouth Opening Help

  1. #1

    Stanley Transitional Jointer Mouth Opening Help

    Hey folks,

    This is my first post. I'm very glad to be a member of the community. Thank you all for having me. I'm very grateful to have such ease of access to the wealth of knowledge this community shares.

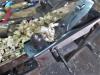
    So, let's get down to business. I inherited a Stanley no. 29 Jointer plane from my future father-in-law. The plane iron showed some considerable pitting, and while the plane body is in good condition, I decided to purchase a Veritas O1 replacement iron. However, as some of you may know, the Veritas plane irons are thicker than the original Stanley blades. As a result, the blade is too close to the front of the mouth for shavings to clear efficiently when the blade is advanced. I'm getting some clogging as well. As some of you may also know, these transitional planes have some shortcomings with the plane iron seating flush due to the frog's design in relation to the throat of the plane. It's my understanding that Stanley even recommended inserting a shim to prevent the plane iron from flexing when the frog was positioned closer to the tote.

    I've come to the conclusion that in order for the thicker plane iron to do what it's designed to do, I'll need to open up the mouth.

    My first question is, assuming I've reached the right conclusion: what's the best method for removing material in order to open up the mouth. Keep in mind, I'd be removing wood, not iron, at the back of the mouth and along the entire throat right up to the frog while maintaining that angle. I have a bastard mill file. I also have a set of Ashley Iles English pattern chisels. Do i pare? Do I file? Both?

    My second question has to do with the size of the opening itself. I have a no. 4 smoother and a no. 5 jack. So this plane will be dedicated to jointing and jointing alone. What's the "ideal" amount of clearance I should have in front of the blade.

    Many Thanks,

    Willy Watson

  2. #2
    Join Date
    Nov 2006
    Location
    Sebastopol, California
    Posts
    2,319
    Don't raise the bridge; lower the water. Align your frog so that the blade is supported by the frog and wooden body over its length (take a suitable bench ruler and run it down as far into the mouth as you can, while aligning the frog to the slanted wood of the frog portion of the wood body. While you're there, check that the frog wood is flat across its width and length, and correct if needed.

    Now, taking suitable chisels, remove wood from the front of the mouth. You probably don't even have to remove it from the full depth of the plane body; just enough at the bottom, and slanting back toward the existing mouth opening across maybe half the thickness of the plane body, for shavings to exit freely.

    Pare first; use a file only to make smooth the final result. One additional benefit of this approach is that, if your work can be imperfect without awful consequences like lack of support in some critical spot for the cutting iron.

    Can't help on the opening, except to say that, with a transitional, you don't get second chances*; so start with a smallish opening (that is, still, suitable for shavings to flow), opening it as needed if shavings jam. Ideal for you will depend on the thickness of shaving you like to make when jointing, which you probably don't know yet; and thickness will be affected by your preferred wood species (thick shavings are easier in pine than in oak, for instance).

    Incidentally, you say "plane body is in good condition." Is it straight at the sole? There will be three measurements here: straight over its length, straight from one side to t'other, and not twisted. The first two can be checked with suitable straight edges. The last is checked with "winding sticks," two pieces of stock that are straight and parallel (same width all the way along), which you balance on the sole, while the plane's held upside down and level, say in your vise. Put them first at the front and back of the sole, then crouch down and sight along the sole. If the sticks are parallel to each other, the body's not twisted; if they're not, you've got some leveling to do. Move the far stick closer to you in several spots and confirm that the body's not twisted.

    Winding sticks: the term comes from the British term for twisted wood, which is wood "in winding." Some people like to take two stable pieces of hardwood, ideally of widely different darknesses (but, if not, there's always stain), and carefully plane them straight and parallel in their width. They check them from time to time and correct as needed. Others go to Lee Valley and buy their winding sticks (http://www.leevalley.com/US/wood/pag...at=1,230,41182). Still others use aluminum extrusions, which tend to be very straight and which are stable in most every shop environment (note that Lee Valley's winding sticks are nothing more than fancy extrusions, checked and corrected for dead straight by the Lee Valley elves). I'm in that last group, except that, instead of buying a piece of aluminum angle or similar at the hardware store, I bought two cheap aluminum levels at yard sales and knocked the level vials out so I wouldn't confuse them with actual levels. My investment was about $2, not counting the time spent cruising sales. If you have two aluminum levels, you've got winding sticks (and you can leave the level vials in).

    I bring all this up because my first transitional jointer was very seriously twisted in its length. I joke that it was optimized for making airplane propellers. I might have been able to fix it by planing down the high corners, but then I might have had issues with the iron not exiting the mouth right; I wound up releasing it to the wild.

    *Well, you can, by splicing in a patch; but it's work.
    Last edited by Bill Houghton; 10-20-2016 at 7:09 PM.

  3. #3
    Join Date
    Sep 2007
    Location
    Longview WA
    Posts
    27,453
    Blog Entries
    1
    Howdy Willy and welcome to the Creek. I am always curious about where folks live, where do you call home?

    I think Bill covered the task well. I am not too up on transitional planes. If the frog is back as far as it can go and can't be made to go any further, it seems adjusting the front of the mouth is the only choice.

    jtk
    "A pessimist sees the difficulty in every opportunity; an optimist sees the opportunity in every difficulty."
    - Sir Winston Churchill (1874-1965)

  4. #4
    Join Date
    Jun 2010
    Location
    twomiles from the "peak of Ohio
    Posts
    12,181
    Have both a Stanley #28 and the #29...
    refurbbed planes.jpg
    They tend to wear a lot from the toe back to the mouth opening. Then the last few inches at the heel..
    One other point to consider....any aftermarket chip breaker that comes with the new irons...WILL NOT WORK. The tab slot for a trans plane is in a very different location than regular chipbreakers...up to 1/2" or more higher up than the normal slot. That is why you sometimes see chipbreakers with two slots....someone cut a new slot lower down the line.

    One can take a #7 Jointer plane, and joint the sole. As for the new iron, jointing the sole with a plane will open up the mouth opening for you.

    On the #31 I also have, the sole at the toe was 1/4" worn away. I managed to joint the sole with a #8 I had at the time. Still has some wear at the toe, but is a lot better now. Oh, and the sides do not NEED to be square to the sole.....these are Jointer planes, and make very awkward shooting planes ( too light?). No real need to go out and buy winding sticks ( make your own is better) and use either a good framing square or a good 4' level to check the sole. Old soles tended to take on a "banana" shape. The area around the mouth will be the "high point".

    Iron width on a 29 is 2-3/8" wide, so a #6 or a no.7 iron will work. Try to save the original chipbreaker, though. You will need it.

  5. #5
    Bill, thank you for the advice. This will be my course of action. I didn't detail the condition of the plane very well, but I have checked the sole with winding sticks and straight edges and it is remarkably true. I have a feeling the original owner didn't use it that much as it doesn't show much in the way of wear.

    Jim, home is northwest VT. I'll have to update my profile.

    Steven, you offer some good advice. I only purchased the plane iron for the reason you describe. I used my trusty mahogany winding sticks that I made and a good straight edge to check for flatness and wind. I do like your idea though. Trouble is, the next longest plane I have is a 5 and it's not really set for jointing. The iron is cambered for removing stock quickly. I could swap out my smooth plane iron and throw it in my 5.

    what to do, what to do...?

  6. #6
    Join Date
    Nov 2006
    Location
    Sebastopol, California
    Posts
    2,319
    Quote Originally Posted by Willy Watson View Post
    I could swap out my smooth plane iron and throw it in my 5.
    Yes. In theory, you can flatten anything with a block plane and lots of careful work - after all, when a machinist scrapes a critical surface, s/he is working very short sections at a time. The trouble with that approach is how often you have to test for high spots. A longer plane simplifies that.

Tags for this Thread

Posting Permissions

  • You may not post new threads
  • You may not post replies
  • You may not post attachments
  • You may not edit your posts
  •