Page 1 of 2 12 LastLast
Results 1 to 15 of 26

Thread: Live Edge Coffee Table with a difference

  1. #1
    Join Date
    Dec 2008
    Location
    Gibsons British Columbia Canada ( near Vancouver )
    Posts
    693

    Live Edge Coffee Table with a difference

    Greetings:

    I am technologically challenged to some degree, but I can post photos off my phone, so I will do the story telling on the sit down computer, and add photos via my phone.

    I had more photos of the build, which spanned over a year, with the impetus to finish brought on by being asked to submit a piece to a juried show in a nearby town.

    The piece started out as a spectacular piece of local Bigleaf Maple ( Western soft maple ) that my buddy had - I have never seen such grain on BLM: tiger stripe and pillowy quilt figure are the most common, then ' diablo ' maple that is crazy all over the place, then burl, but this piece is what I call an ' inverted quilt '. Live edge, about 5-3/4 feet long and about 20 '' wide and a full 2'' thick, we haggled over the price and it was mine. Flat sawn off a pretty large log, it had full live edge on both edges. I let it settle in the shop for over a year to see what it would do - amazingly, it stayed flat as could be - that was over 3 years ago now. He rough planed it in his 24'' Oliver, but there was some tearout, nearly 1/8'' deep due to the crazy grain.

    The plan: Coffee table was the original idea, but I wanted something different in the way of legs, and am not a huge fan of live edge. Something in the way of supporting the top to the floor, without highlighting the live edge. Nothing came to mind, and endless surfing the 'net was fruitless. Sure, there are a bunch of ways to support a coffee table top, but I wanted something different, so, my twisted mind went to work.

    '' Design something that draws your eyes to the figure of the wood '' I thought, but '' be minimalist in how that is accomplished '', all the while being unique and not bringing the live edge into the forefront. Also, how to deal with the straight edges where the slab was straight cut 90 degrees to the grain?

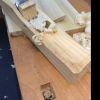
    So, being someone who likes metal as well, I came up with the design for ' ZED ' ( ZEE to my American Creekers ) as in the last letter of the alphabet. Cut off part of the slab for the base, leave a 42'' x 20'' piece for the top. Make a substructure mortised into both the top and bottom slabs, connect those steel framework pieces with two one inch pieces of steel at a 45 degree angle.

    So, you visually see the base ( which is the outside of the slab ) two pieces of solid steel rod come out of it at a 45 degree angle, and go into the bottom of the top slab, which is mounted 180 degrees to the bottom, so the outside of the slab on the top, is facing down - the figure was much better on this side BTW. Black out all the live edge, top and bottom, so your eye focuses on the figured wood, minimally connected by the two rods at 45 degrees.

    Hopefully I haven't put anyone to sleep yet - more to come..

  2. #2
    Join Date
    Dec 2008
    Location
    Gibsons British Columbia Canada ( near Vancouver )
    Posts
    693
    To accomplish my vision, I collaborated with a retired machinist friend and got a hold of some 2'' x 1'' x 3/16'' channel iron. Found some blocks of steel that fit inside the hollow side of the channel, cut them to 6'' long, and ground the side so they fit the taper of the inside of the channel iron. Welded them in to the ends of the four pieces of channel, so they would receive the 1'' rods. Then the tricky machinist part - boring a 1'' hole into the four pieces at a 45 degree angle, which my friend did extremely accurately ( of course, he is a master ).

    I drilled and tapped the ' block ' end of each channel to receive 5/16'' NF set screws, two per block, to affix the rods when they went through into the blocks.

    So, I had four pieces of channel, C/W blocks welded in place and bored at 45 degrees, set screw holes drilled and tapped.

    Now the tricky part for me, the woodworker. Drill two holes in the base at 45 degrees that the one inch rods will appear out of - no margin for error. First, I planed the top and bottom flat ( by hand ) and made sure the cut that was 90 degrees to the length was true ( on one end anyway ). No room for error here!

    I fabricated a 3/4'' plywood frame that fir on my drill press - machined a piece of scrap to the exact thickness of the bottom board and did a couple test runs - which turned out perfectly.

    Then, with the edge grain still at 90 degrees, I machines mortises into the bottom of the bottom board to receive the different length steel structure pieces, and fit the 1'' rod, ( now cut at 45 degrees ) inside for a test fit.

    Pic on next post

  3. #3
    Join Date
    Dec 2008
    Location
    Gibsons British Columbia Canada ( near Vancouver )
    Posts
    693
    At this point, I had attached the feet to the bottom of the bottom.
    Attached Images Attached Images

  4. #4
    Join Date
    Dec 2008
    Location
    Gibsons British Columbia Canada ( near Vancouver )
    Posts
    693
    Next, what to do with the non-live edge?

    Well, I took a jigsaw, set at about 30 degrees and undercut the four edge grain edges. I made them wavey to some degree to mimic the live edge undulations and waves, then finished them further with a angle grinder with a Kutz-All attachment, which gives a coarse finish, but I had plans for that - small ' beaver teeth ' gouge cuts on the end grain - I had about 100 lineal inches by 2'' wide which to treat - 5,000 cuts is a low estimate I am sure - this took several hours -

    I wanted it tactile but refined -

    Pics on next thread.

    I painted all the live edge with flat black milk paint - method to my madness?

  5. #5
    Join Date
    Dec 2008
    Location
    Gibsons British Columbia Canada ( near Vancouver )
    Posts
    693
    Here is the in progress of the gouging.
    Attached Images Attached Images

  6. #6
    Join Date
    Dec 2008
    Location
    Gibsons British Columbia Canada ( near Vancouver )
    Posts
    693
    To achieve the effect I wanted, I treated the live edge with milk paint as noted.

    The finish for the non-live edge is a 1/3 - 1/3 - 1/3 mix of satin Waterlox, raw tung oil and mineral spirits. A couple test pieces with this mixture over the milk paint yielded satisfactory results, so on we go.

    I then levelled the set up table ( a cabinet saw ) and set the base of the table, C/W the steel structure screwed into it, onto the set up table. I secured the rods previously, and set the longer, top steel structure onto the rods, carefully measuring and marking so I would end up with a desired overall height. I cut the rods at 45 degrees and re-fit them back onto the rods, ensuring everything was as I wanted it.

    I did have to shim one of the structure pieces for the top slightly, but with everything that could go askew, I felt it was pretty good.

    I set the top on the steel for the top and marked the mortise locations, and used a square to mark on the bottom where things should line up. Hard to describe, but when re-assembling, I had to set screw and Loctite the steel to the rods - this cannot be adjusted after assembly.

  7. #7
    Join Date
    Dec 2008
    Location
    Gibsons British Columbia Canada ( near Vancouver )
    Posts
    693
    Here are a couple shots, including the router work for the mortises.
    Attached Images Attached Images

  8. #8
    Join Date
    Dec 2008
    Location
    Gibsons British Columbia Canada ( near Vancouver )
    Posts
    693
    I was a bit ahead of schedule, so why not add a drawer? I wanted it to be low profile, so a side view of the table didn't show the drawer pocket. Also of issue was the fact that attaching a drawer pocket to the bottom of the top slab ( being flat sawn ) - wood movement had to be taken into account.

    I had some 1/8'' aluminum plate - addresses both concerns - used 1/2'' thick quartersawn teak for the sides and viola! A drawer pocket. Sized it to nestle between the channel iron supports that protrude from the bottom of the slab by about 1/2'', drilled some mounting holes, staggering them a bit, and tried to taper the pocket so I had let go available - more on that later.

    I flattened the bottom of the top board prior to routing, and double checked it after the mortises were routed out. Had a bit of a hump where the drawer pocket was to be mounted, a problem easily remedied.

    The issue of the top of the top board was still at hand though - it was still rough planed, tearout and all.

  9. #9
    Join Date
    Dec 2008
    Location
    Gibsons British Columbia Canada ( near Vancouver )
    Posts
    693
    Drawer pocket pictures
    Attached Images Attached Images

  10. #10
    Join Date
    Dec 2008
    Location
    Gibsons British Columbia Canada ( near Vancouver )
    Posts
    693
    The last piece to the puzzle is the top - All I wanted to do is obtain justice to the piece of wood, and, I wanted it to be as crisp as I was able to do. As previously stated, there was a couple spots with about 1/8'' deep tearout, and I didn't want to sand it. Practice on the other three sides had me confident I could pull it off, but there is always trepidation - for me anyway. LV Smoother with a toothing blade, traversing the top at 45 degrees, then back at 90 degrees to the first pass to get down to the bottom of the tearout, then traverse the same way with an old Stanley # 5 to get to flat, checking constantly with a straight edge. After that, a couple of the Krenov planes I made to finish it off. That process took five hours for the top of the top.
    Last edited by Dave Beauchesne; 08-14-2016 at 7:51 PM.

  11. #11
    Join Date
    Dec 2008
    Location
    Gibsons British Columbia Canada ( near Vancouver )
    Posts
    693
    Pics of the flattening / final smoothing of the top.
    Attached Images Attached Images

  12. #12
    Join Date
    Dec 2008
    Location
    Gibsons British Columbia Canada ( near Vancouver )
    Posts
    693
    Before finishing the top, there was the drawer. I had screwed and completely fastened the steel to the top and bottom boards; as well, the drawer pocket was secured to the bottom of the top board.

    I had some really nice curly Bigleaf Maple for the front and back boards of the drawer, and had some nice quartersawn pices of some unknown mahogany - a nice, rich, reddish brown color. Through dovetails and a 1/8'' thick Baltic Birch plywood bottom finished it off, hide glue to glue it up. I fabricated the pull out of 1/4'' SS rod, drilling and tapping the ends so I could secure it to the drawer front.

    Once it was dried for a couple days, I fit the drawer to the pocket from the back, but lost the let go as the sides of the pocket were a bit waved, something I blame on using the metal construction - when I pre-drilled the holes for the screws, the grain of the teak pulled the drill bit slightly in a couple of spots, and once you thread the countersunk screws into the wood, they can draw the wood a hair one way or the other.

    I fit the drawer to the pocket from the rear, got a pretty nice fit, and used a couple of small cap screws to act as stops so the drawer could not be pulled out completely. A small piece of wood acts as a stop to keep the front flush when pushing the drawer in fully.

  13. #13
    Join Date
    Dec 2008
    Location
    Gibsons British Columbia Canada ( near Vancouver )
    Posts
    693
    Drawer in progress
    Attached Images Attached Images

  14. #14
    Join Date
    Dec 2008
    Location
    Gibsons British Columbia Canada ( near Vancouver )
    Posts
    693
    Lastly - the finish. A coat of probably 1/8 # cut ultra blond shellac to pop the figure and raise the grain, followed by a light rub with 800 grit paper to knock down the nibs. A second treatment of the same is all I wanted to do before the three part finish I detailed earlier. Slather this on, let it soak in, wipe off the excess and let dry. I did this three times. There was no need to sand - the grain had been raised and knocked off with the shellac. I had previously treated the milk paint with the same mixture, with two coats on the end grain edges. It stayed a nice satin, almost flat finish, which I wanted. After letting things cure a few days, Briwax clear to the tune of about 4 coats finished it off. The drawer got similar treatment.
    Last edited by Dave Beauchesne; 08-14-2016 at 7:51 PM.

  15. #15
    Join Date
    Dec 2008
    Location
    Gibsons British Columbia Canada ( near Vancouver )
    Posts
    693
    Finishing the top and reveal ---

    This is a love it or hate it design. I am not sure where I stand, but am satisfied with the end result. I wanted something totally different and feel I attained that.

    Comments welcome.

    Dave B
    Attached Images Attached Images

Posting Permissions

  • You may not post new threads
  • You may not post replies
  • You may not post attachments
  • You may not edit your posts
  •