Results 1 to 14 of 14

Thread: Moving a Grizzly G0636X into a Basement Shop - The Process

  1. #1
    Join Date
    Dec 2010
    Location
    WNY
    Posts
    9,715

    Moving a Grizzly G0636X into a Basement Shop - The Process

    OK, you know that I have this saw in my basement, but I never told you how I got it down there. So here's the tale.

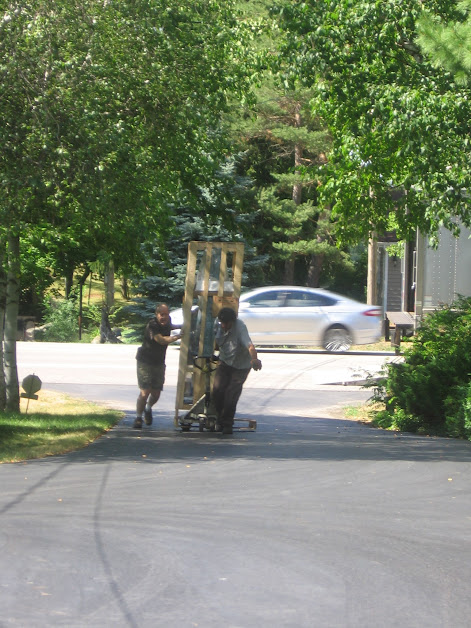
    I placed the order on a Wednesday AM and it shipped from the MO warehouse that afternoon on UPS freight. I paid an extra $35 for lift gate service. The total shipping was still less than $200, which I thought was very reasonable for something this big that weighs 786 lbs. The following Monday UPS called and asked if wanted it delivered Tuesday, Wednesday, or Thursday. Bring it Tuesday, please. Ken Vick volunteered to help me get it into my basement, bless him. Tuesday's objective was to just get it into the garage. About 4 PM this showed up at the street.


    I asked the driver if he had a pallet jack. Yes. OK, would you be willing to pull the machine up to my garage? Of course. So he brought it to the lift gate and down, where Ken and I inspected it for damage but found none, so the three of use pushed and pulled it up to the door of my garage with no great effort. I gave the driver a tip, which he said I didn't need to offer, but accepted after I said it was just a small thank you for saving us a lot of extra work. With that he left and we were left with this.


    The Grizzly pallet was too narrow for the UPS pallet jack to fit into, so they had put it on top of another pallet. That complicated our plan to slide or walk the machine off the pallet. We talked about it a bit and decided to try to lift he upper pallet and machine enough to slide the lower pallet out from under it. We managed to do just that by inserting some 2x4's through the upper pallet, blocking up one end of them and using two car jacks to pick up the other end.


    Here it is just as we had it lifted and had the pallet almost out. With the lower pallet removed we lowered it down onto a couple of pairs of 2x4's right at the edges of the machine pallet, in order to pull out the jacks and 2x4's, and then knocked the blocking 2x4's out one at a time.


    OK, down the factory packaging now. As you can see, the packaging is a small pallet and an open crate. The machine inside was completely covered in a plastic bag, and another piece of plastic was under the machine and taped to the bag, essentially completely enclosing the machine. We took the crate off, and then proceeded to remove the table, wheels, and motor. The table came off easily. Ken thought it only weighed about 50 lbs, but I think it's at least 75. I weighed the upper wheel and it is 30 lbs. the lower wheel weighs more because the double pulley is on the back of it. I took the wheel covers off, too; they probably weigh 10 - 15 lbs each. All went well until I tried to remove the drive pulley off the motor so I could remove the motor, which I've read weighs 93 lbs. The set screws that hold the pulley on the motor shaft won't budge. The set screws are dinky little 3 mm hex so you can't get a lot of torque on them. I shot some PB Blaster into the holes but it had no effect over the 5 minutes or so I waited. If the set screws were installed with some type of permanent Loctite, I have not clue how I am going to remove them. So we're proceeding with the motor still on the machine, but how do you remove those set screws? You would need to if you had to change the motor. Anyone know how? Suppose I could call Grizzly.


    The only damage we found was a little scuffed paint on the top of the base of the machine on the back side. I'll call Grizzly just to see if they have a touch up spray paint can but it's really no big deal as it is.

    OK, now to get the machine into the garage. It's too tall to fit under the overhead door on the pallet so it had to come off. As I thought about how to move the machine all the way into my basement I set out to use mechanical help instead of muscle power whenever possible. To slide the machine into the garage I thought the winch I have for the back of my car would work but I needed an anchor near the kitchen door to attach a snatch block to for it to work. The only place I felt confident anchoring to was the sill plate of the house, so I crawled under the landing and lag bolted a structural U-bolt to it, then attached a length of chain with the snatch block on the end of that. Worked like a charm. With Ken and my neighbor steadying the machine and flipping pieces of plywood we pulled it off the pallet and into the garage w/o incident.


    We pulled it up close to the landing and called it good for the day.

    Stayed tuned for the next installment of the Great Bandsaw Saw Adventure - following shortly.

    John

  2. #2
    Join Date
    Dec 2010
    Location
    WNY
    Posts
    9,715

    Moving a Grizzly G0636X into a Basement Shop - Step 2

    When last I left you the BS was resting comfortably in my garage. The next morning I made a girdle of plywood and 2 x 4's around it's spine. I tried one more time to loosen the set screws on the motor pulley, with no more luck than the day before so I decided to proceed with it still installed. I estimate the thing weighed nearly 500 lbs at this point.


    Then I pushed it against the garage landing in the center of the door opening. Once there I screwed a cleat to the plywood, with the cleat resting on the landing.


    That cleat would serve two purposes, it would provide a pivot point when I pulled on the top of the saw and it would help keep the saw from tipping left or right. If you look carefully you can see the winch cable attached to the lift eyebolt at the top of the machine. That cable connected to a handwinch that installed inside my kitchen on a simple frame of 2x4's braced against a wall on one side and my kitchen cabinets on the other. Another 2x4 to the ceiling keeps the contraption for lifting up as tension is applied. You can sort of see it here:


    and better here:


    Well, it worked, and you can see in this photo how the cleat worked perfectly as a pivot point, and prevented the saw from trying to slide out as I tipped it.


    With that step accomplished we used the winch to pull the saw on its plywood back further into the kitchen. When the cleat got to the threshold I unscrewed it and we pulled in the rest of the way. Fortunately, even with the motor still attached the saw stayed in good balance. The last little bit we had to push/pull by hand but it slid easily on the tile floor.


    At this point you can sort of see the challenge we had. We needed to go to the right, down the cellar steps, but the wall on the left limits the access. Part way along that wall is a pocket door to a half bath which provides relief if you can get the top of the machine that far. I had made a mock up out of plywood to see if it would fit and it did if I picked up the base of the machine a few inches as I got it into the doorway. That mockup was 24" wide at the base and 12" the rest of the way. The column of the saw is about 9" wide, but with the plywood girdle it was 10-3/4". Still, I was reasonably confident it would make the turn OK. My backup plan was to stand the machine up and go through the door upright. But I didn't want to do that because the top of the machine would have to go through the door first. In other words, I have to tip it head first down the stairs, then winch it upwards and pull the base through. It was doable, I just preferred not to do it that way if at all possible. We almost ended up having to do it that way.

    I installed 3, 2x6's down the cellar stairs.


    They are screwed to 2x4 cleats below, and those cleats are screwed to the stringers. That anchored everything in place so nothing could slip out as the BS slid over them. I cut a small hole in the stairwell ceiling and hung a 2 ton chain fall from a chain wrapped around a 4 x 4 that spanned two ceiling joists in the attic. The span is only 40 inches across the stairs so 2 joists is sufficient to hold well over 1000 lbs. the photo above also shows a cable coming from a winch I installed at the bottom of the steps. That winch was used to pull the saw into the stairwell as the hoist held the bottom end up. In the last photo of the BS above you can see the yellow sling around the base of the saw and attached to the chain fall. Here's another photo of that.


    All went well until we tried to make that turn. The plywood girdle jambed against the right side door molding of the basement door and the top of the BS hit the baseboard on the opposite wall. I tried lifting the end of the saw as I had done to get the mock up to clear but then the top of the saw hit the wall opposite the stairs. We went back and forth a couple of times w/o success. It finally became clear that we needed to remove the baseboard molding and cut the plywood girdle where it was jambing on the door molding. The molding was easy to pop off. Cutting the plywood while it was almost flat on the floor and jambed against the door molding proved more of a challenge. But the HF multi-tool eventually chewed its way through it with me cutting from one side and Ken cutting most of it away from the other side. A few hammer whacks at the end and we had cut out a semi-circle with about a 6" arc.

    And that was it. It pivoted right around the door frame then and the top of the machine went into the bathroom door opening. If I had only cut the lower portion of the girdle the same width as the saw spine it would have gone around there with no trouble on the first shot. I now know that this is absolutely the largest saw that can go down this stairway, at least lying down.

    So we pushed the saw through the opening, pulling it from below with the winch once or twice as needed, too, while lowering the chain fall until the saw tipped down the stairs.


    I had guessed that the chain fall would not have enough capacity to lower the saw all the way to the bottom in one shot, and I was right. So when we got near the limit of the chain fall I crawled past the saw and screwed two 2 x 4 cleats on top of the 2x6 runners.


    Well, that's my 10 photo limit, so I'm going to leaving you hanging here. Watch for how this turns out, shortly.

    John

  3. #3
    Join Date
    Dec 2010
    Location
    WNY
    Posts
    9,715

    Moving a Grizzly G0636X into a Basement Shop - The Last Step

    Last I left you the BS was resting against some cleats I screwed to the 2x6's runners. With that accomplished, we were able to disconnect the chain fall and reattach it to a lift eyebolt at the top of the machine.


    Nearly home now, we lowered the machine until it hit the concrete floor, then shimmied down to it. Ken pushed and I pulled and we stood it upright, mission safely accomplished.


    We called it good and Ken left. A few minutes later I realized I needed to take a project out of the basement today so the saw had to be moved. Installing the mobile base around it turned out to be surprisingly easy, and my wife and I did it in about 5 or 10 minutes. I tipped the machine and she slid in a pre-assembled half of the base, then we did the other side. It really went smoothly.


    That Shop Fox mobile base only lifts the machine about 1/2", which allows it to still fit under a standard 80" door. Very thoughtful consideration in the design of the saw and base.


    The only damage to the machine was to some paint on the top of the base on the backside.


    We found it when we removed the crate and plastic. The plastic had not been ripped so it must have occurred at the factory, before packaging. I called Grizzly this morning, as much to tell them so they might improve their inspection before shipment, as anything else. The Grizzly folks were very pleasant and quickly asked if I would like a can of touch up paint. Why yes, thank you very much. I should have it next week - no charge. I have to say, the whole buying experience with Grizzly, delivery by UPS Freight, and follow up call to Grizzly went very smoothly. I would not hesitate to buy another machine from them.

    OK, I wheeled the machine into what I think will be its final location.


    This morning I put the parts I had removed back on. That process gave me a real appreciation for how well this thing had been designed and built. It's incredibly robust and the fit and finish as very, very good. I forgot to check if the wheels are co planer, but I bet they are. The saw looks to be everything I wanted. The blade guides work easily enough, and the guide post goes up and down silky smooth. Same for the table tilt adjustment. Everything fits together properly and moves easily.


    My 14" Delta is looking nervous, but I told him I'd never get rid of him. He's getting a 1/4" blade now - for which he's very happy.

    Thanks for following along. If you get the idea of getting a big, heavy machine and taking it down your basement stairs, please be careful. I felt very safe with what I did, but I only did it after very careful planning. And I had a great partner in the process. Actually, I had two, Ken Vick and my wife.

    Thanks a million Ken and Monika.

    John

  4. #4
    Join Date
    Dec 2005
    Location
    West Lafayette, IN
    Posts
    6,530
    Why did you make 4 separate threads instead of replying to your first one? You should ask a mod to merge them.

  5. #5
    Join Date
    Dec 2010
    Location
    WNY
    Posts
    9,715
    Maybe I'm wrong, but I thought there is a 10 photo limit per post.

    John

  6. #6
    Quote Originally Posted by John TenEyck View Post
    Maybe I'm wrong, but I thought there is a 10 photo limit per post.

    John
    if there is its per Post so next time just reply to your own thread

  7. #7
    Join Date
    Feb 2010
    Location
    Houston, TX
    Posts
    135
    Congratulations on the new saw! And thanks for the blow-by-blow details on the move - very clever and well orchestrated.

  8. #8
    Join Date
    Jun 2014
    Location
    SE Ohio
    Posts
    144
    Dang, that took a great bit of effort, as well as ingenuity.

  9. #9
    I hope don't plan on moving any time in the near future!! That would be a bear to take out. Thanks for the pictures.

    Red
    RED

  10. #10
    Join Date
    May 2019
    Location
    Staatsburg, NY
    Posts
    32

    Thanks!

    Thank you for this very informative post. I found it very helpful.

  11. #11
    Join Date
    Oct 2007
    Location
    Falls Church, VA
    Posts
    2,344
    Blog Entries
    1
    When I moved my 17” rikon bs to the basement, I enlisted a bunch of coworkers. One guy was an accomplished rock climber so he took the belay position at the top. I hired riggers to get the thing out of the basement. Going up, gravity was not my friend.

    both ways, I added extra post support to the basement stairs. The attachment at the top just scared me.

  12. #12
    Join Date
    May 2018
    Location
    Lancaster, Ohio
    Posts
    1,366
    How do you like that mobile base now that you have years of use on it?
    Have professionals scheduled to put my new to me Rockwell/Delta 28-350 in the basement, currently in the garage
    If I would have seen this set of pictures first I might have ben able to convince the wife to let me move it myself
    Ron

  13. #13
    Join Date
    Dec 2010
    Location
    WNY
    Posts
    9,715
    Quote Originally Posted by Ron Selzer View Post
    How do you like that mobile base now that you have years of use on it?
    Have professionals scheduled to put my new to me Rockwell/Delta 28-350 in the basement, currently in the garage
    If I would have seen this set of pictures first I might have ben able to convince the wife to let me move it myself
    Ron

    Me? I don't think I've moved the saw more than a few inches since I put it into it's place. I bought it more as a way to be able to move it into my shop than with any intentions of moving it afterwards. But I have the same brand mobile base on my drum sander, which weighs only a little less, and I move that quite often. I have no complaints about it; it does its job w/o complaint by either of us.

    John

  14. #14
    Join Date
    May 2018
    Location
    Lancaster, Ohio
    Posts
    1,366
    Thanks John
    I would like to do the pallet jack route for multiple machines however think once the band saw is down in the basement it will be too tight, so will need a bunch of mobile bases.
    Removed a wall downstairs and somehow have acquired a lot more tools down there. Some were stored away and now mounted permanently on a new bench. Shopsmith was moved from garage down. Wood moved from stored on wall torn down to other walls.
    Upgraded from a 6" jointer to a 8" jointer, causing a tight spot to be too tight and required 14" bandsaw and tool box to move to the new area. Rebuild dust collection system again this time, filters. 12" combo jointer/planer was acquired and needs put back together with new motor. Uniplane and 6x48 Delta belt sander came along with the Rockwell 18" bandsaw. Did get a 6 pack of LED lights today to install in shop to brighten things up.
    Ron

Posting Permissions

  • You may not post new threads
  • You may not post replies
  • You may not post attachments
  • You may not edit your posts
  •