


kaleidoscope_1.jpg
Almost from the day he was born, my grandson has had a fascination with stars. I decided that I would make him a telescope. I figured that, if I started on it now, I might get it done by the time he was old enough to be able to use it.
Having never built any kind of optical instrument before, I decided to start with something a bit simpler, a kaleidoscope. How hard could that be? Well as it turned out, there's a big difference between making a kaleidoscope and making a "good" kaleidoscope. If I were to sell this for no more than the hours I have in it, even at minimum wage, I think it would gather a lot of dust!
One of my primary design points was to have interchangeable object boxes. That seemed to be the only way to make something like this that would hold interest for more than a few minutes. And I wanted one box to be openable so that it's contents could be changed. I also wanted to have one oil filled box. Those considerations added some complication to what seemed at first to be a fairly simple project. I had several ideas about how to go about this but, as the work progressed, many "on the fly" changes became necessary as I realized that one thing or another was not going to work out as planned. All in all, this was a challenging project with a lot of precisely sized and fitted parts.
Last year I bought some thread chasers and spent some time learning how to use them. I learned a lot and one of the things I learned is that chased threads are probably not the best choice for pieces like this that are over 2" in diameter. Even the slightest wood movement can cause the threads to bind or to become to loose. So, for this project I resorted to using black ABS pipe fittings which were turned down to the needed sizes. Learned something here too. You need to use slower lathe speeds to avoid heat buildup which will melt the plastic and cause an irreparable mess! I did end up hand chasing the threads on the retaining ring for the openable box because I could not find any fittings that were the right size.
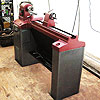
Once I had everything done, I realized that it was going to need a stand. I had thought about a stand in the beginning but it was more of a cradle to rest the scope in. But this is a pretty big scope and not lightweight so I decided it would be a "table model". I made the stand with latches so the scope can be removed for handheld use as well. I trapped myself into having to make several identical parts with the spindle stretchers. I got them pretty close to almost the same.
There is, it turns out a small community of kaleidoscope makers supported by a small group of collectors and, of course, a general market. There is quite a bit of good information on the web about kaleidoscope making so I was able to acquire the basic information. Some of the scopes these people are making are true works of art. I wanted to make a very "traditional" scope. I have no desire to become a "kaleidoscope maker" but it was a very enjoyable project and a good learning experience. Even so, with everything I learned about making them it seems a bit foolish not to put it to use so I may make a few more at some point.
Specs:
The kaleidoscope itself is 12" inches in length with the object box mounted. The main tube is 2 1/2" inches in diameter and is made from an oak burl. I have been saving that piece of oak burl for years thinking that I would, at some point, make one of those torus shaped bowls from it. But I could not resist the temptation! The other components are either ebony or hard maple dyed black. The object box mounting ring is captured and is free to rotate. I wanted the scope itself to be removable so I made the cage openable via the small latches. Making the stand was probably as much fussy work as making the scope itself.
kaleidoscope_2.jpg kaleidoscope_3.jpg

 Reply With Quote


")
