Page 1 of 2 12 LastLast
Results 1 to 15 of 27

Thread: Bowl Blank Orientation

  1. #1
    Join Date
    Mar 2015
    Location
    Warsaw, Missouri
    Posts
    92

    Bowl Blank Orientation

    I'm getting ready to start roughing out bowls from cherry logs that were cut and end-grain sealed three months ago. When I cut the log sections, I cut sections slightly longer than the diameter of the log, then split the section length-wise, removing the pith - so each log section yielded two pieces that are almost half-rounds, plus two quarter-sawn boards from the middle piece that contained the pith.

    I am going to be coring bowls, and boiling them before putting up for some months to dry. Given these factors, does it make any difference (other than grain orientation on the finished bowl) whether the top of the bowl is from the side that faced the pith vs bark side? Of course, I get bigger bowls if the bark side is the base of the bowls.

    I wouldn't have even given this a thought except I just finished reading one of Raffan's books, and in virtually all the photos of bowl blanks (his blanks were not half moon shaped, they were sections of cylinder) it looks as though he is orienting the blank so what was bark side becomes the top of the bowl...

  2. #2
    It makes a difference to aesthetics.

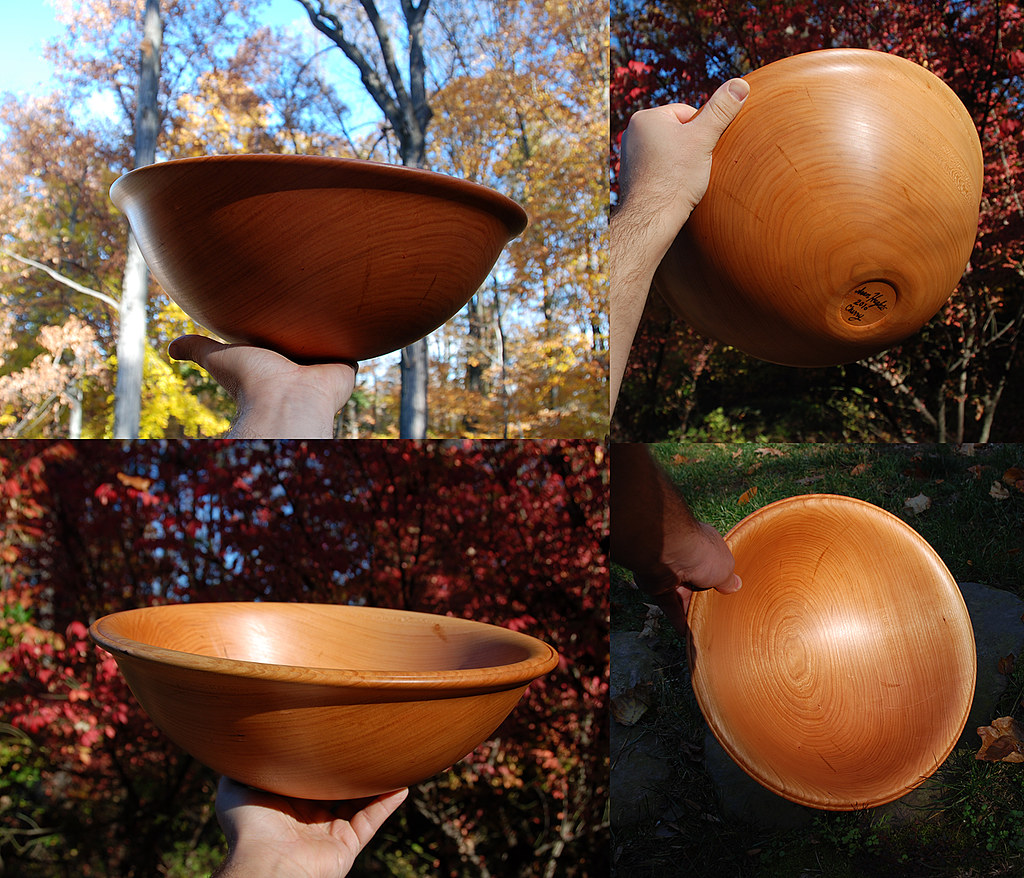
    Most people starting on green turning want to make the most of their precious wood, so they want the largest possible vessel. That means bark at the base, pith at the rim, to follow the natural curve of the log. However, this gives a 'butterfly' pattern in grain; half circles cupped upward toward the rim.

    Turning inside out - which is my strong preference (everyone has their opinion) - results in concentric circles emanating from the base. The problem is, if you don't mount the blank just so, the point of origin may not be directly in the center. But if you get it right, it's very striking. It showcases the natural rings of a log in a way that flat work can never do.

    In fact, if you turning oak, then I HIGHLY recommend you try to turn it this way. The reason is that the flecks associated with quatersawn wood actually radiate perpendicularly to the growth rings. When you turn it inside-out, you see the grain in concentric circles, and then large ray-fleck circles intertwined on either side of the bowl.

    The first, cherry bowl was turned outside out. The others were oak, turned inside out
    Attached Images Attached Images
    Last edited by Prashun Patel; 01-28-2016 at 2:34 PM.

  3. #3
    Which do you think is prettier? If you're not sure, try it both ways to see which you prefer. You can get a larger bowl when the rim is towards the pith if that matters.

    Just wondering why you decided to boil the wood?
    Bill

  4. #4
    Join Date
    Mar 2009
    Location
    Chevy Chase, Maryland
    Posts
    2,484
    If you turn with the rim at the bark side and the bottom at the pith side, you tend to get a concentric circle pattern:


    If you turn with the rim at the pith side and the bottom closest to the outside of the tree, you get sort of "X" patterns:
    ~ Do not seek to follow in the footsteps of the men of old; seek what they sought.

  5. #5
    Join Date
    Oct 2008
    Location
    Kapolei Hawaii
    Posts
    3,236
    Not familiar with cherry, but if it has contrasting colored sapwood, turning it inside out leaves the nice dark heartwood at the bottom of the bowl, and when you look in the bowl that is what you see. Turning it outside out, the heartwood would be on the edges of the top of the bowl, and the heartwood will be half end grain. The outside of the bowl will probably be nicer than the inside of the bowl because of the heartwood and the contrast. When you look in the bowl, you'll see sapwood at the bottom.
    In addition to what everyone else said about the grain direction.

  6. #6
    Join Date
    Mar 2015
    Location
    Warsaw, Missouri
    Posts
    92
    Thanks...I get the difference in opinion, was wondering if it makes any difference in the drying of twice-turned bowls. As to the boiling, I'm new to bowl turning, but have the challenge to turn an entire cherry tree that was storm-blown at our church into bowls, platters, and miniatures that can be sold at the local crafts festival this coming October (I have 71 half-sections of potential 18-23 diameter) and have read about boiling rough tuned bowls to minimize cracking during the drying phase - and allegedly cuts drying time by about half. I have a purpose-built rocket stove, boiling pot from 55 gallon drum, and the lack of time anchor seal is supposed to take...

    I'm guessing the boil-or-not is a running argument on every turning forum where it gets discussed and don't want to trigger another yes-you-can/no-you-shouldn't thread.

  7. #7
    Join Date
    Nov 2007
    Location
    Fort Pierce, Florida
    Posts
    3,498
    One other thing, regardless of which way you plan on turning the bowls, you should have insured that the pith was as centered as possible on the half circle. Do this even if it means one large and one small piece. Make the BEST piece not the BIGGEST piece.

    A while back a bought a butternut billet at a wood carvers show that made two 10" bowls. It was cut centered so I turned bowls both ways. Dramatic difference in appearance.
    Retired - when every day is Saturday (unless it's Sunday).

  8. #8
    Join Date
    Dec 2009
    Location
    El Dorado Hills, CA
    Posts
    1,311
    Everything I have heard is that small bowls sell significantly easier than large bowls. There is no need to turn every one of your logs into 18-24" bowls. This gives you a lot of options on how you want to orient the bowls.

    You have so many logs that you can try both directions. The consensus appears to be bark up, but try a few the other way. You might even want to cut up some of the logs into 2-3 smaller bowls. And try a few once turned bowls that you let warp as they dry. If you have a bowl saver, then try a set or two of nested bowls.

    Steve

  9. #9
    If I were you, I'd skip the boiling. Anchorseal the heck out of them and turn them as quickly as you can get to them.

    Once roughed out, if they are waxed very well, it's been my experience that a very good percentage make it through unscathed.

    Turn the roughouts to even thickness - especially at the bottom.

    Try a couple in quartersawn orientation. That's something you don't see too often. The effect can be striking. Turn some live-edge. Cherry is a joy to work with.

  10. #10
    Join Date
    Aug 2011
    Location
    Lummi Island, WA
    Posts
    665
    John - As has been pointed out, whichever way you orient the blanks is a matter of what you want the bowl to look like when you're done. It sounds like you're going to be letting these sit on the shelf for a while before re-turning them. If you're already setup for boiling, I say go for it. It can be a quick way to work when coring. I don't do a lot of cherry, but when roughing and coring figured maple, madrone or locust I always setup my workflow do that blanks get roughed, cored and thrown into the boilpot already setup and boiling. They just keep accumulating until the pot is full or I'm too tired to keep going. pull the blanks off the bottom and stack on edge in rows until they've cooled down, then stack brick-laid, urside-down on the slab floor out of the way of drafts and sunlight until they've surface dried. After that (usually a few days), they get stacked on wire shelves stickered to allow them to dry evenly. They are then ignored until I'm ready to turn them. I check with a moisture meter until they're at max 12% before finish turning.
    Last edited by Jeffrey J Smith; 01-29-2016 at 12:45 PM.

  11. #11
    Jeffrey - would be interested to see your boiling setup... how do you heat? propane, small fire, nuclear fission?

    have been thinking about building a little rocket stove to get a boiling unit going, but can't stop turning long enough to get it off the ground.

    thx.

  12. #12
    If you are going to boil, 1 hour per inch of thickness, and allow to come back to air temps in the water. The boiling helps to stabilize the wood as it dries, taking out a lot of stress, and breaking down cell walls so the 'bound' water has an easier time getting out of the wood. Round over all rims as this is huge in helping to prevent cracks. Make sure to have a stainless, or at least galvanized tub for boiling otherwise the wood will come out black. You probably can find some local turners who would love to help. That sounds like a lot of wood to process in a rather short time, unless you are a full time turner.

    For bowl size, I just turn every thing in to sizes of the tree. So, generally anything over about 16 inches is a hard sell unless the people have a large family or entertain a lot. Personal size bowls are in the 6 to 12 inch size, with 12 inch being a 'meal' bowl. Small 3 to 4 inch bowls are great for knick knacks.

    I turn green to final thickness, and let them dry and warp. Out here, people love the 'organic' shapes. At 1/4 to 3/8 inch thick, they are totally dry in 1 to 2 weeks max.

    robo hippy

  13. #13
    There are probably a few species of wood that "need" to be boiled to minimize the amount of warping and cracking, but for most others I think that it might be extra work. But, if that is what you want to do, then go for it. I would say that the main purpose of boiling is to stabilize the wood and not really to accelerate drying although I'm sure that it helps with that as well. I think that when most of us were beginners we had the same thoughts as you do ... how to speed up the natural drying process. For me and maybe most others, the conclusion is that we don't want to accelerated drying ... instead we want to slow it down. Slower drying gives better yield of usable rough turned blanks. After a while most of us have quite a backlog of dry rough turned pieces waiting to be final turned so the drying process is no longer something that needs to be hurried along.

    A former member of my club was seriously into turning and boiling Norfolk Island Pine to make lampshades and other translucent items that he didn't want to warp all to heck. That is one example where boiling is really important. I suppose that if I had the equipment I might give it a try, but it's not on my high priority list of what I would like to do.
    Bill

  14. #14
    Join Date
    Aug 2011
    Location
    Lummi Island, WA
    Posts
    665
    Quote Originally Posted by Reed Gray View Post
    Make sure to have a stainless, or at least galvanized tub for boiling otherwise the wood will come out black.
    I agree with just about everything Reed noted, with a couple of exceptions...I've been using a very large aluminum stock pot for several years now, and used a half-barrel steel drum and an old porcelain crab pot for a while - none have discolored the wood for me. Got an excellent deal on-line for the stock pot - it's 26" diameter and 24" tall. Does a great job. I often boil maple and madrone in the same pot - the red extractant (mostly from the madrone) does discolor the water and turns the surface of the wood a little red, but it doesn't penetrate beyond about 1/16th" into the blank.
    I let them boil at least an hour per inch of thickness, but often leave them in the pot at a low boil for several hours while the roughing continues - only pulling the bottom ones when I need more room.
    Got the boiling recipe from Dave Sweitzer (D-Way Tools). The only time I've had a problem was when I left them in the water while it cooled. I generally pull them out hot and let them air cool. When they were left in the pot to cool nearly every blank was covered with mold within a few days while drying. Could have been situational, but I've pulled them hot and air dried ever since without a problem. I do spray the dried blanks with a solution of boric acid in a spray bottle to keep mold at bay during the wetter months. That works much better than using bleach to control mold for me. Bleach tends to evaporate away leaving water behind and allowing mold to return.
    If I remember correctly, Dave quenches the blanks in cold water when they leave the pot. I haven't found it to be necessary and just pull them hot and let them air dry stacked on one edge of the rim until they're cool then on the concrete floor (ones on the bottom supported with sticks), rim down stacked like bricks until they're surface dried, then on the wire shelves.

    All in all, the workflow is pretty quick - turn, core, chuck into the pot as I go. let 'em boil until done roughing the last blank. Sit and rest with an adult beverage while the last are doing their turn, then stack 'em up and go clean up the massive pile of shavings. It's actually one of the most gratifying - and fun - aspects of turning for me. A day well spent.

  15. #15
    John,

    As far as drying it won't make a huge difference in either orientation. You may get a little less warping at the rim with the foot toward the pith. Fruit woods tend to crack easier than others so boiling may help you, can't see it hurting.

    I like all orientations. I think they get boring if the bowl is perfectly placed with the rings all the time. To me I like seeing the butterfly effect more off to the side or the oval growth rings off to the side of the bowls. That can be just as pleasing to the eye as them perfectly aligned IMHO. It is wood they all look great if turned into a nice form and to how you wanted it to look.

    Good luck

Posting Permissions

  • You may not post new threads
  • You may not post replies
  • You may not post attachments
  • You may not edit your posts
  •