Results 1 to 6 of 6

Thread: Woodpecker Plunge Lift istallation and review

  1. #1
    Join Date
    Feb 2003
    Location
    South Jersey
    Posts
    1,571

    Woodpecker Plunge Lift istallation and review

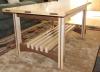
    This is a quickie review of the Woodpecker Plunge Lift Router Plate and installation. I bought this back in January and never got around to installing it. First picture below is on my old setup which is no more than a cheepo workbench I made years ago. It’s also my in-feed table from my first stationary tool, a Sear radial arm saw. The new router plate will get installed where the Jet mortiser is now. Second picture is a shot of the template for the router plate I also purchased from Woodpeckers. Third pic is the layout and the center section being cut out. I drilled out the corners with a spade bit. Forth pic is the template double stick taped in place and the edge routed with a template bit from Woodpeckers too. Fifth pic is the router plate in place, the fence is just sitting there. I’ll put some anchors in later for that. Sixth pic is my PC OSS with a Woodpecker plate. This is one of the reasons I decided on the Woodpecker plate for my router. I think the PC OSS plates are discontinued now. The router I’ll be using is the Hitachi M12V. I had to remove one of the springs to get it to work smoothly. It was hard to turn the crank with 2 or no springs. Don’t ask which spring I left in there as it’s been 5 days and I forget already. I think it was the one closest to the crank mechanism. Overall opinion, I really like the Woodpecker plates. Very well made and easy to install with the template. I’m thinking of putting the router plate in the side table on my table saw and using the bench hole for the OSS but this may be a while before that happens. Last pic is a shot of the back of my homemade router fence made from leftover ¾” birch plywood. Didn't know there was a max number of attachments allowed so they'll be in the first reply.
    Attached Images Attached Images

  2. #2
    Join Date
    Feb 2003
    Location
    South Jersey
    Posts
    1,571

    Here are the rest of the pictures

    Here are the remaining pictures. Didn't know there was picture limit.
    Attached Images Attached Images

  3. #3
    Looking good Peter. I think I may have gotten the last Woodpecker OSS plate on closeout, sure am glad I got it when I did. It was one of their Demo's I think. Been impressed with their products, their stuff is solid, nothing shabby.
    Tony

  4. #4
    Join Date
    Jan 2005
    Location
    Harrisburg, NC
    Posts
    2,255
    Nice set up Peter.

    Richard

  5. #5
    Join Date
    Dec 2004
    Location
    NW Indiana
    Posts
    1,050
    Peter I have the same setup, I might suggest the long crank handle because you have such a tall fence. ( I had the same problem) also maybe put some laminate on the table top and fence faces. You'll fine the work pieces would slide across alot easier. other wise looks great, I like your sander set up.

  6. #6
    Join Date
    Feb 2003
    Location
    South Jersey
    Posts
    1,571
    Thanks for the compliments everyone. No plans to laminate this table. I might put the router plate in the table saw extension but not in the near future. No problems with stuff sliding on this surface but laminate would be much slippery I guess. What I really need to do is get my butt in gear and make more saw dust.

    Pete

Posting Permissions

  • You may not post new threads
  • You may not post replies
  • You may not post attachments
  • You may not edit your posts
  •