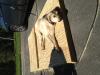
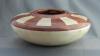
Wife's new end table in Walnut. Finish is Generals Finish Arm-R-Seal. I added a small rim to keep items from rolling off.
C&C welcome
Curt
IMG_2695.jpgIMG_2696.jpg


 [OP]
Contributor
[OP]
Contributor
Wife's new end table in Walnut. Finish is Generals Finish Arm-R-Seal. I added a small rim to keep items from rolling off.
C&C welcome
Curt
IMG_2695.jpgIMG_2696.jpg
 Contributor
Absolutely stunning! Beautiful table.
 Member
Nice. I always wonder over "round" tables and projects. I don't think I would even know where to begin. Finish looks great in the picture for sure.
What was your finishing schedule?
Beautifully done Curtis.
"A hen is only an egg's way of making another egg".
Samuel Butler
 Member
Great looking table, fine workmanship and design.
C&C WELCOME
Member
Wow, that is very,very, nice!! Great job!
Contributor
Very nice indeed!! Did you do sliding dovetails for the legs? Could you post a pic of your router setup if you did?
Thanks, g
I've only had one...in dog beers.
[OP]
Contributor
I applied 4 coats of Arm-R-seal with 24 hours in between coats and a light sanding with steal wool between coats.Originally Posted by Jebediah Eckert

Did you do sliding dovetails for the legs?
Gary, I dug two mortise and made a loose tendon for each leg joint.
All the Best
Curt
 Member
Great table. I really like this design, it is elegant and not overly ornate.
_______________________________________
When failure is not an option
Mediocre is assured.
 Member
I'm currently refinishing a table that's very similar, though it only uses 2 dowels per leg.
Curtis, did you ONLY use Arm-R-seal, or some kind of stain / dye first? I know Arm-R-Seal has a little color to it.
Also, was there a particular reason for choosing this finish over other options? (I'm having a very hard time deciding what to use, though I'm leaning towards vintage Behlen's brushing laquer.)
Last edited by Allan Speers; 10-11-2015 at 9:12 PM.
Member
Very nice. Makes me feel guilty about a similar project that wood was glued up and basic templates made over a year ago. Nice thing about this forum that one gets a new idea or nudge to finish work in progress.
[OP]
Contributor
My opinion is dark wood and oil are made for each other. I typicaly use Sam Maloof oil from Rockler due to it super ease of use. I prefer Arm-R-seal for table tops due to it higher polyurethane content which stand up to abuse better. No dye or stains used, just Walnut wood and Arm-R-seal. My opinion is lacquer makes wood look a little plastic. I never use it.
Sam Maloof oil is made up of 1/3 Boiled Linseed oil, 1/3 Tung oil and 1/3 polyurethane. Arm-R-seal is similar with a higher poly content.
All the Best
Curt
Last edited by Curtis Myers; 10-12-2015 at 8:56 AM.
[OP]
Contributor
I received a notification asking about a plans for the end table so I took some measurements this morning and more photos to help.
Overall height is 26". This seamed to be a standard height
Top is a glue-up of two 9" pieces of air dried Walnut. Final dimensions are 16" diameter and about 7/8" thick
Turned top first
Cut a small rectangle piece of 3/4" stock. Drilled 2-1/8" hole in center and glued to bottom (underneath) of the top.
Turned spindle second
Used a template to draw leg shape into rectangle stock (see 2nd photo for grain orientation, running down length of leg for strength). Made mortise with mortising machine prior to cutting out legs. Squared up stock is easier for loading into mortiser to line up straight and true.
To get the curvature on the leg to fit the spindle nicely.
1st used a spindle sander to get a close fit. I did this prior to cutting leg out (its still a leg pencil drawn onto rectangle stock).
2nd rough cut the leg out on bandsaw.
3rd tape template to leg (Double sided tape), used table router with flush trim bit. Also used 5/8" round-over bit on legs.
4th placed 180 grit sandpaper around spindle. Stroked (sanded) leg on spindle wrapped with sandpaper to get a perfect fit.
All the Best
Curt
Legs.jpgIMG_2707.jpgSpindle.jpgDSC_3895.jpgDSC_3897.jpgDSC_3894.jpg
 Posting Permissions

 Reply With Quote